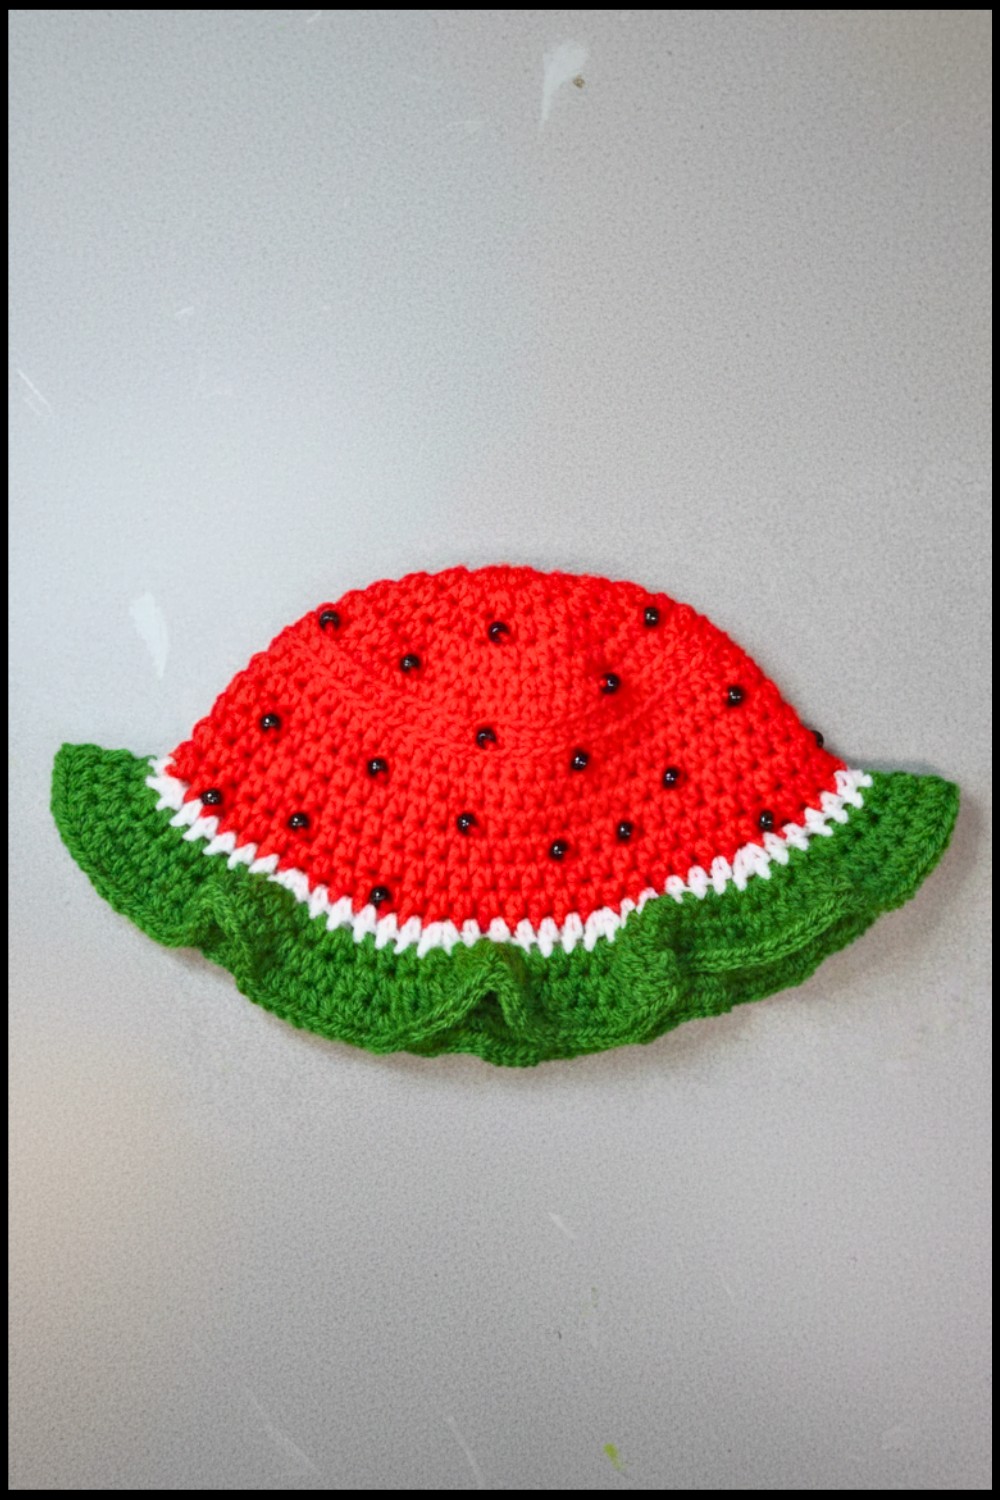
Watermelon Bucket Hat Crochet Pattern – Free and Easy Tutorial
Soak up the sunshine in playful style with this free crochet watermelon bucket hat pattern that adds fun & cheerful flair to every summer.
Bright reds and greens turn heads wherever you go with a hat that looks just like a slice of juicy fruit. Soft stitches form a round brim that keeps the sun off your face, while the playful design makes everyone smile. The crochet watermelon bucket hat pattern brings a fun twist to sunny days, family outings or trips to the beach. Lightweight yarn means it feels comfortable even during the hottest weather.
Fresh and Fun Watermelon Bucket Hat Crochet Pattern Free
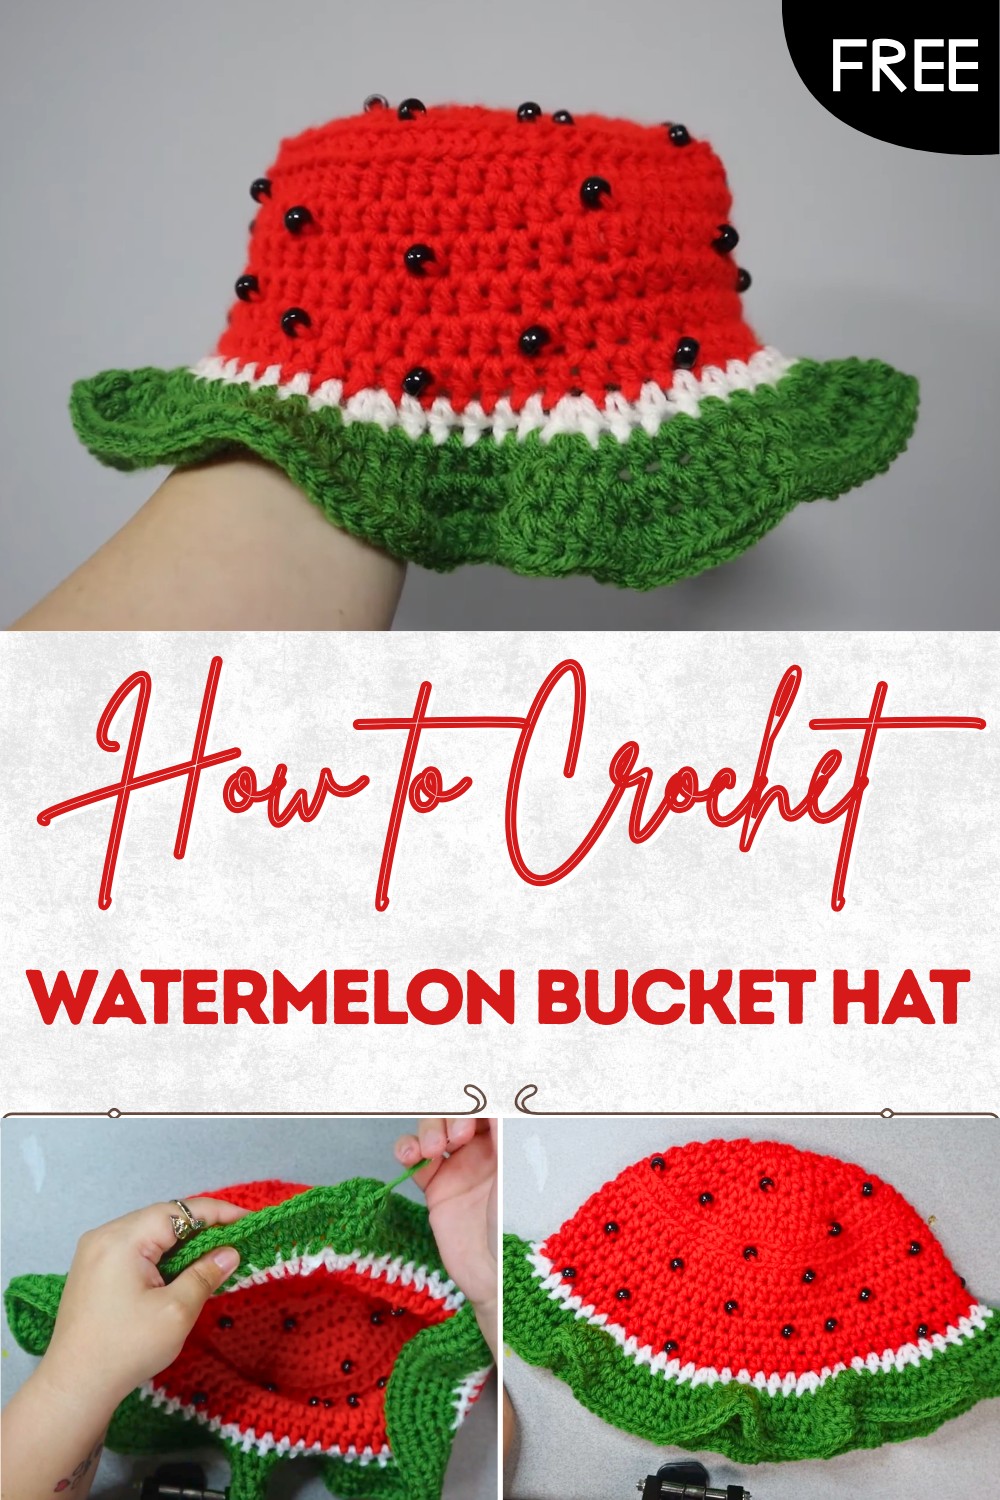
Dark “seeds” worked right into the stitches give authentic detail, making this hat stand out in every crowd. Shade your eyes and add charm to your everyday look while keeping hair neatly tucked away. Easy to match with kids’ or adults’ outfits, this pattern brings color and joy for all ages. Personalize with bright yarn or even add little accents for a special touch. Simple steps create a cheerful hat bursting with character and usefulness for any outing.
Crochet Watermelon Bucket Hat Pattern
Materials
- Yarn:
- Worsted weight (weight 4) acrylic yarn
- Red or Pink (main body, “watermelon” part)
- Green (brim/rind)
- White (separating rind row; only a small amount needed)
(Recommended: Big Twist, JoAnn’s brand)
- Worsted weight (weight 4) acrylic yarn
- Crochet Hook: 5.5 mm (essential for maintaining the correct shape with this weight yarn)
- Black Beads: Approx. 35, for “seeds”
- Yarn Needle or Sewing Needle: For threading beads onto yarn and weaving in ends
- Scissors
Key Abbreviations
| Abbreviation | Meaning |
|---|---|
| ch | Chain |
| hdc | Half Double Crochet |
| sl st | Slip Stitch |
| st(s) | Stitch(es) |
| inc | Increase (2 in same st) |
| BLO | Back Loop Only |
Special Notes
- Gauge and hook size are important for fit.
- Beads are optional; can be omitted or replaced with black embroidery for seeds.
- The hat is worked from the top down in continuous rounds.
- The hat is crocheted inside out; once complete, turn it right side out.
- Adjusting the increases will control the size (see tips).
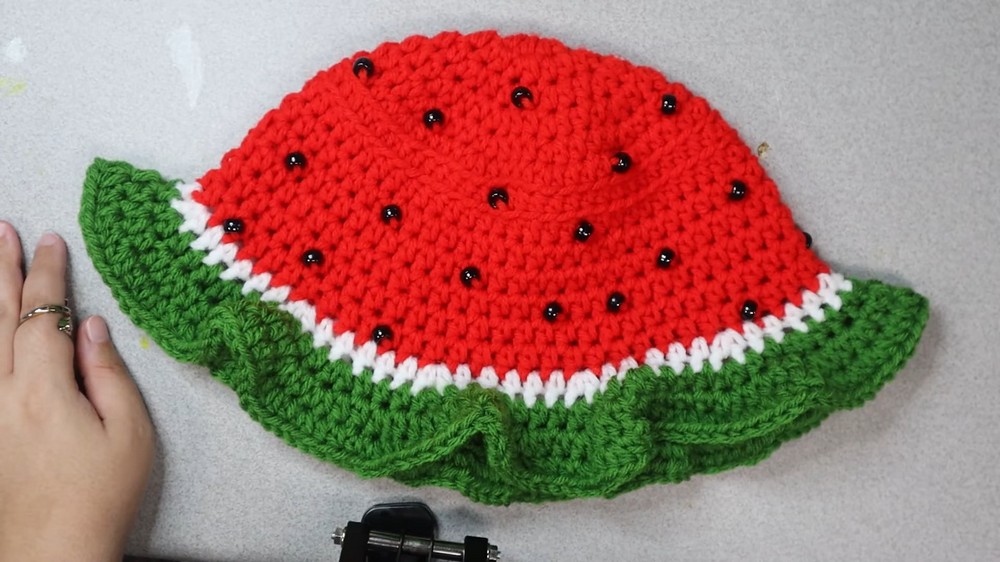
- For a classic watermelon look, add beads to the “red” rows only.
Pattern Instructions
1. Prepping the Beads
- Using a needle, thread about 35 black beads onto your main (red or pink) yarn before beginning.
- Slide all beads down the yarn to keep them out of your way while crocheting initial rows.
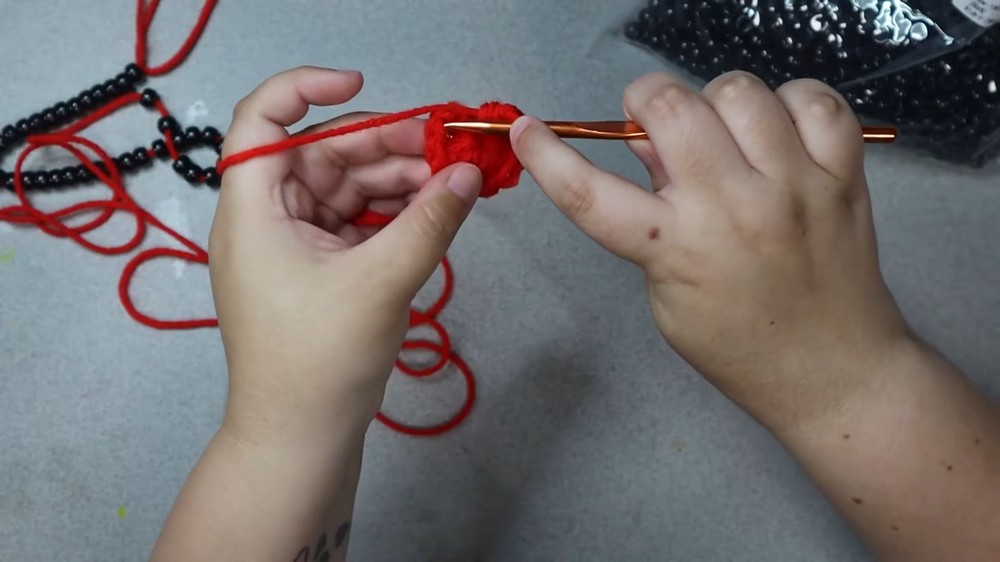
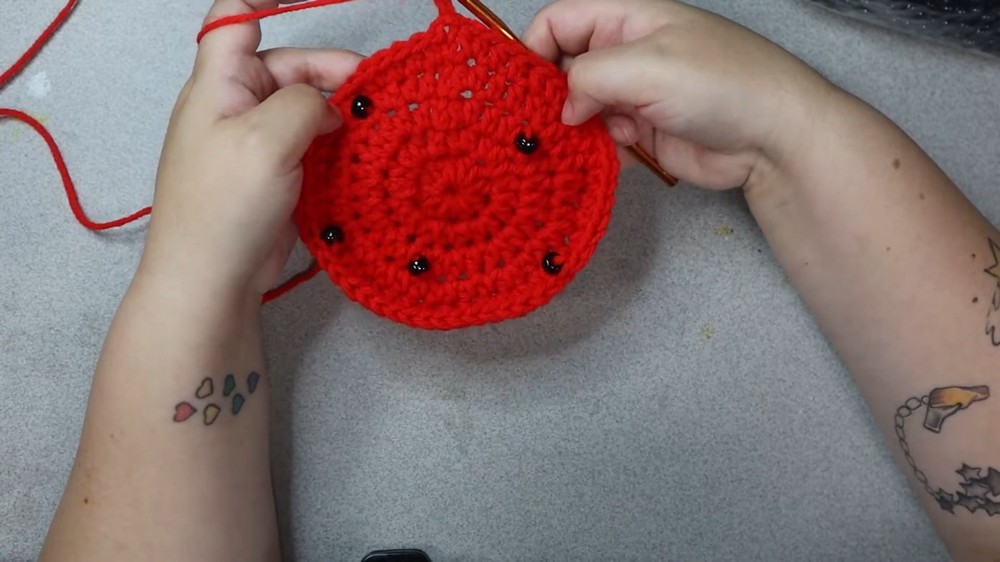
2. Top of the Hat (Magic Circle or Chain Start)
- Make a slip knot, ch 4, sl st into first ch to form a ring.
(Or, use a magic ring if preferred.)
3. Crown
Round 1:
- Ch 2 (does not count as hdc here or below), 10 hdc into ring.
- Sl st to first hdc to join. (10 sts)
- Pull yarn tail to close the center tightly. You may trim the tail now.
Round 2:
- Ch 2, 2 hdc in each st around (inc in every st).
- Sl st to first hdc. (20 sts)
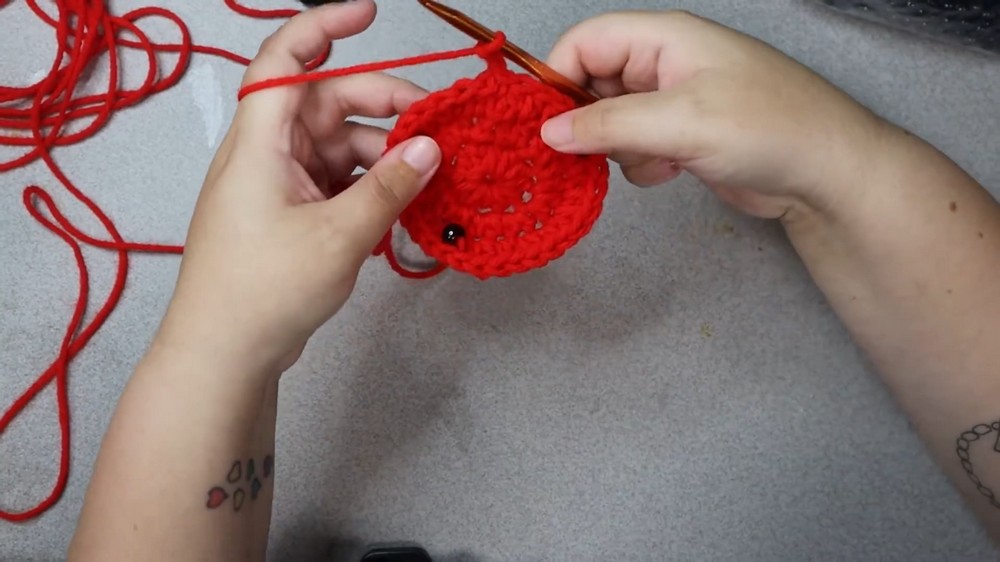
Round 3:
- Ch 2, (1 hdc in next st, 2 hdc in next st) around.
- Sl st to first hdc. (30 sts)
- Add beads randomly if desired (see “How to Add a Bead” below).
Round 4:
- Ch 2, (1 hdc in next 2 sts, 2 hdc in next st) around.
- Sl st to first hdc. (40 sts)
- Continue mixing in beads as you like.
Round 5:
- Ch 2, (1 hdc in next 3 sts, 2 hdc in next st) around.
- Sl st to first hdc. (50 sts)
- Add beads randomly.
Round 6:
- Ch 2, (1 hdc in next 4 sts, 2 hdc in next st) around.
- Sl st to first hdc. (60 sts)
- Continue bead placement.
Round 7:
- Ch 2, (1 hdc in next 5 sts, 2 hdc in next st) around.
- Sl st to first hdc. (70 sts)
- Add beads as desired.
(Note: If you need the hat larger or smaller, add an additional increase round, or stop increasing early.)
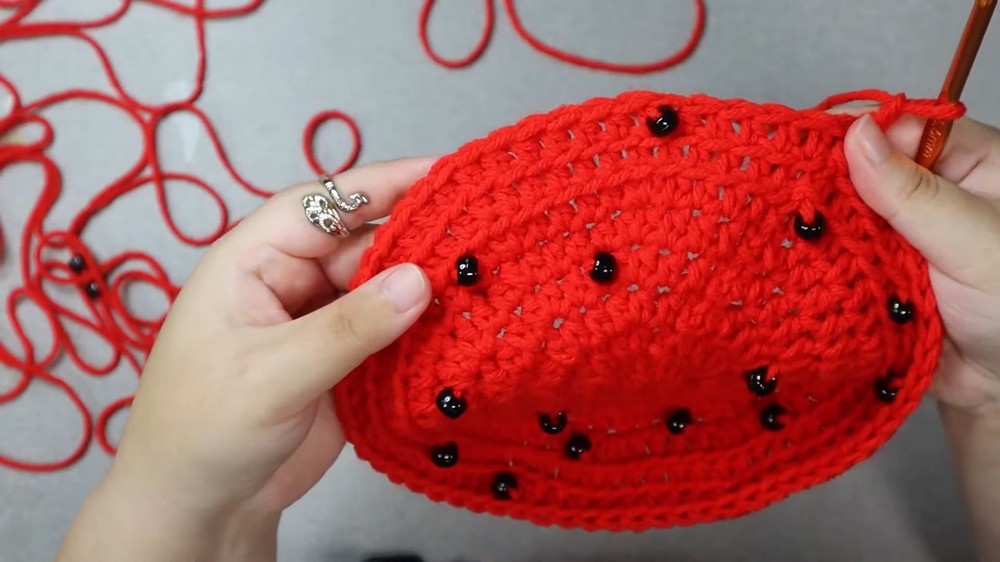
4. Body of Hat
Rounds 8-9:
- Ch 2, hdc in each st around, BLO.
- Sl st to join. (This creates a subtle ridge for structure.)
- Continue adding beads, about 2 per round here.
Rounds 10-14:
- Ch 2, hdc in each st around.
- Sl st to join.
- Place beads sporadically, up to around 4 per round as spacing increases.
- Repeat for a total of 5 plain red (or pink) rounds (after the 2 BLO rounds).
- After last hdc round, cut red/pink yarn and finish off. Remove any extra beads.

5. Color Change – White “Rind”
Round 15:
- Join white yarn, ch 2.
- (Hdc in next 5 sts, 2 hdc in next st) around (increase every 6th stitch).
- Sl st to join.
- Only 1 round in white.
6. Brim – Green
Round 16:
- Join green yarn, ch 2.
- For a straight brim: (Hdc in next 6 sts, 2 hdc in next st) around.
- For a ruffly/wavy brim: (Hdc in next 3-4 sts, 2 hdc in next st) around, or add extra increases as you see fit.
Rounds 17-18 (Green):
- Ch 2, hdc in each st around.
- Increase in every 7th st for slight ruffle, or every 8th-9th for straighter brim, or add more increases at will for more ruffle.
- Sl st to join after each round.
Total brim rounds (green): 3 rows (plus the one white row = 4 brim rows total).
- After final round, finish off and weave in all ends.
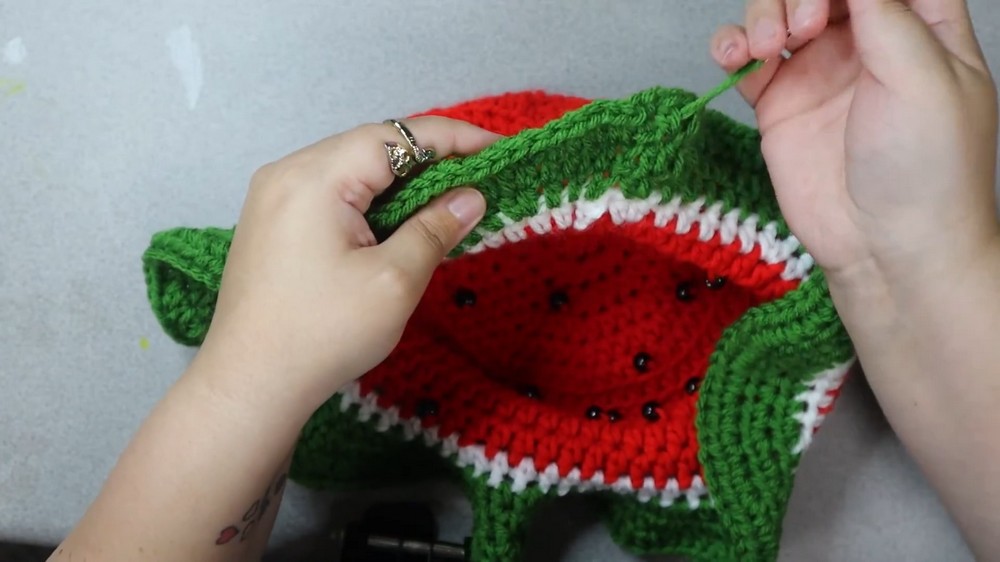
7. Finishing
- Turn hat inside out so beads all face outward.
- Weave in all remaining ends with a tapestry needle.
- Adjust brim/shape with your hands as needed.
How to Add a Bead (HDC with Bead)
- Bring one bead up to the hook (let it slide up close).
- Yarn over (without bead).
- Insert the hook into the next st, yarn over again (with the bead “trapped” between the hook and the last yarn over).
- Pull through (you have three loops on the hook; the bead is up close to the fabric).
- Yarn over and pull through all loops to finish hdc.
- The bead will now sit on the right side of the fabric.
- Space beads as desired for a natural “seed” effect.
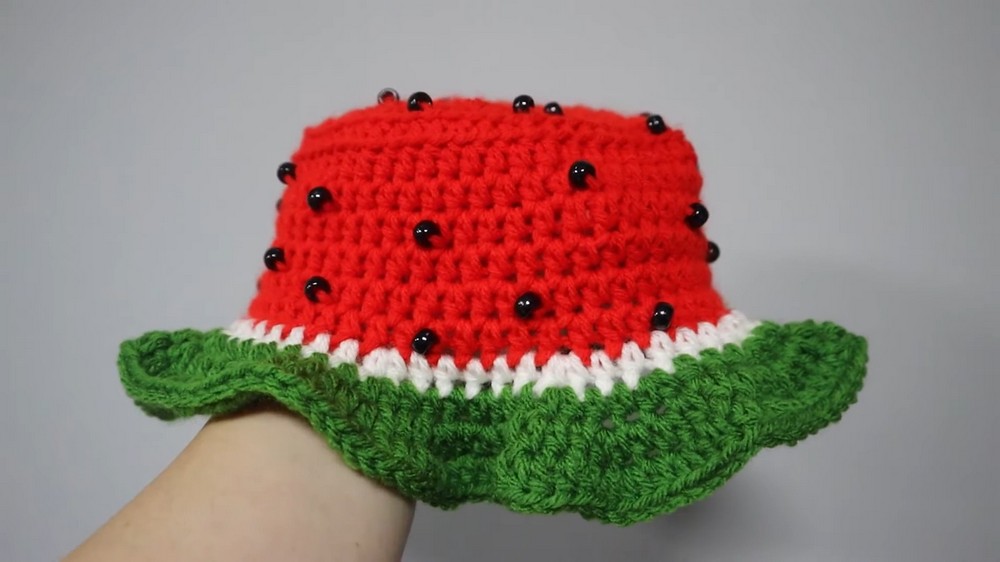
Conclusion
Congratulations! You have completed a whimsical and summery watermelon bucket hat featuring “seed” beads, a sweet white rind, and a vibrant green brim. This pattern is approachable for adventurous beginners and can be customized for fit based on your gauge and number of increase rounds.
Pattern Correction & Tips
Corrections:
- Each increase row adds 10 stitches in the crown; add or subtract rounds for a bigger/smaller hat.
- If your stitches are too tight/hat is small, try a 6.00 mm hook.
- Add increases more frequently in the brim for extra ruffle, less frequently for a more classic shape.
Tips:
- Don’t stress exact bead placement; natural watermelons have seeds in random patterns!
- If substituting lighter yarn, always check sizing as hat will turn out smaller.
- For beading, keep all beads on the “wrong side” (facing you) as you work, then flip when finished.
- The “seam” (where each round starts/ends) will be at the back; start and try to end color changes here.
- For child/adult/toddler sizing, add/remove a few final increases in the crown.