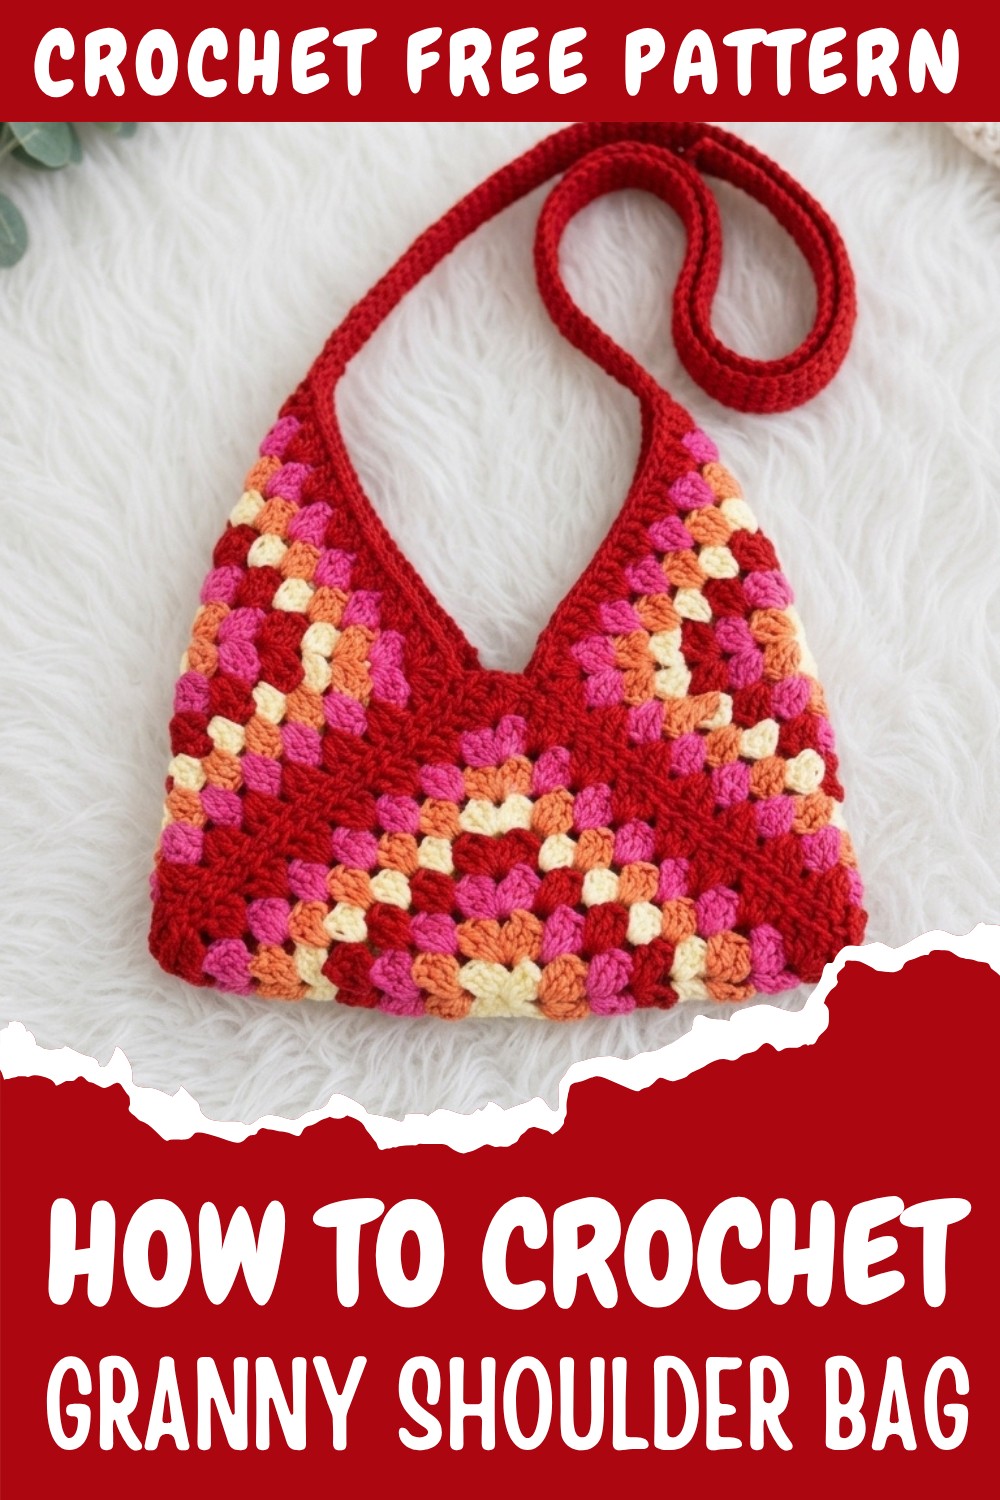
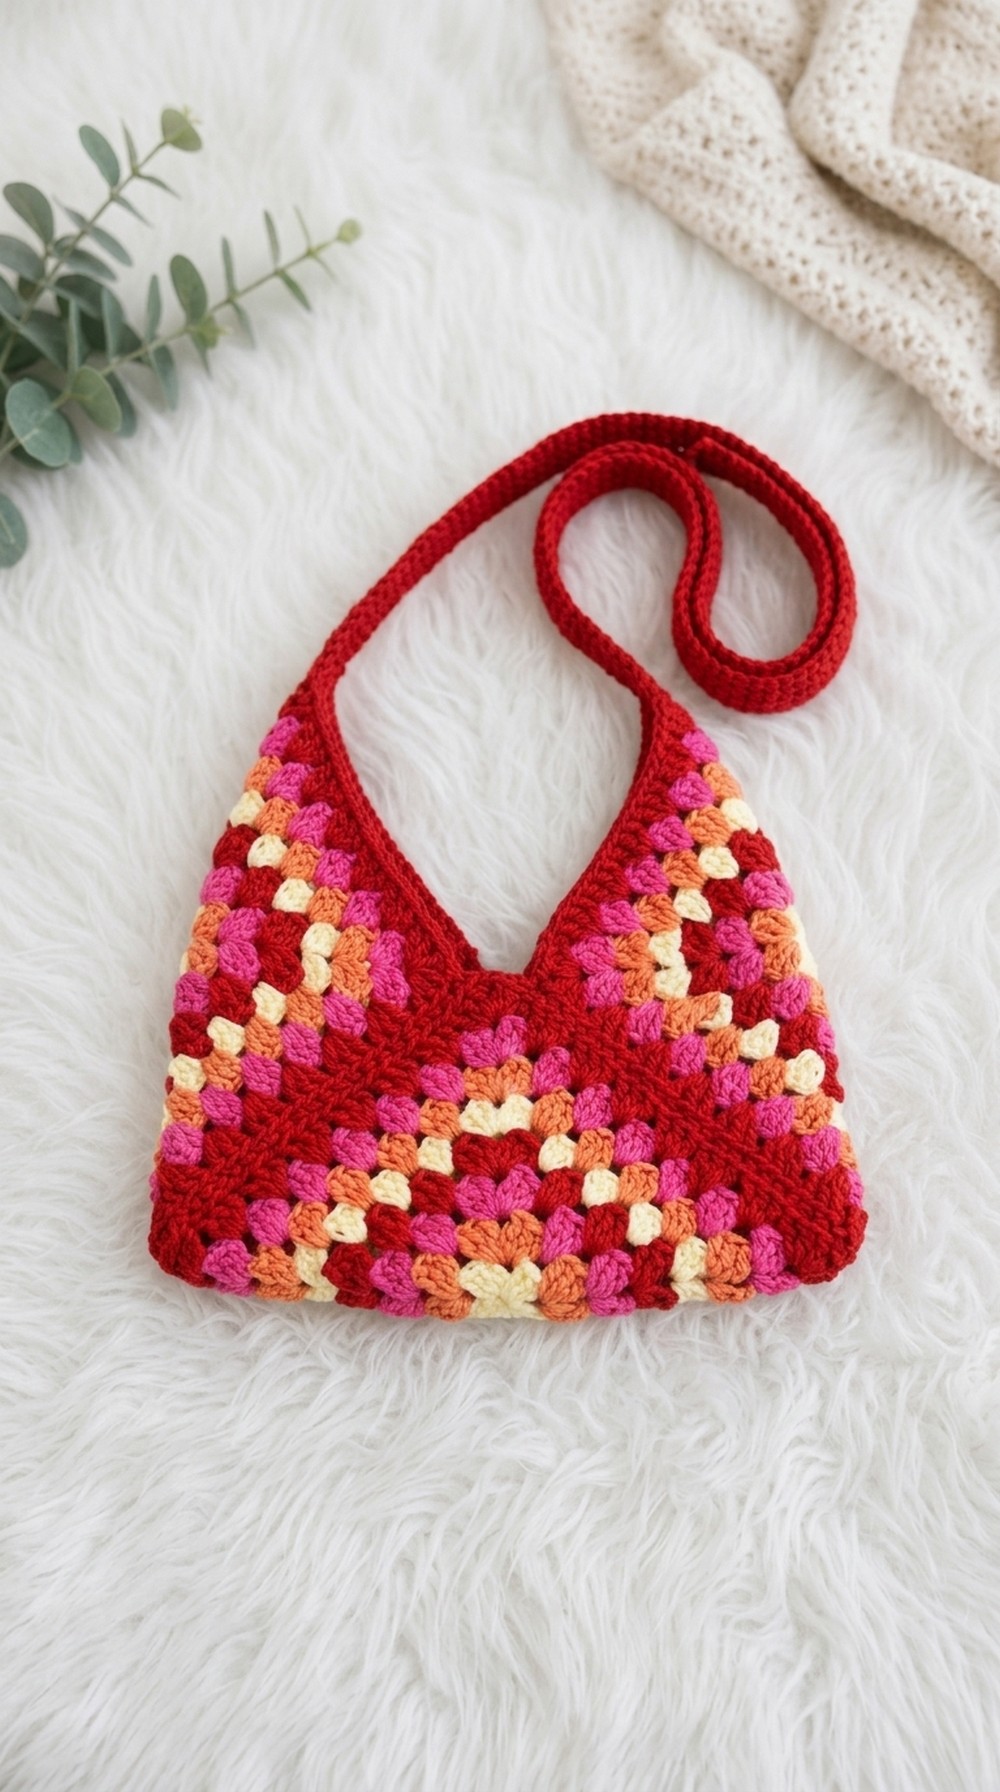
Free Crochet Granny Shoulder Bag Pattern for Everyday Fashion
Enhance your crochet skills by stitching this free crochet granny shoulder bag pattern, a perfect blend of creativity and practicality.
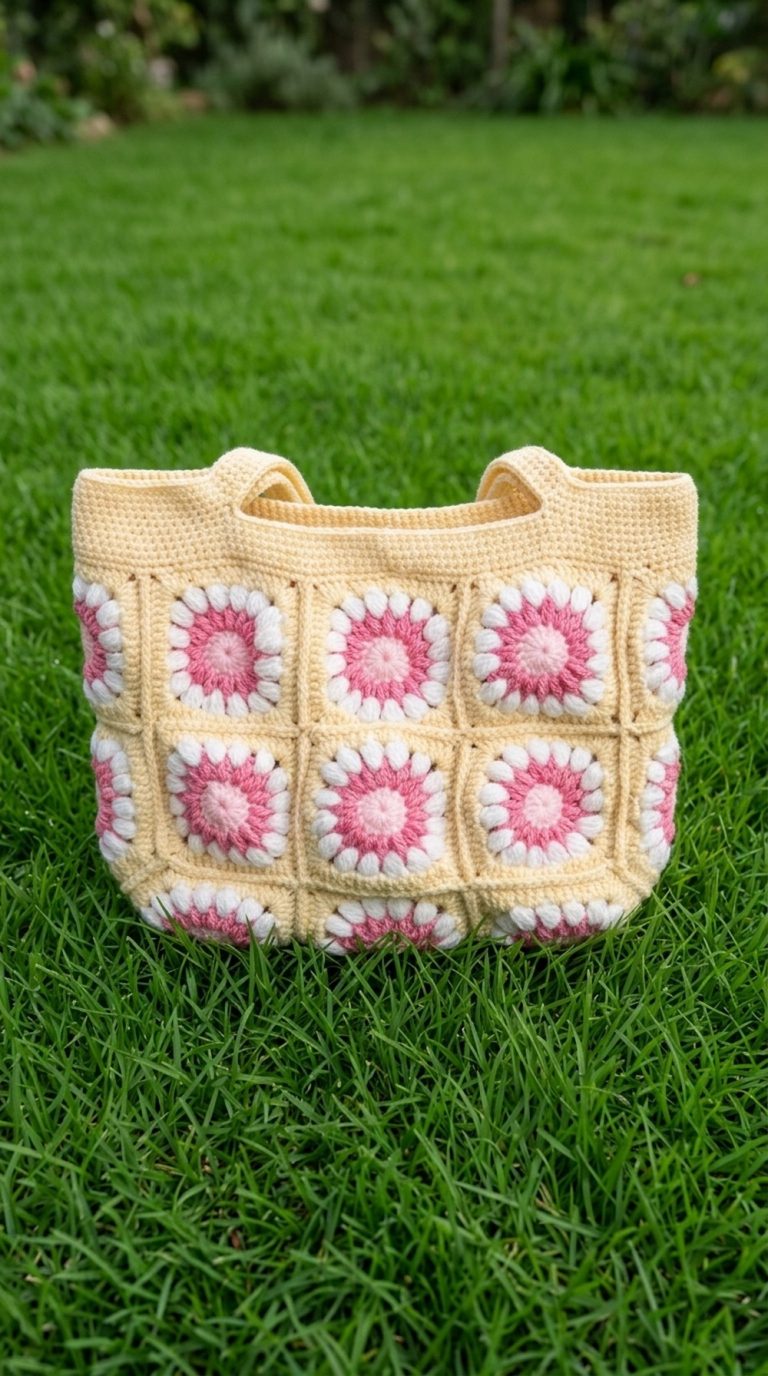
Crocheting a shoulder bag is such a fun way to mix creativity with practicality, and this granny square shoulder bag pattern is the perfect project to combine both. Made using the classic granny square technique, it beautifully showcases the charm of colorful cotton yarn, creating a lightweight, summery bag that can hold your daily essentials with ease. Its elegant yet simple pattern makes it ideal for beginners, while its versatility means you can incorporate your favorite colors for a personal touch. By using basic stitches like the double crochet (dc) and chain stitch (ch), you’ll easily master the foundation needed for this project. Plus, these stitches are fundamental to other creations, such as blankets, coasters, and pillow covers.
Easy Crochet Granny Shoulder Bag Pattern with Professional Results
This pattern offers endless customization. You can crochet the bag larger or smaller just by adding or reducing rows in the granny squares, giving you flexibility in its size and style. The bag pattern is small and perfect for a quick outing, yet sturdy enough to handle daily items like your phone, wallet, or keys. Whether paired with casual jeans or summer dresses, this pattern offers a timeless, handmade accessory.
Through this pattern, you will gain a deeper understanding of constructing granny squares, assembling them into practical shapes, and crocheting neat handles. You’ll also find how versatile granny squares can be—they’re not just for bags! By modifying colors and sizes, you can use the same techniques to create tote bags, placemats, or even decorative table runners. Overall, this pattern is not just about crocheting a bag; it’s about opening a world of crocheting possibilities while building confidence in your skills.
Free Crochet Granny Shoulder Bag Pattern – Step-by-Step Guide
Creating your own handmade crochet shoulder bag is a fun and fulfilling project, especially with the Free Crochet Granny Shoulder Bag Pattern. This beginner-friendly pattern creates a cute, summery bag that is lightweight, functional, and customizable. It uses the granny square technique, a timeless crochet method that is versatile and great for mastering skills like making precise stitches, joining pieces, and adding handles.
With vibrant colors and detailed instructions, this pattern is perfect for crocheters of all levels. Whether you’re making your first bag or adding another item to your collection, this beautifully designed granny pattern will become a staple accessory.
Table of Contents
- Introduction to the Pattern
- Materials Needed
- Key Abbreviations
- Step-by-Step Pattern
- Making the Granny Squares
- Joining the Squares
- Assembling the Bag Body
- Adding the Handles
- Special Features of the Bag
- Tips for Success
- Conclusion and Final Thoughts
Introduction to the Pattern
This crochet shoulder bag pattern is ideal for anyone who loves handmade accessories. The pattern works best as a small bag for quick outings, but you can adjust it for larger needs by adding extra rows to the granny square. With its bright, summery feel, the pattern can be tailored in any color combination to match your personal style.
This bag is perfect for:
- Beginner crocheters mastering granny squares.
- Intermediate crocheters looking for a multipurpose project.
- Anyone interested in crafting functional yet trendy homemade projects.
Skill Level: Beginner to Intermediate
Special Technique: Granny squares, point joining, and handle construction (all explained step-by-step).
Materials Needed
- Yarn: 4-5 colors of cotton yarn (recommended for a sturdy and lightweight finish). Any even number of colors can be used.
- Hook: Size 3mm (adjust based on the yarn thickness).
- Tapestry Needle: For sewing and weaving in ends.
- Scissors: For cutting yarn.
Key Abbreviations
- ch – Chain
- sl st – Slip Stitch
- sc – Single Crochet
- dc – Double Crochet
- sp – Space
Step-by-Step Pattern
Step 1: Making a Granny Square
- Start with a slip knot and chain 4.
- Join the first and last chain into a ring with a sl st.
- Chain 3 (this counts as your first dc of the round).
- Inside the ring, make 2 more dc. You now have your first group of 3 stitches.
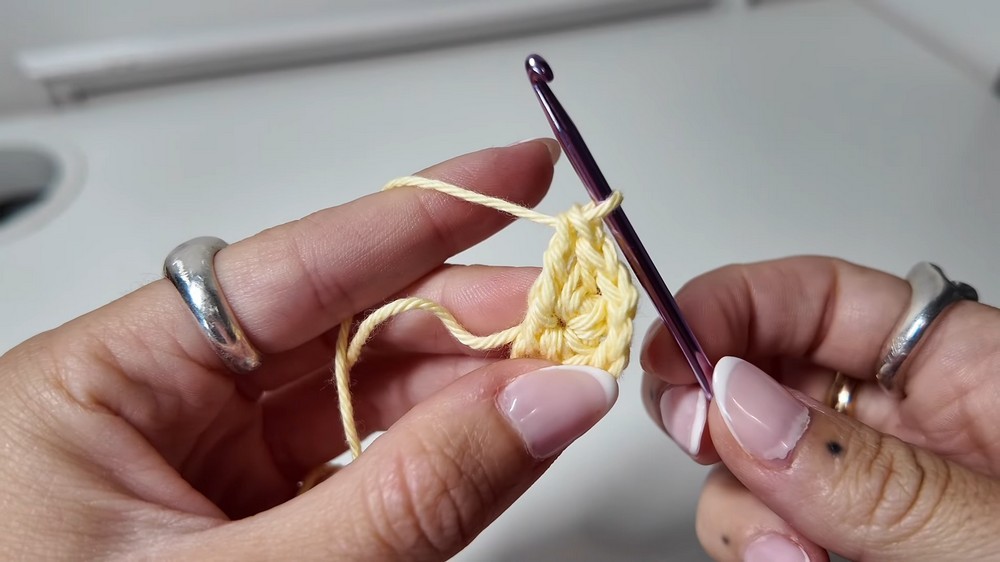
- Chain 2 for the corner and create another group of 3 dc. Repeat this pattern until you have 4 groups of 3 dc, each separated by 2 chains.
- Close the square by joining the last stitch to the top of the starting chain with a slip stitch. Cut the yarn and fasten it off.
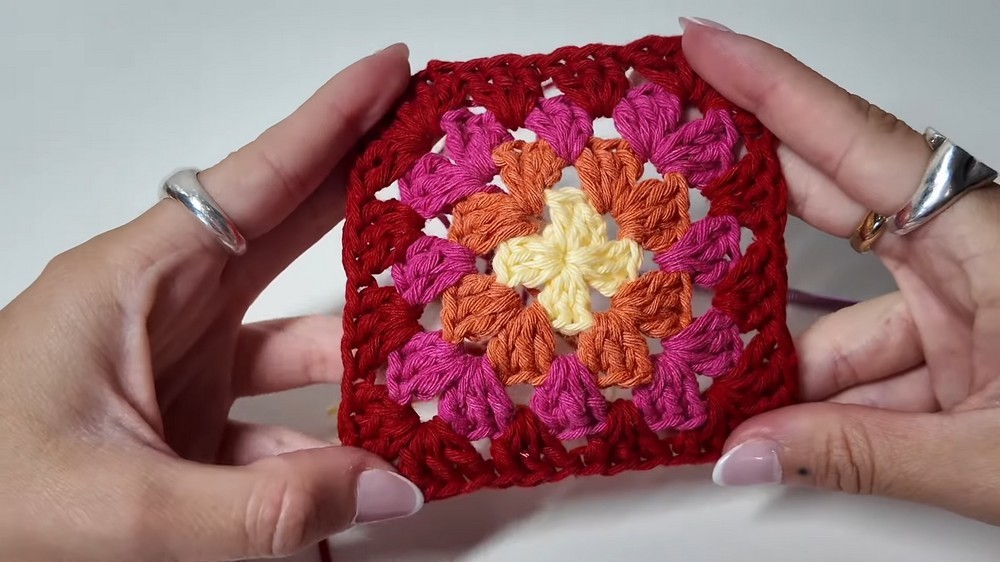
Tip: Use a different color for every round to achieve a vibrant, summery look.
Step 2: Adding Additional Rounds
- Attach a new color to any corner space (created by the 2 chains) with a slip stitch.
- Chain 3, and make 2 dc into that same space.
- For every corner: Make 3 dc, chain 2, and another 3 dc.
- For non-corner spaces: Make 3 dc.
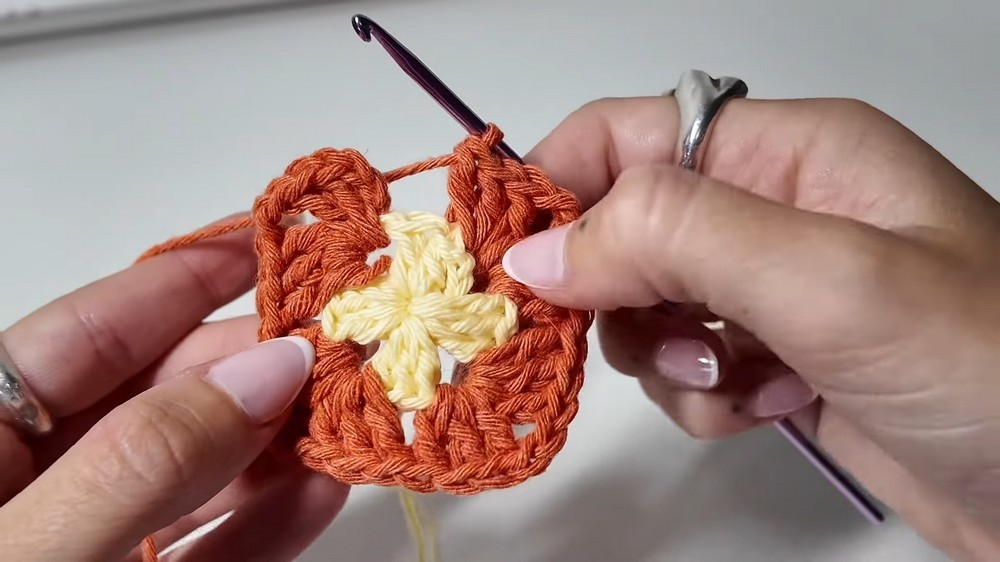
- Repeat this pattern for however many rounds you want. In this example, 8 rounds were used to make a medium-sized bag.
- Once you’re satisfied with the size, cut the yarn and weave in the ends.
Step 3: Making More Granny Squares
- Create two more squares using the same technique. You’ll need a total of three identical granny squares for the bag.
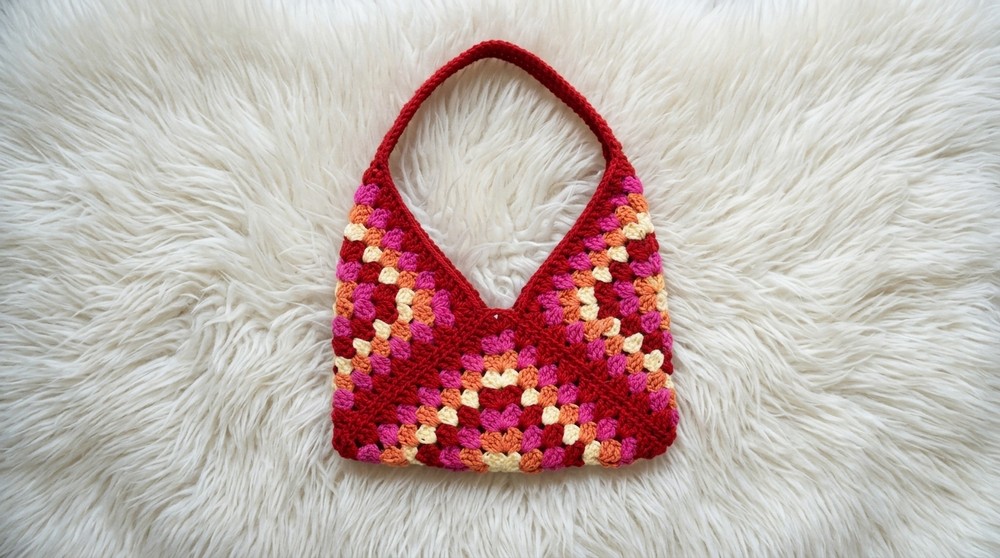
Step 4: Joining the Squares
- Fold each of the three squares in half to create a “V” shape with the corners pointing downward.
- With the wrong side (where the yarn ends are visible) facing outwards, join the three granny squares by sewing along the edges. Use the back loop only method for a neater seam.
- Once joined, turn the bag inside out to reveal the smooth, finished edges.
Step 5: Adding the Handles
- Attach the yarn to any corner and chain 3. This will act as your first dc.
- Make 3 more dc, one in each stitch, for a total of 4 stitches across.
- Chain 3, turn your work, skip the first stitch, and make 3 dc. Repeat this process until the strap is your desired length.
- Finally, sew the strap to the opposite corner of the bag.
Special Features of the Bag
- Customizable Size: Simply add or skip rows in each granny square.
- Color Variety: Create vibrant multicolor designs or stick to understated monochromatic styles.
- Functionality: Lightweight yet sturdy, making it suitable for carrying small essentials like a phone or wallet.
Tips for Success
- Use cotton yarn for durability and a polished finish.
- Be consistent with tension to maintain even-sized stitches and rows.
- Weave in loose ends securely to ensure your bag stays neat after use.
- Choose vibrant summer colors for a bold, playful look, or neutral tones for a chic accessory.
Conclusion and My Final Thoughts
This Free Crochet Granny Shoulder Bag Pattern is a lovely project for anyone wanting to make a stylish, handmade accessory. It’s beginner-friendly, versatile, and easy to customize. The use of basic stitches like chain, slip stitch, and double crochet makes this project approachable even if you’re just starting out.
What I Learned: This pattern taught me the beauty of simplicity in crochet. By combining a basic granny square technique with a little assembly, it’s possible to create an accessory that looks store-bought! It also reinforced the importance of experimenting with colors and being precise with stitch placement.
Final Message to You: Crochet isn’t just a craft; it’s a way to turn creativity into something tangible. Take your time, enjoy the process, and don’t be afraid to make it your own. This bag is more than just a carry-all—it’s a reflection of your skill and style.