Light & Free Crochet Bralette Top Pattern Perfect for Warm Days
Solve your summer outfit needs with an easy and chic free crochet bralette top pattern designed for all skill levels and styles.
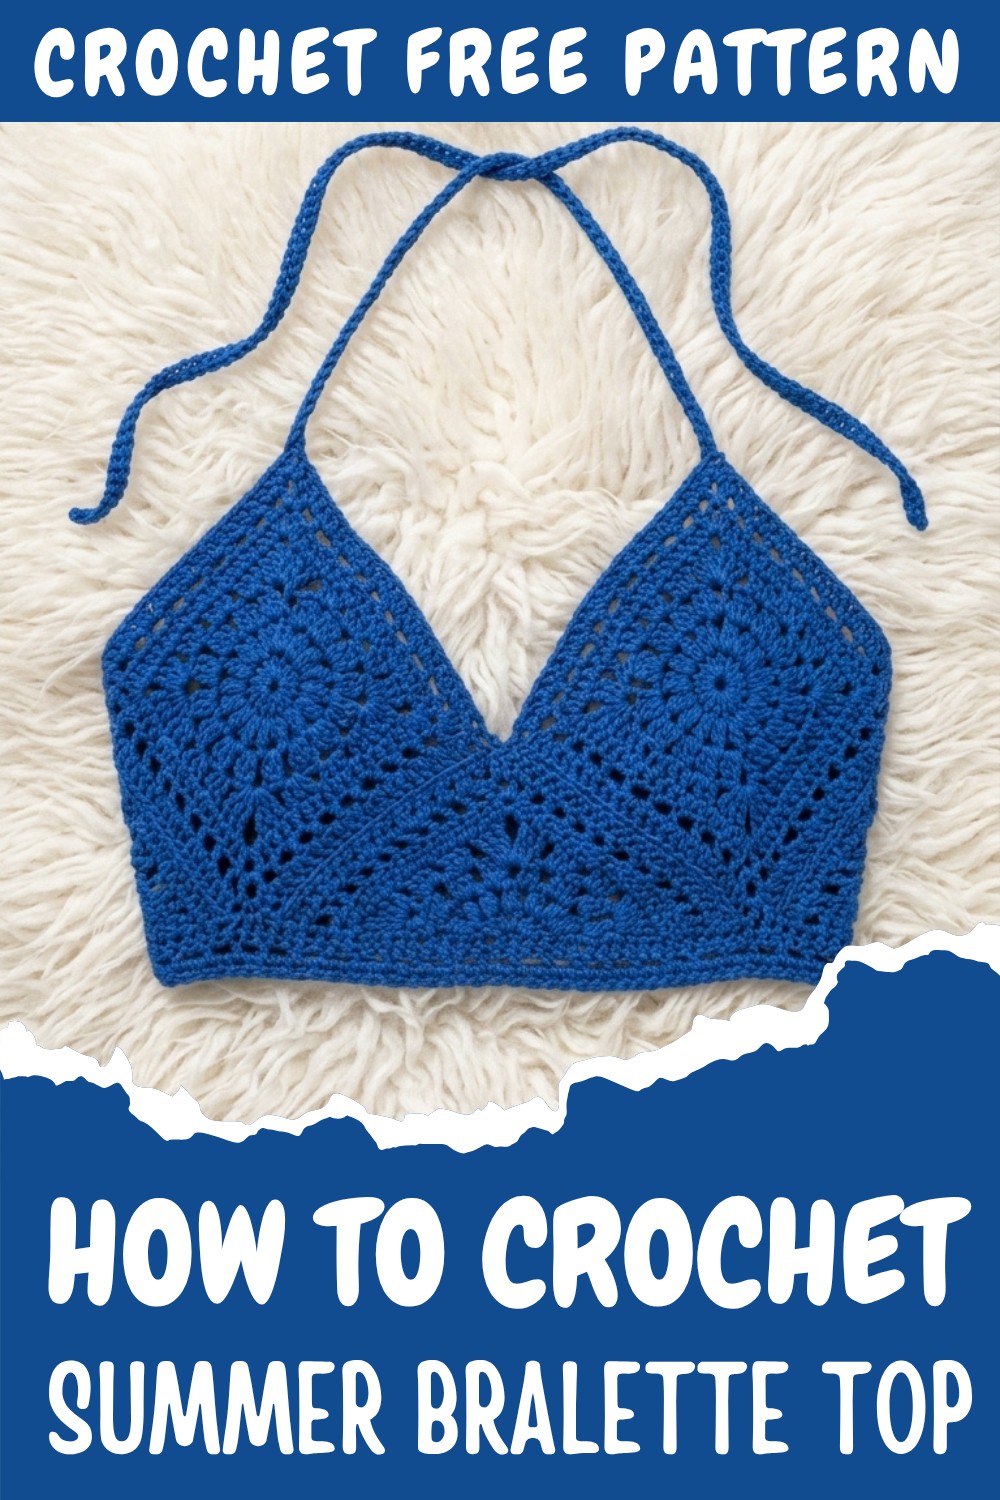
Crocheting your own bralette top is such an exciting project, especially when it’s stylish, beginner-friendly, and works up quickly! This pattern was inspired by the need for a cute crop top to pair with a crochet maxi skirt, and the result is a stunning combination of creativity and functionality. The pattern features Sunburst Granny Squares and Granny Triangles, which form the centerpiece of the bralette. The unique look comes from simple yet effective stitches like half double crochet (hdc), double crochet (dc), and space stitches, creating texture and polished edges while keeping the project lightweight and breathable. Bonus: these stitches are perfect for crocheting other amazing items like bags, decorative pillows, or even wraps.
Easy Crochet Bralette Top Pattern Perfect for Summer
What makes this pattern so beautiful is its versatility. From pairing it with skirts for a boho-chic vibe to adding shorts for a laid-back summer look, this pattern will be your go-to for warmer days. Don’t worry about size adjustments—if you need more coverage, you can simply add a few rows following the same stitch techniques. The handmade blocking technique makes the squares sharp and uniform, ensuring that your finished garment looks polished and professionally done. Whether you use vibrant yarn or neutral tones, this pattern makes it easy to incorporate your personal style.
Through this pattern, you’ll gain confidence in working with granny squares and triangles while mastering foundational stitches. You’ll also learn blocking techniques and how to create invisible stitched seams for a polished finish. Once you master this pattern, you can branch out into creating bralettes, crop tops, bags, and even coordinating skirts. This project is perfect for both beginners and seasoned crocheters looking for fast, fashionable results.
What I love most about this pattern is how quickly it comes together while teaching practical crochet techniques. It’s proof that simple stitches, paired with a bit of creativity, can result in something undeniably gorgeous.
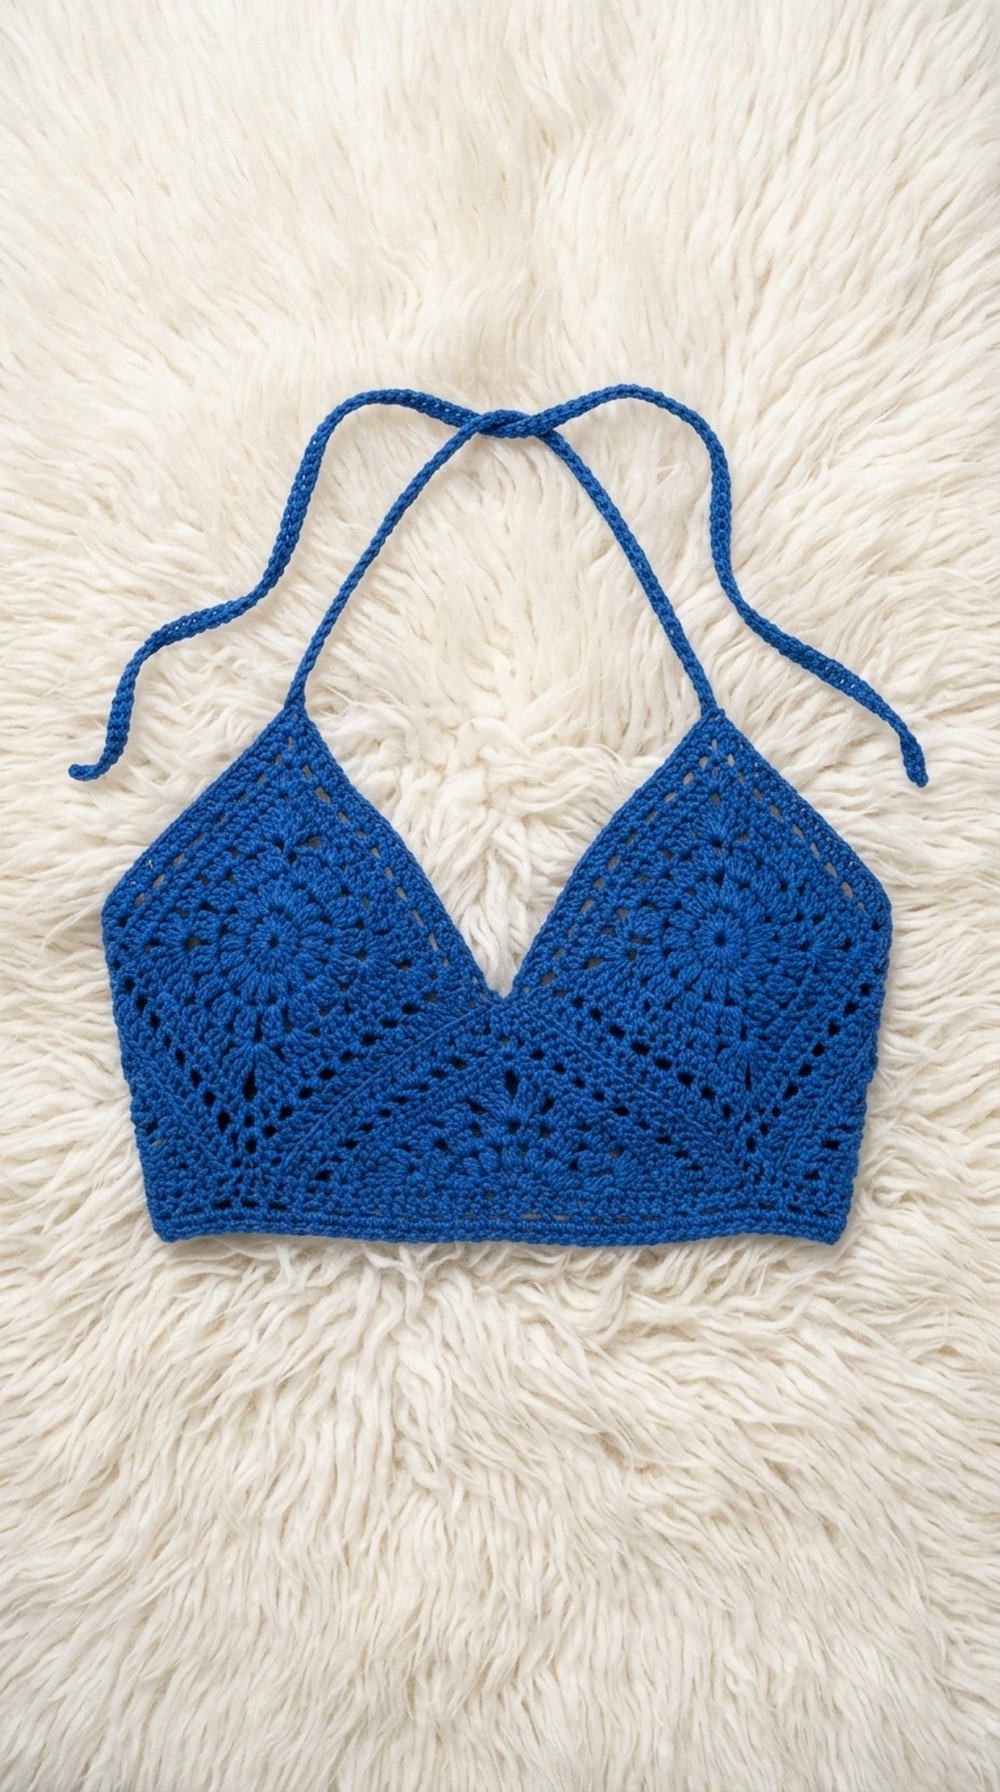
Sunburst Granny Square Bralette Top – Step-by-Step Crochet Pattern
This Sunburst Granny Square Bralette Top pattern combines timeless crochet with modern fashion to create a unique and customizable piece. Perfect for beginner and intermediate crocheters, this pattern is lightweight, easy to wear, and looks incredible paired with a long skirt or high-waisted jeans. What makes this design standout is its use of granny squares and granny triangles, paired with foundational stitches like half double crochet (hdc), double crochet (dc), and space stitches, which add texture and sophistication.
Whether you’re making this top for a casual summer outfit or want to use leftover yarn scraps, this pattern gives you endless creative freedom! It also teaches foundational techniques that can later be used to make crop tops, skirts, bags, and even shawls.
Table of Contents
- Introduction
- Special Features
- Materials Required
- Abbreviations
- Special Techniques Used
- Step-by-Step Pattern
- Tips for Success
- Conclusion
- What I Learned from This Pattern
Special Features
- Beginner-to-intermediate crochet project.
- Uses Starburst Granny Squares and Granny Triangles.
- Incorporates various stitches (hdc, dc, space stitches) for texture variations.
- Customizable size based on body type.
- Includes blocking techniques for polished results.
- Perfect for summer or casual wear.
Materials Required
- Yarn: Lightweight cotton or acrylic yarn in blue (use scrap yarn for an eco-friendly option).
- Crochet Hook: Size 4mm or 5mm.
- Tapestry Needle: For sewing ends and invisible stitching.
- Scissors: To trim yarn.
Abbreviations
- ch: Chain
- hdc: Half Double Crochet
- dc: Double Crochet
- sc: Single Crochet
- sp: Space
- sl st: Slip Stitch
Special Techniques Used
- Granny Square Blocking: A technique to keep edges smooth and panels uniform.
- Invisible Thread Stitching: Zigzag stitch for seamless panel joining.
- Space Stitch Design: Alternating double crochets with chain spaces for textured rows.
Step-by-Step Pattern
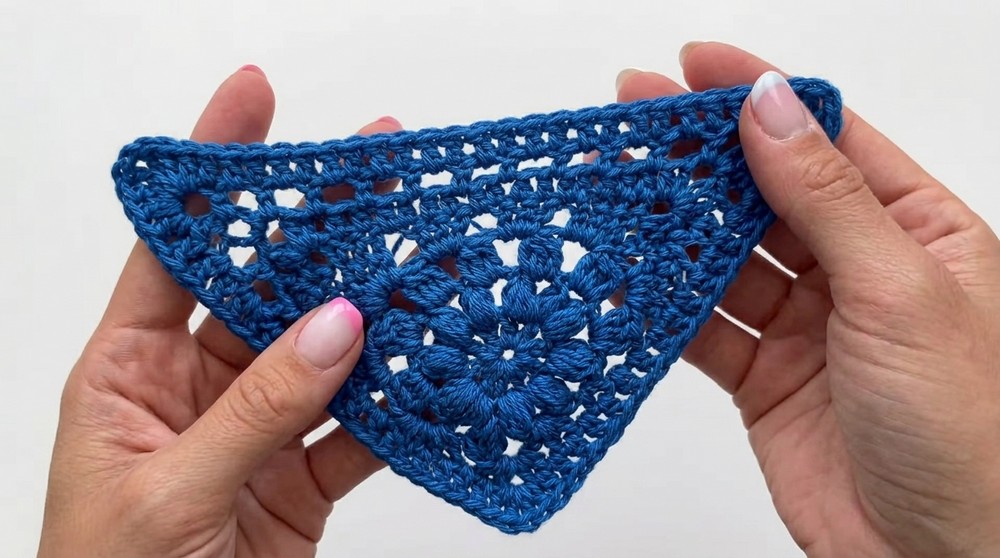
Step 1: Making Granny Squares and Triangles
- Granny Square: Follow a tutorial to make the Sunburst Granny Square. You’ll need two squares for this project.
- Granny Triangle: Follow a tutorial for the Sunburst Granny Triangle. You’ll need three triangles.
- After finishing, each square and triangle will be expanded with additional rows for proper fitting.
Step 2: Adding Rows to Squares
Row 1: Half Double Crochet (hdc)
- Chain 2, and place 1 hdc in every stitch around the square.
- At the corners: (hdc, ch 2, hdc) into the corner space.
- Slip stitch to the starting chain to finish the round.
Row 2: Space Stitch (Double Crochet with Chains)
- Chain 2, then ch 1 more. Skip the next stitch and place 1 dc into the second stitch.
- Continue: (ch 1, skip 1, dc into next stitch) around.
- At corners: (dc, ch 2, dc) into the corner space.
Row 3: Double Crochet (dc)
- Chain 2, and place 1 dc in every stitch and chain space.
- At the corners, work (dc, ch 2, dc) into the space.
- Slip stitch to end the row and tie off.
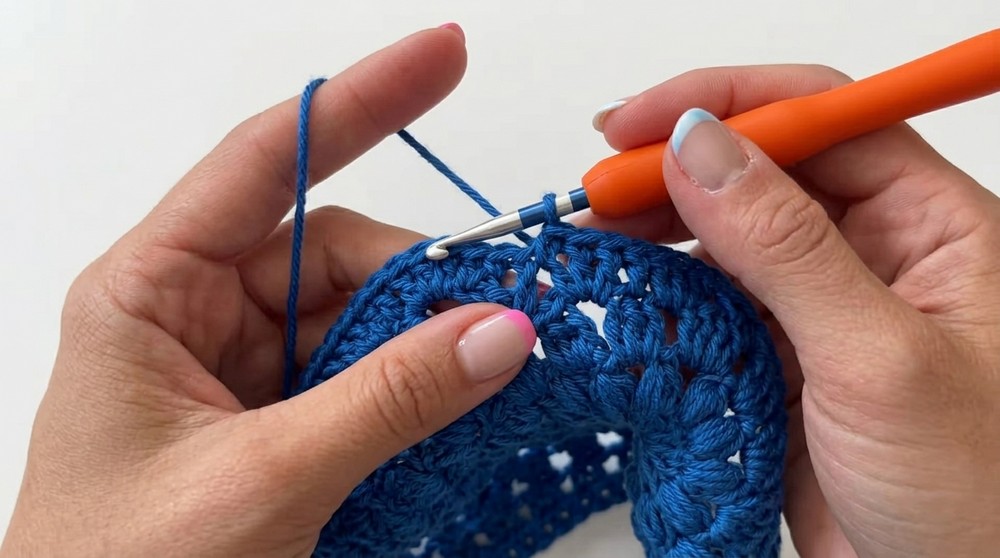
Step 3: Adding Rows to Triangles
Row 1: Half Double Crochet (hdc)
- Chain 2, and place 1 hdc in every stitch.
- At the triangle’s point, work (hdc, ch 2, hdc) to keep the sharp corner intact.
Row 2: Space Stitch (Double Crochet with Chains)
- Chain 2, then ch 1 more. Skip the next stitch and place 1 dc in the second stitch.
- Continue: (ch 1, skip 1, dc into next stitch).
- At the corner: (dc, ch 2, dc) into the sharp-space point.
Row 3: Double Crochet (dc)
- Chain 2, and place 1 dc in every stitch and space.
- At the corner: (dc, ch 2, dc) into the sharp-space point.
- Tie off and block all finished pieces for a neat and uniform shape.
Step 4: Sewing Panels Together
- Lay out the pieces: Arrange squares and triangles in their matching positions (2 squares for the top, 3 triangles for the base).
- Use an invisible zigzag stitch with thread or yarn to join pieces.
- Work through the back loops only for clean seams.
Step 5: Adding Straps and Drawstrings
- Straps: Use yarn slip knots and create braided straps for the neckline using your desired length.
- Drawstrings:
- Take long strands of yarn (e.g., 6 strands).
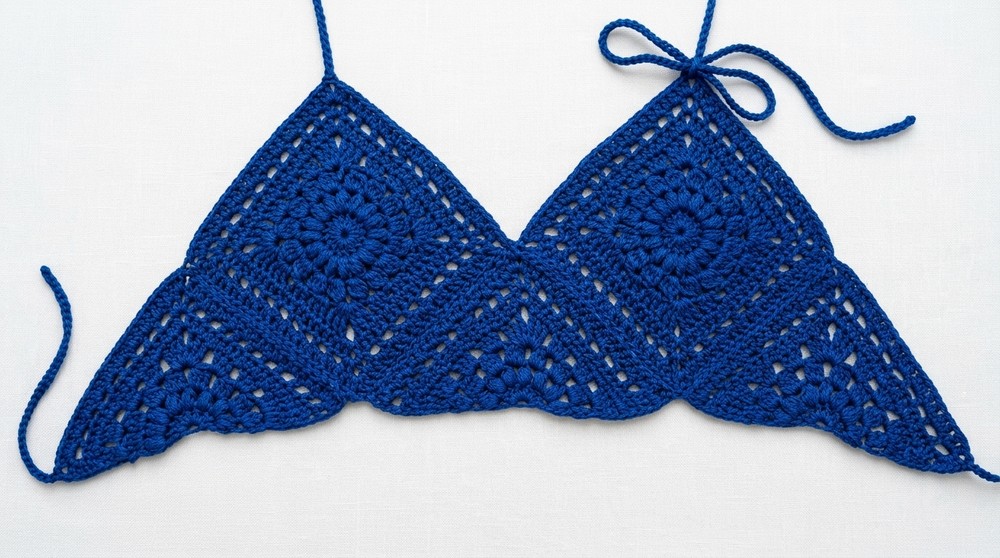
- Chain or braid them into sturdy straps for the waist. Attach at the bottom corners and weave through.
- Take long strands of yarn (e.g., 6 strands).
Step 6: Adding Finishing Edges
- Create rows of single crochet (sc), half double crochet (hdc), or double crochet (dc) around the top or hem for a polished look.
- If desired, add space stitches for decorative edging.
Tips for Success
- Use colorful yarn for a playful look; neutrals work best for a modern style.
- Always block your squares and triangles to ensure even edges.
- Adjust the strap length to fit snugly or loosely based on your preference.
- While sewing, take your time to maintain neat and seamless stitches.
Conclusion
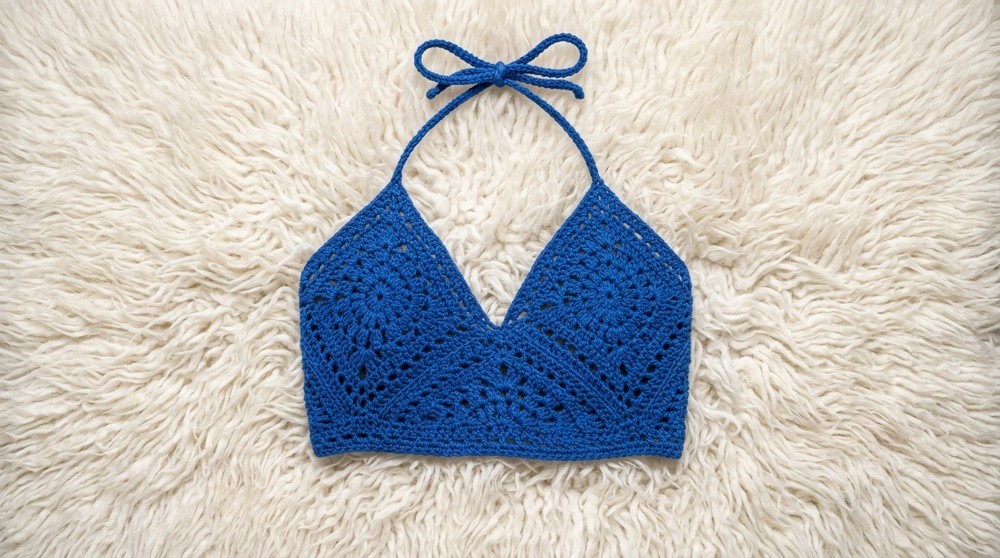
The Granny Square Bralette Top is a fast and fun crochet project that proves even simple squares and triangles can turn into a trendy clothing piece. By mastering basic stitches like hdc, dc, and sc, this pattern helps build confidence and skills for future crochet projects. Perfect for summer, this pattern can be worn casually or dressed up depending on your choice of colors, embellishments, and styling.
Through this tutorial, I learned that small details like blocked edges, decorative designs, and finishing rows make a huge difference in crocheting a polished item. Whether it’s creating unique straps or using my leftover yarn for a cohesive set, this project combined creativity with practicality in a beautiful way.