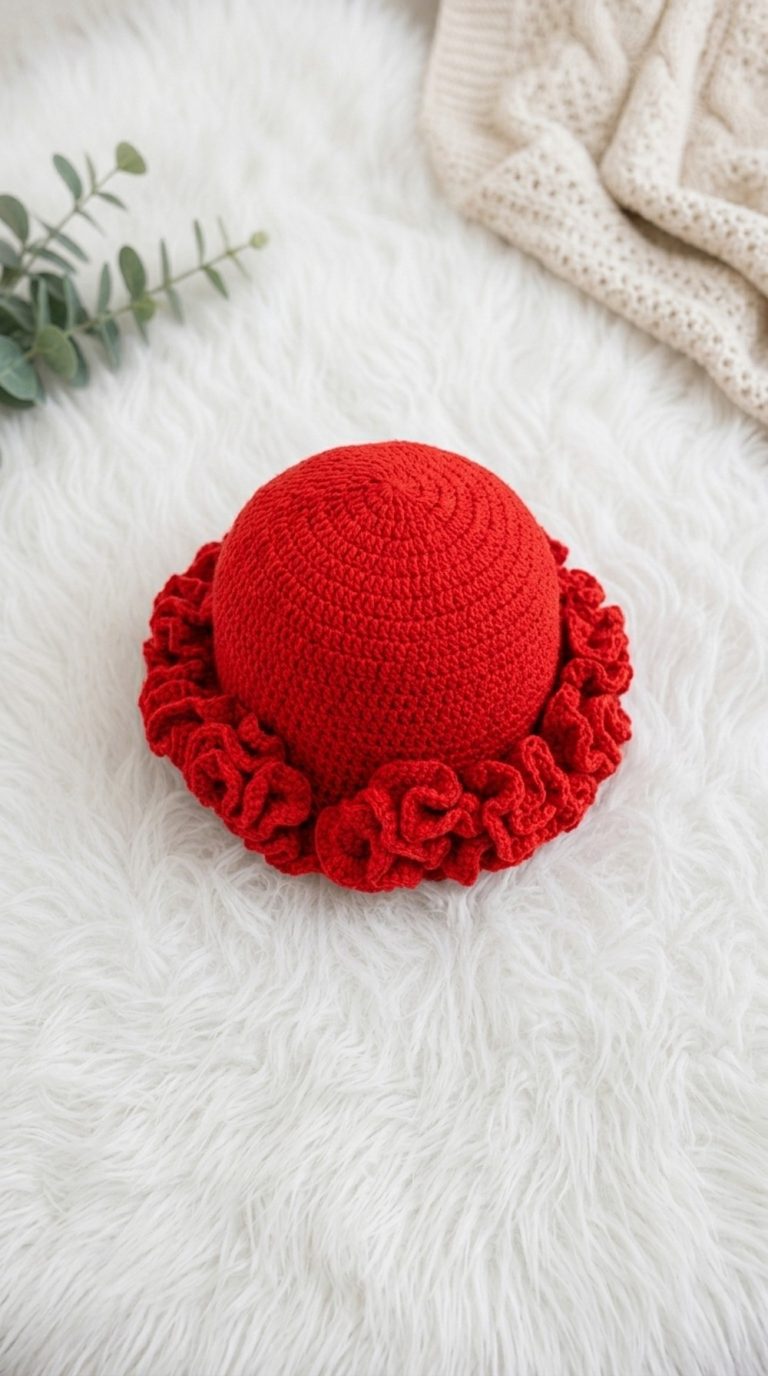
Free Crochet Baby Bonnet Hat Pattern – Easy & Cute
Looking for a fun and beginner-friendly crochet project? A Free Crochet Baby Bonnet Hat Pattern is an amazing choice! This pattern not only lets you practice simple crochet skills, but also gives you a heartwarming result a soft, adorable bonnet for a baby around 6 months old. Crocheting your own baby bonnet is satisfying, quick to finish, and makes for a gift that’s packed with care and personality. If you want to learn or improve your crochet skills, starting with this pattern is a great step. The easy-to-follow video instructions guide you clearly, so you’ll feel confident as you go.
Adorable Baby Crochet Bonnet Hat Pattern for Beginners
This baby bonnet stands out with its classic, rounded shape and smooth texture. You can use any soft, baby-friendly yarn—colors like deep maroon, gentle pastels, or brilliant brights all look great. The main stitch here is the double crochet, which creates a pretty and comfy fabric. Want to try something new? By making simple changes to the edges or using this pattern as a base, you can design a matching scarf or a headband for the baby too. The possibilities grow as you gain confidence!
Troubleshooting tips:
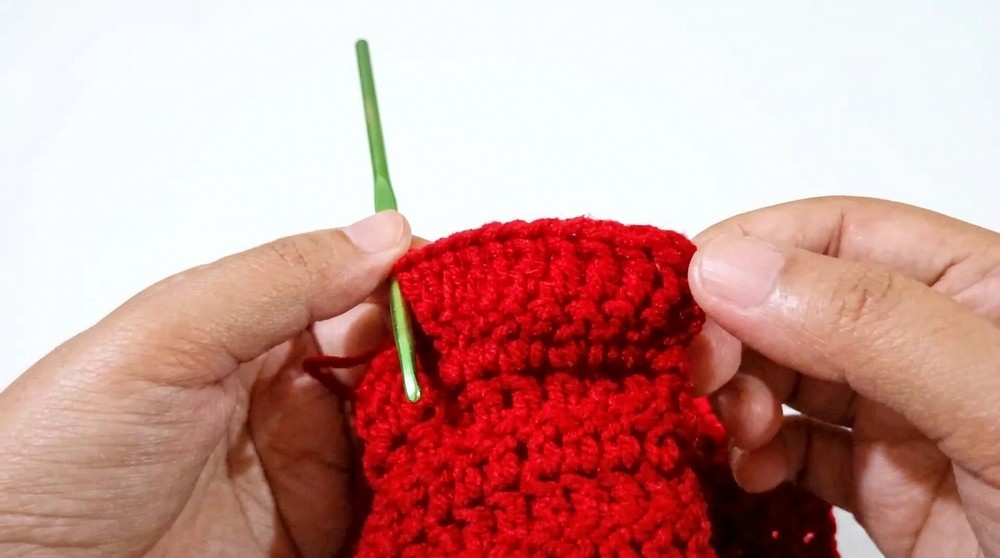
- If your bonnet is uneven or the wrong size, recount stitches in each row and check with a ruler (should be about 13 cm across after row 5).
- If the opening is too loose/tight, adjust your hook size or yarn thickness.
- Make sure you weave in all yarn ends, so the bonnet is safe and smooth.
To finish, follow the sizing guide: the bonnet from crown to edge should measure about 18.5 cm, which fits most 6-month-old babies. Try on the bonnet as you work to be sure of the fit, and adjust the pattern for different ages by changing yarn or the number of rows. With careful steps and a little patience, you’ll end up with a beautifully made baby bonnet that everyone will admire!
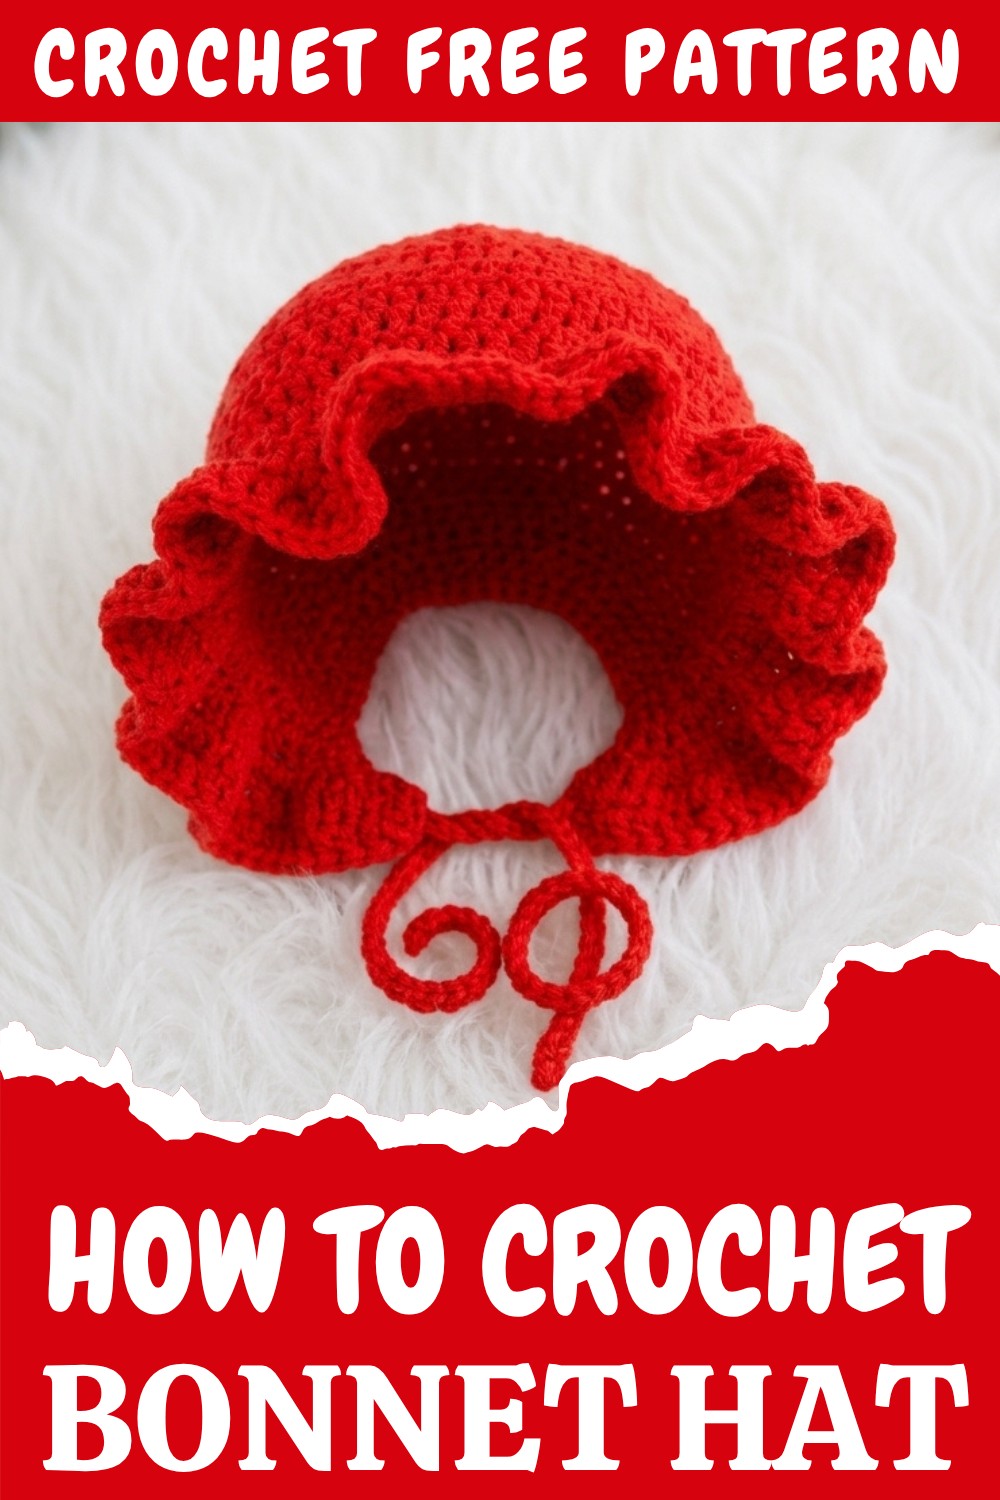
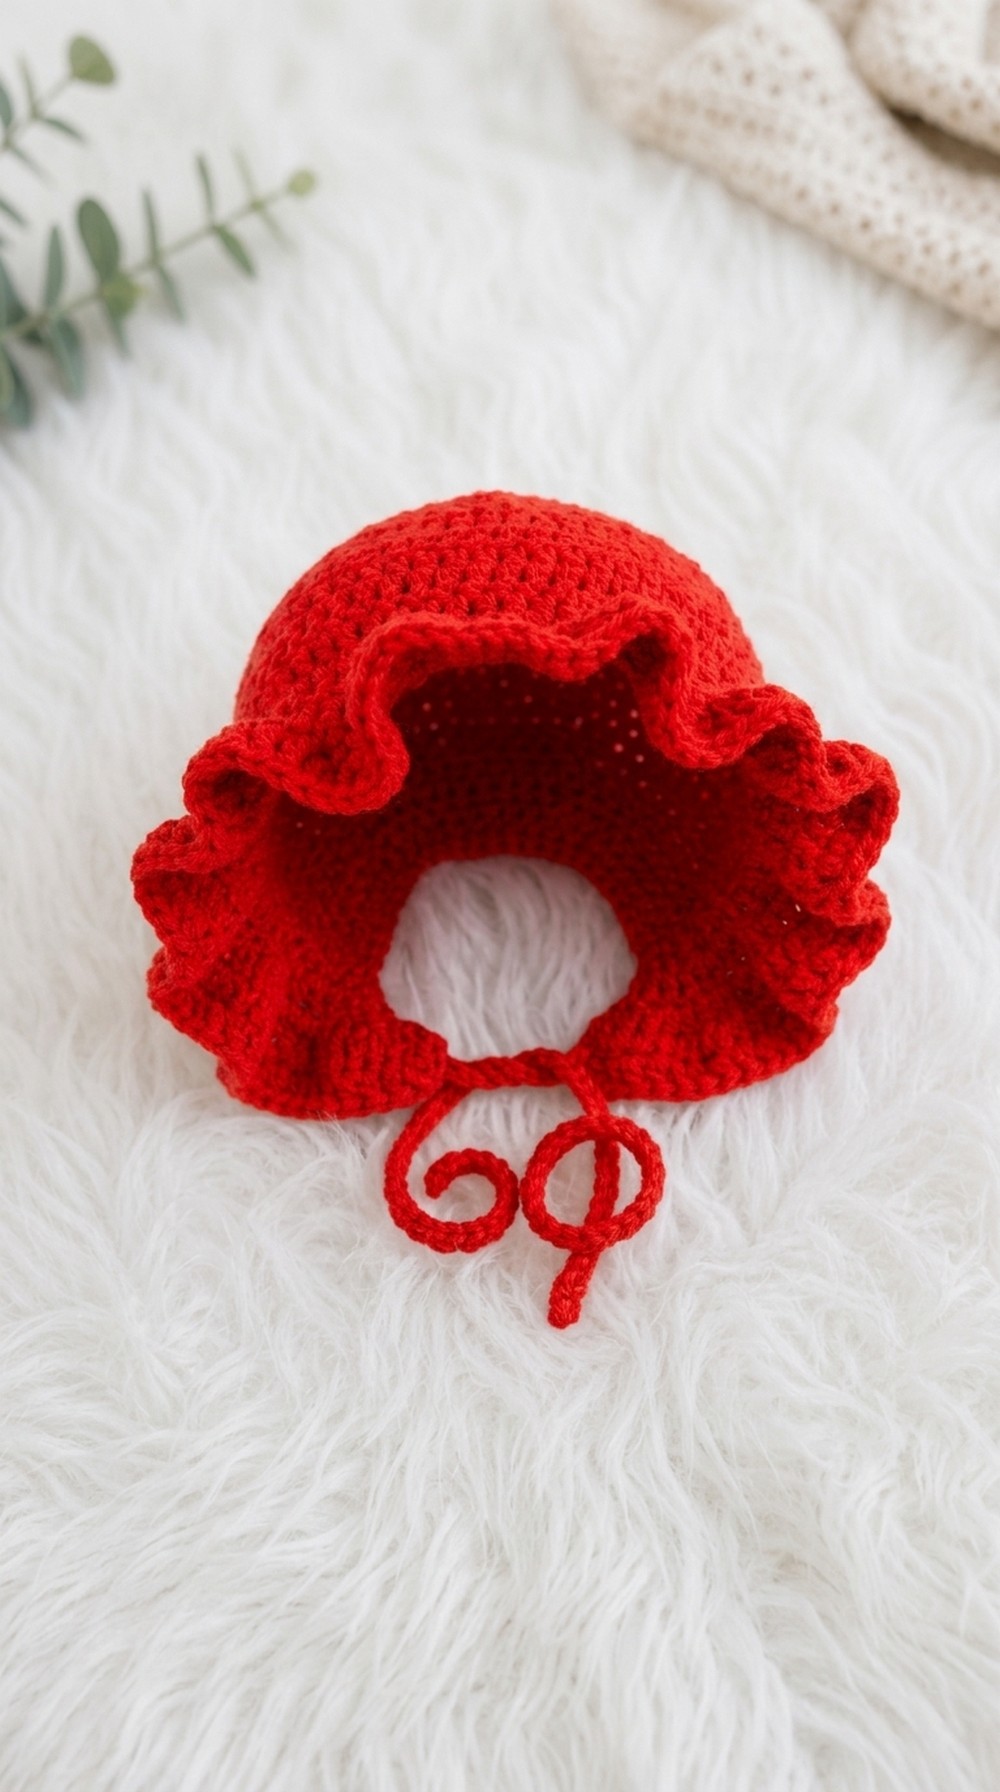
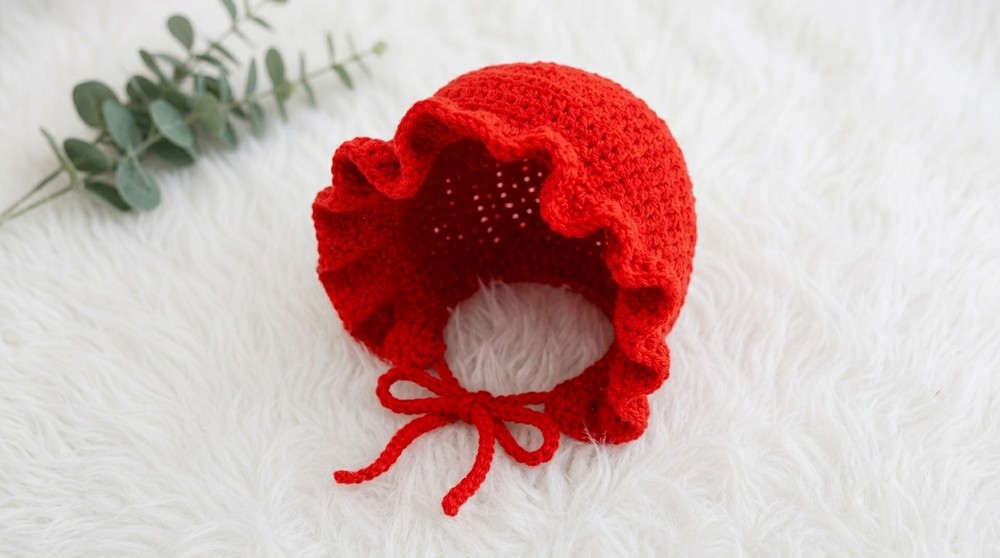
6-Month Baby Bonnet Crochet Pattern
This bonnet is designed for a 6-month-old baby and features classic shaping, easy lace edging, and a long tie for a secure fit. Pattern includes step-by-step instructions, explanations, and helpful tips.
Skill Level
Intermediate
This pattern involves working in the round, increasing, and simple shaping.
Materials
- Sakura milk cotton yarn (DK, 3 or 4 ply; Bright Red color recommended)
- 4 mm crochet hook
- Scissors
- Yarn/tapestry needle (for weaving and cleaning up ends)
Abbreviations (US Terms)
- ch = chain
- dc = double crochet
- sl st = slip stitch
- st(s) = stitch(es)
Special Notes
- The bonnet fits a 6-month-old (diameter ~13 cm, length from center to lace edge ~18.5 cm).
- Pattern starts with a magic ring and continues in rounds.
- The bonnet lace and tie are worked at the end.
- Each starting chain(s) in round counts as the first dc.
- If in doubt, carefully count your stitches after increases.
Pattern
Step 1: Magic Ring & First Round
- Make a magic ring.
- Ch 2 (counts as first dc).
- Work 11 dc into the ring. (Total: 12 dc including ch 2.)
- Pull the ring tight.
- Sl st to the top of the starting chain to close the round.
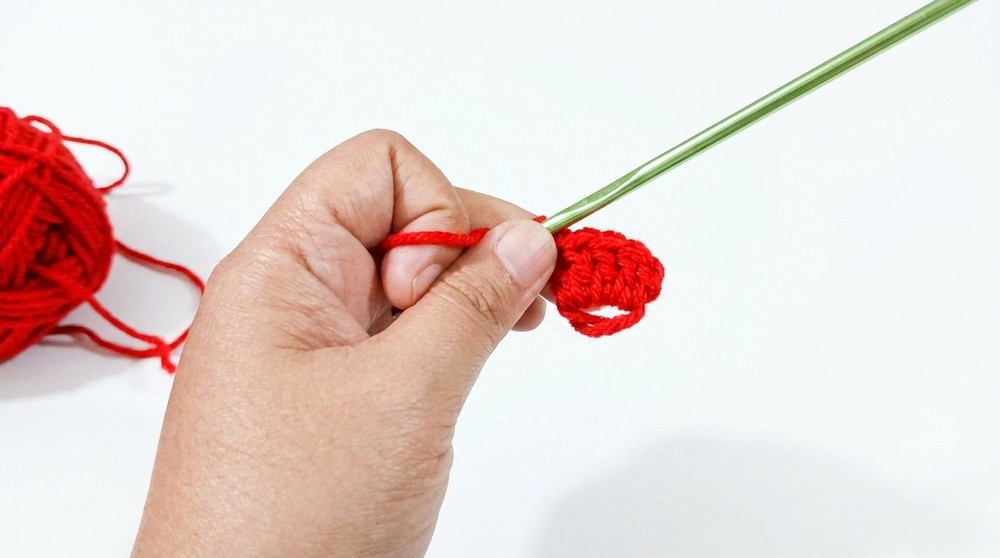
You’re forming the bonnet’s crown. The magic ring prevents a hole at the top. Always count your stitches—it will be 12.
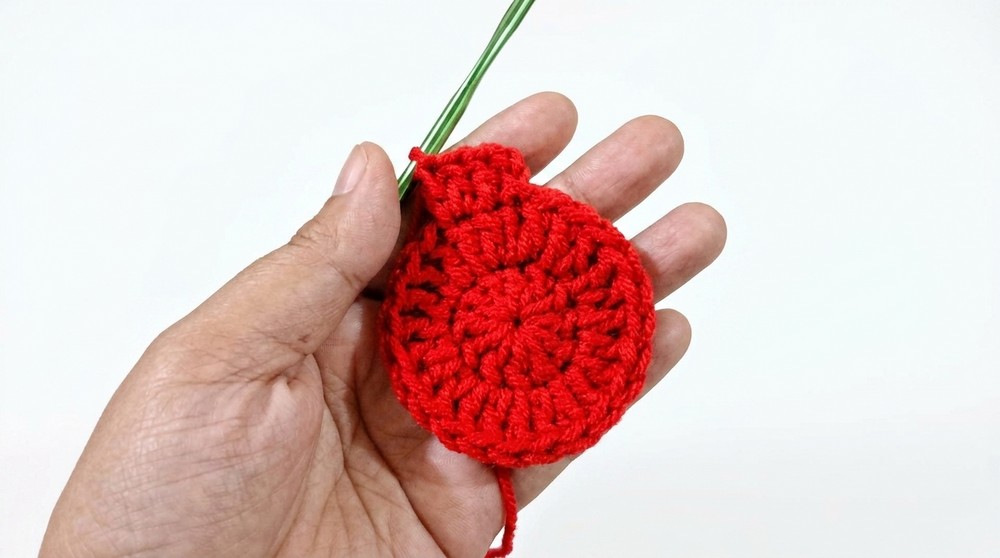
Step 2: Second Round (Increase)
- Ch 2.
- Work 2 dc in each st around (fill every stitch from previous with 2 dc).
- Sl st to join.
You are increasing in every stitch. This makes the bonnet wider and helps it fit the baby comfortably.
Step 3: Third Round (Increase Pattern)
- Ch 2.
- Work 1 dc in next st, 2 dc in the following st. Repeat around. (Pattern: 1 dc, 2 dc, 1 dc, 2 dc …)
- Sl st to join.
Alternating increases keep the bonnet expanding evenly. Count carefully after each repeat!
Step 4: Fourth Round (Increase Pattern)
- Ch 2.
- Work 1 dc in each of next 2 sts, then 2 dc in the next st. Repeat. (Pattern: 1 dc, 1 dc, 2 dc …)
- Sl st to join.
Spacing out the increases gives a smooth, rounded crown. The pattern grows slightly more gradually.
Step 5: Fifth Round (Increase Pattern)
- Ch 2.
- Work 1 dc in next 3 sts, then 2 dc in the next st. Repeat around.
- Sl st to join.
You are gradually spacing increases further apart, so the bonnet grows smoothly. After five rounds, your circle should measure about 13 cm in diameter.
Step 6: Rounds 6–14 (Body of Bonnet)
- Ch 2 (or ch 1 for a slightly tighter edge).
- Work 1 dc in each st around. No increases.
- Sl st to join at the end of each round.
Work these rounds as plain double crochet. There are no increases, so the bonnet forms a gentle curve. For each round, always chain to start and join at the end.
Step 7: Back-and-Forth Rows (Working Flat for Shape)
- To create the deeper bonnet shape, after Round 6, work back-and-forth rows (not in the round), turning at the end of each row.
- At the end of each row, ch 1 and turn, then dc across until row 14.
This method lets the bonnet cup around the head instead of being a flat circle. Always turn at the end and continue dcs.
Step 8: Lace Edge (Row 15)
- After row 14, ch 1 and turn.
- Work 1 dc in next 2 sts.
- In each subsequent st, work 2 dc until the last 2 sts.
- In each of the last 2 sts, work 1 dc.
- Ch 1 and turn.
This row forms the lacy, ruffled edge by increasing throughout and finishing neatly.
Step 9: Final Row (Lace Finishing)
- Ch 1 and turn.
- Work 1 dc in first st.
- In the next 7 sts, work 1 dc each.
- In the 8th st, work 2 dc in the same st.
- Repeat: (7 dc, 2 dc in the next st) until you finish the round.
- Finish with sl st and cut yarn.
These increases create a gentle wavy effect along the edge. Adjust your tension for neat lace.
Step 10: Making the Tie
- Attach yarn at one corner of the bonnet edge.
- Ch 150 (for a long tie—adjust length as desired).
- Cut yarn and fasten off.
- Weave in ends.
- Repeat on the opposite corner for a second tie if desired.
Use these chains to tie the bonnet under the chin or at the back. Use a tapestry needle to neatly thread the chains through the lace row (3rd row from the front).
Pattern Corrections & Tips
- If your increases are uneven, recount stitches or use stitch markers for key points.
- If bonnet is too large or too small, add or remove one round in the body section.
- Keep your starting chains tight at the crown to prevent holes!
- For a softer lace edge, use a lighter tension or smaller hook.
Conclusion
You have created a charming, classic baby bonnet sized for 6 months. The shaping is gentle, the lace edge is easy, and the ties are adjustable for a secure fit. With careful counting and neat finishing, your bonnet will be both beautiful and practical—perfect for gifting or everyday wear.