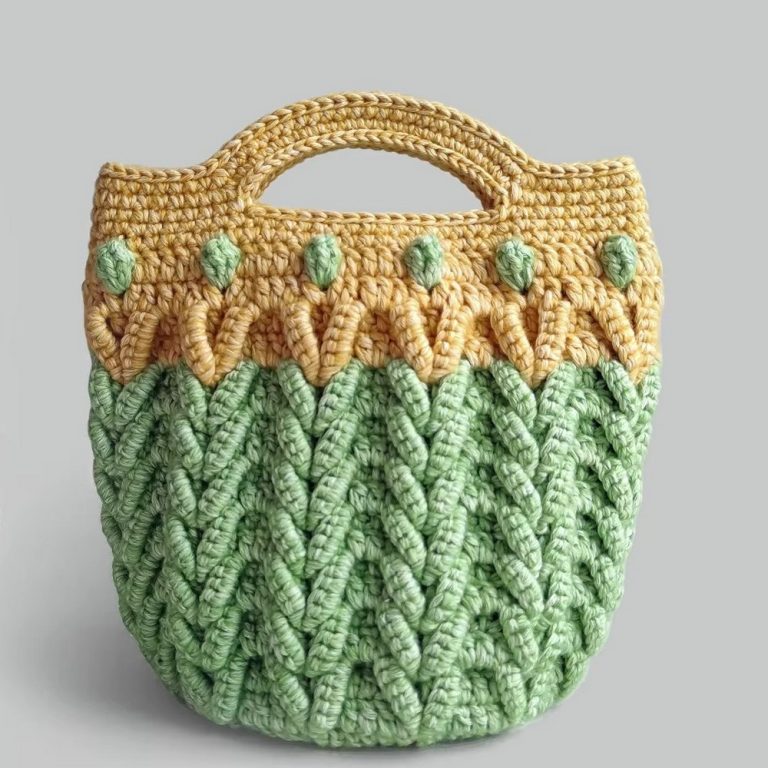
Ultimate Free Pattern for Crochet Crossbody Purse
Stylish and practical for everyday outings a free crochet crossbody handbag pattern lets you personalize your bag with simple instructions.
There’s something truly special about carrying a bag that feels both soft and sturdy in your hands. With playful texture and a chunky look this accessory turns any simple outfit into something stylish and unique. People love how easy it is to slip your phone wallet and little treasures inside for a quick trip to the market or a stroll with friends. Following a crochet crossbody handbag pattern means you get to make your very own creation picking your favorite color and size to fit your needs.
Crossbody Handbag Pattern Perfect for Casual Chic Looks
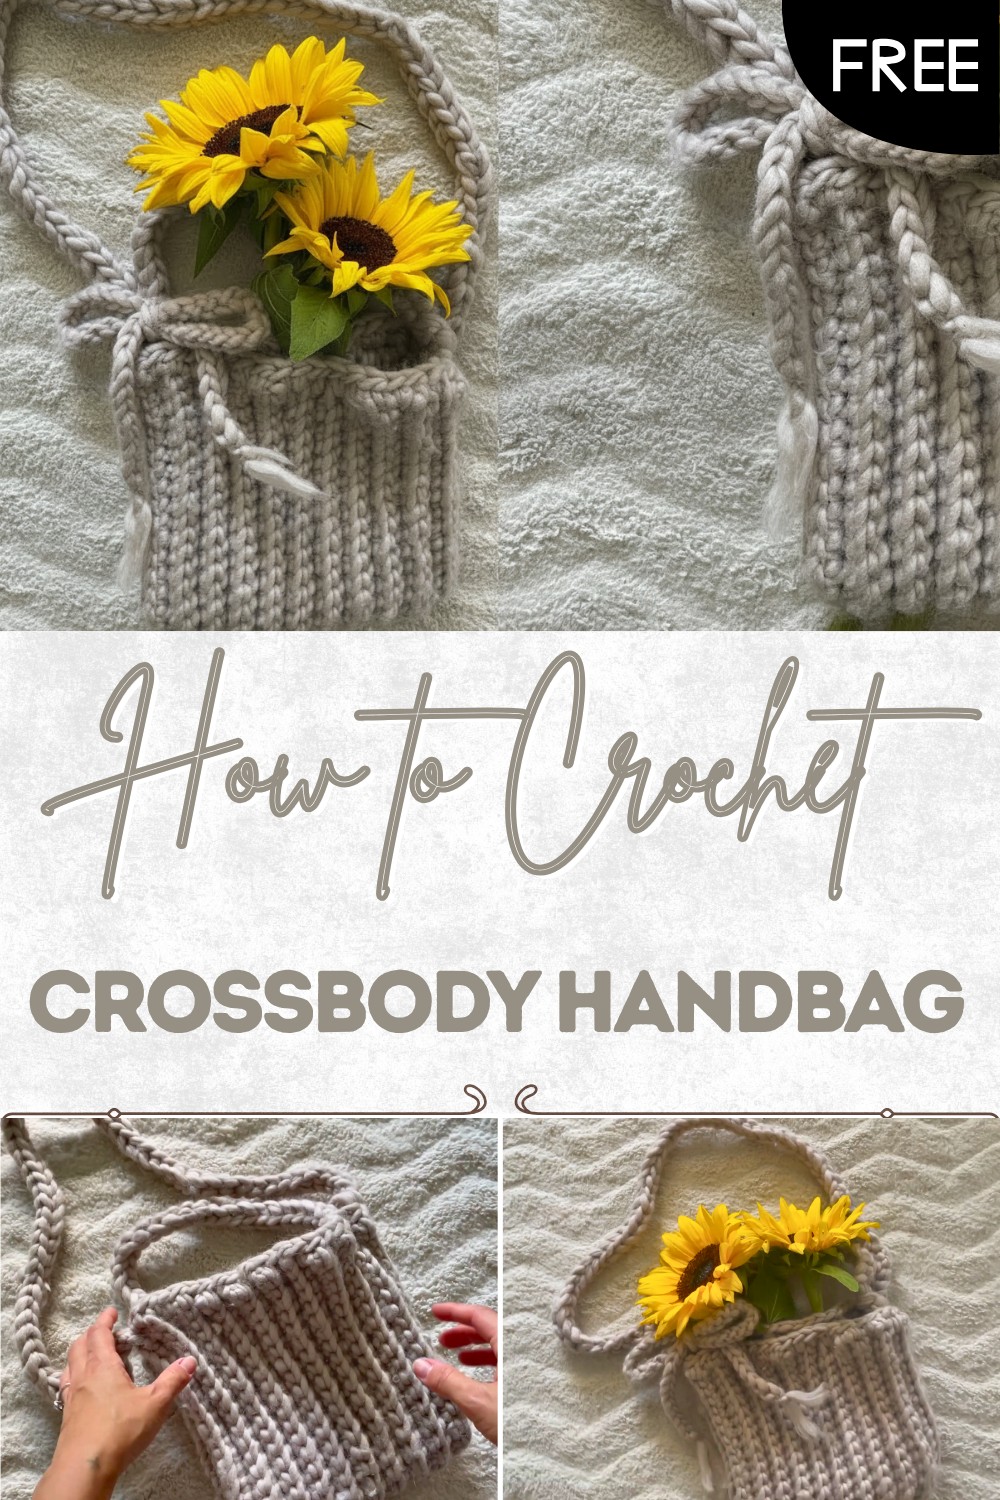
This bag is not just pretty to look at—it is strong, holds up well with daily use and feels comfortable across your body, leaving your hands free for other things. The wide strap sits easily on your shoulder and the ribbed look adds a special touch that people notice. Making this bag is not only fun but also brings a sense of pride every time you wear it.
Crochet Crossbody Handbag Pattern
Materials
- Yarn: Super chunky/bulky yarn (e.g., weight 6), approx. 1–2 skeins depending on bag size
- Crochet Hooks:
- 7.0 mm hook for body
- 10.0 mm hook for straps (or use largest comfortable for multiple strands)
- Notions:
- Scissors
- Yarn needle or small crochet hook (for weaving in thick ends)
- Measuring tape
- (Optional) Handmade label or bow embellishment
Key Abbreviations (US Terms)
| Abbreviation | Stitch Name |
|---|---|
| ch | chain |
| sc | single crochet |
| BLO | back loop only |
| hdc | half double crochet |
| sl st | slip stitch |
| st(s) | stitch(es) |
| rep | repeat |
Special Notes
- Size Customization: Chain is double the desired finished height of bag.
- Texture: All rows after Row 1 are worked in Back Loop Only (BLO) for a ribbed look.
- Stitch Count: Always work the last st at each edge to keep sides straight; use stitch markers if needed.
Pattern Instructions
1. Bag Body
Step 1: Foundation Chain
- With 7.0 mm hook, ch a length that is double the desired finished height of your bag.
Example: For an 18 cm tall bag, ch to approximately 36 cm (sample shown: ch ≈ 36 cm).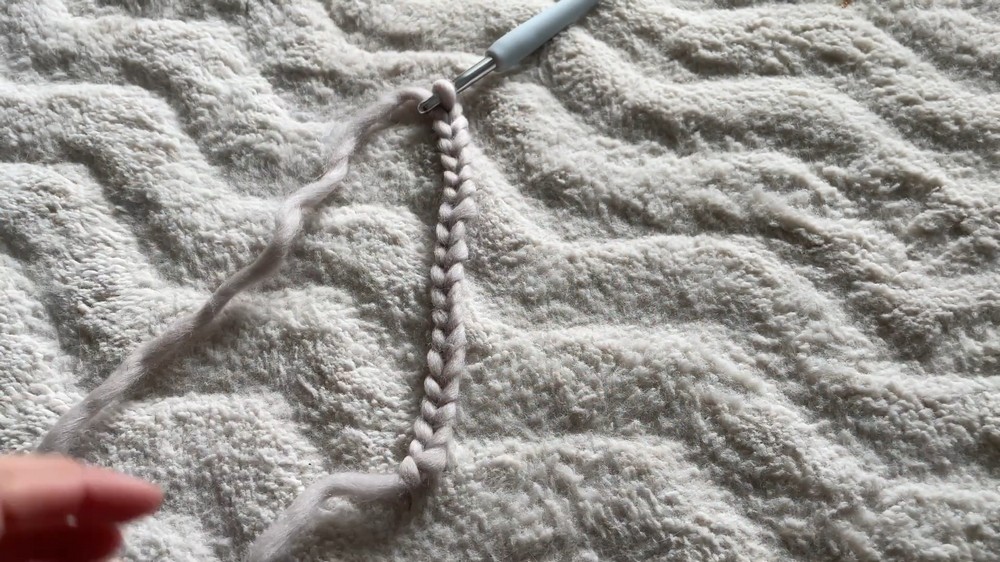
Step 2: Row 1 (Set-Up)
- Ch 1 (turning ch, does NOT count as a st), turn.
- Sc in 2nd ch from hook and in each ch across.
- (Tip: Count stitches and note number for every row).
Step 3: Row 2 and Onward (Ribbing)
- Ch 1, turn.
- BLO sc in each st across (work single crochet in the back loop only).
- Rep this row until the rectangle is as wide as desired for your bag.
(Sample finished rectangle: about 40 cm × 22 cm.)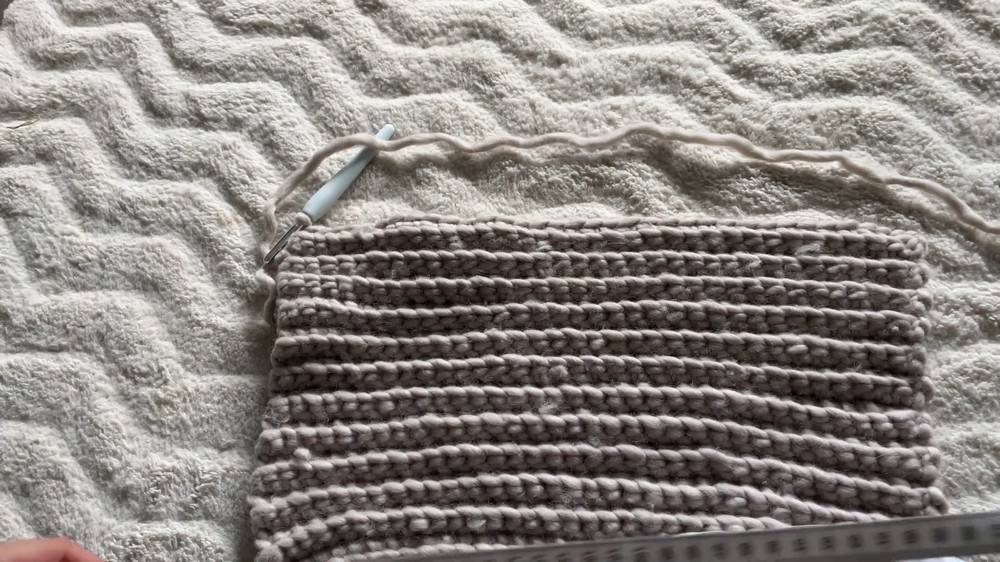
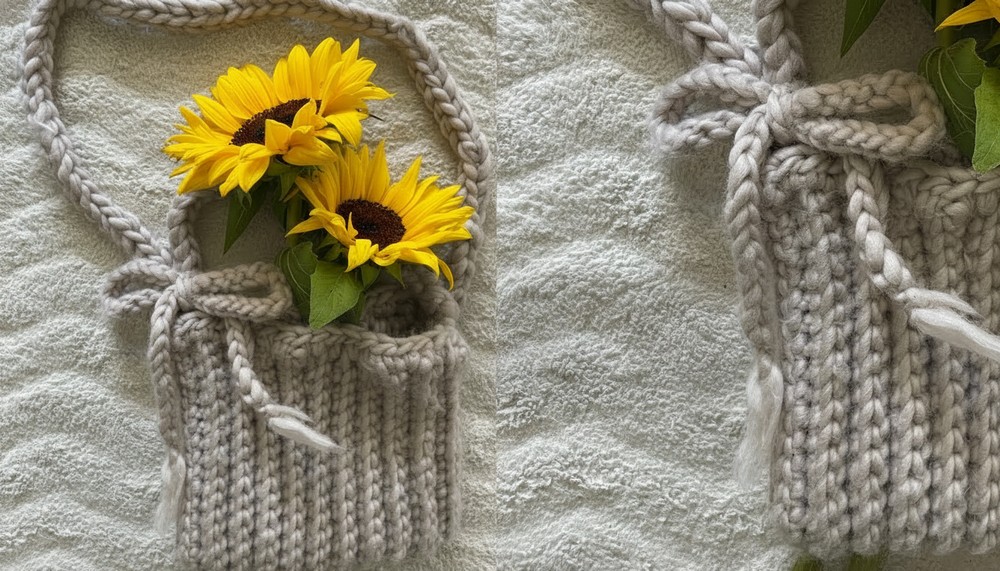
2. Bag Assembly
Step 1: Fold & Side Seams
- Fold bag in half (short side to short side) to form the shape.
- With a slip knot on your hook, align edges and sl st both sides together through the “V”s of both layers.
- For the first seam: Start at bottom corner, slip stitch up the side to the top edge.
- When finished, cut yarn, fasten off, and pull tight.
- Repeat for the other side starting from the bottom.
Step 2: Top Opening Edge
- At the bag opening’s top “mouth”, join yarn at any point.
- Ch 2, then work hdc evenly spaced around the opening.
- There are no defined stitches, so “force” your hook through spaces evenly across the edge.
- Join to your starting ch with a sl st, ch 1, cut yarn, pull through and tighten.
- Turn bag right side out.
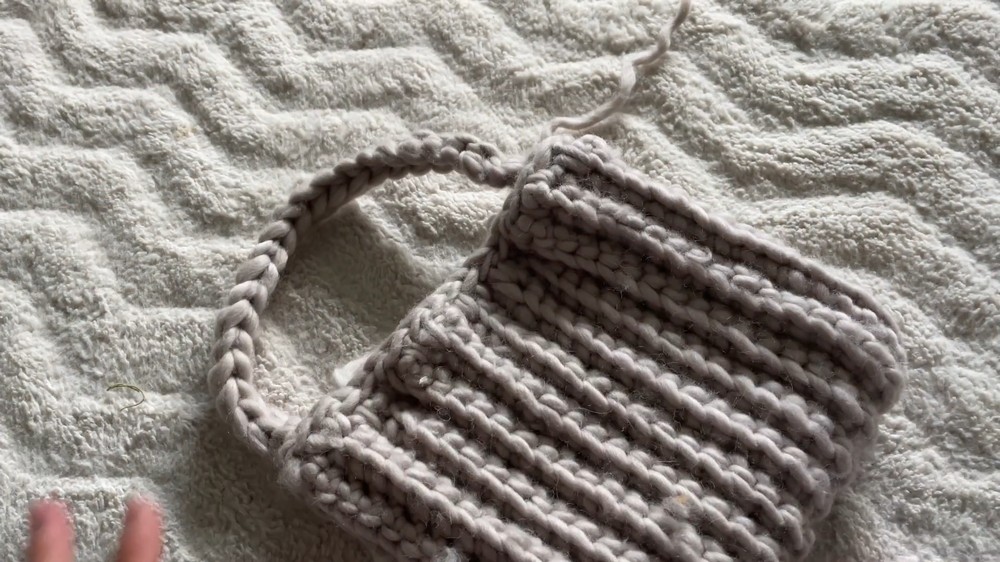
3. Creating the Straps
Short Handle
- Cut 4 equal long strands of yarn.
- With 10 mm hook, attach all 4 strands together at the bag’s top edge (through a seam for strength).
- Pull through and secure with a slip knot.
- For extra thickness, braid or use “cord” method:
- Divide the 4 strands in half.
- Insert hook between them.
- Bring front two strands over and to back, bring back two over and to front.
- Pull a loop through; repeat until desired length.
- When at end, pull all yarn through the final loop to secure.
- Attach to other side of bag using same method, secure with knots, weave in tails.
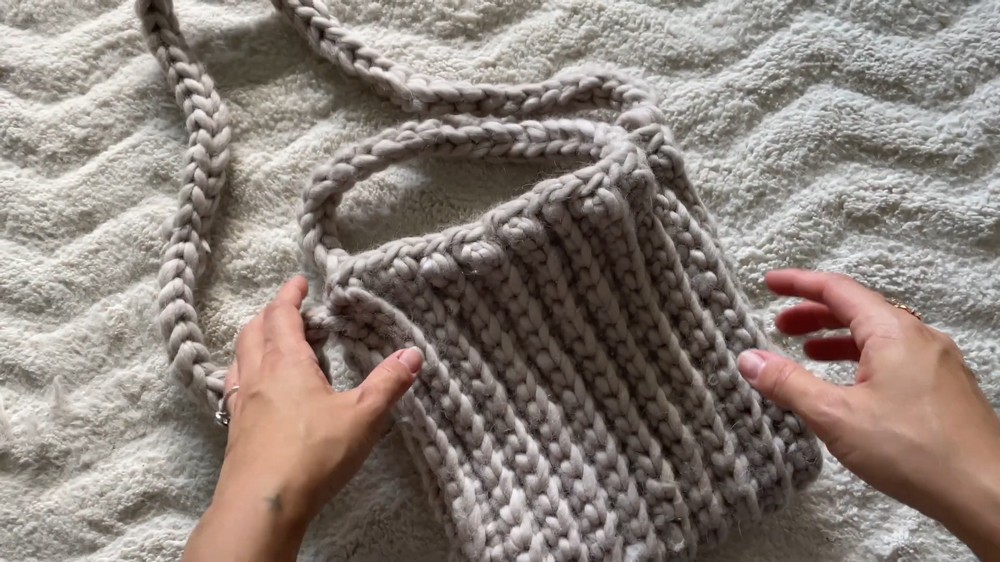
Crossbody Strap
- Repeat with another 4 (longer) strands for a long strap.
- Attach to side seam of bag using the same braided/cord method or a thick chain.
- Secure at opposite side, tie off, and weave in all yarn ends.
4. Finishing Touches
- Use yarn needle or hook to weave in all ends (for very thick yarn, pull tails through with small hook in several directions).
- (Optional) Attach a label or bow for embellishment:
- For a bow, crochet a long chain and tie in bow shape, then sew or knot onto a strap or bag.
- Double-check all knots are secure, and trim any excess yarn.
Pattern Correction & Tips
- Stitch Count: Be diligent about working both edge stitches in each row; missing them causes shrinkage and unevenness.
- BLO Only: Use back loop only for ribbed texture unless you want a normal solid fabric.
- Joining Sides: Align the top and bottom corners before slip stitching, and match up the “ridges”/rows for a neat seam.
- Strap Length: Try on before securing the strap ends—adjust for comfort.
- Finishing: If your yarn is very chunky and will not thread through a needle, always use a small crochet hook for weaving in.
Conclusion
Congratulations! You have completed a fast, trendy, and sturdy crochet crossbody bag with a beautiful ribbed texture and stylish chunky straps. This design is highly adaptable—adjust size and details as needed for your lifestyle. Add a bow, use multi-color yarn, or personalize as you wish.