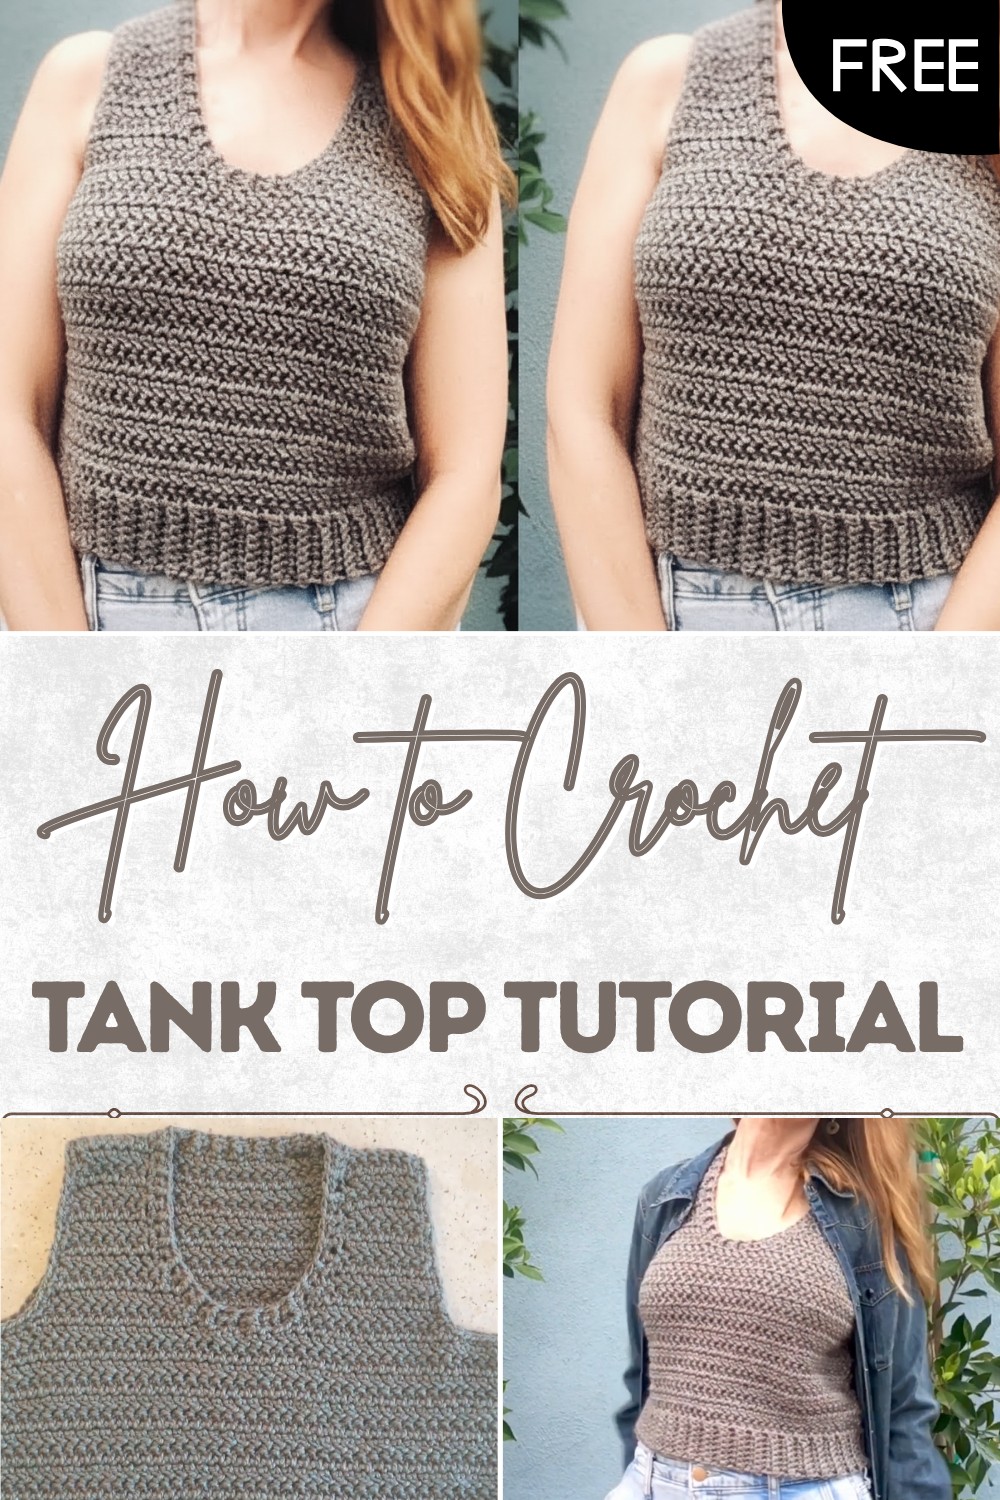
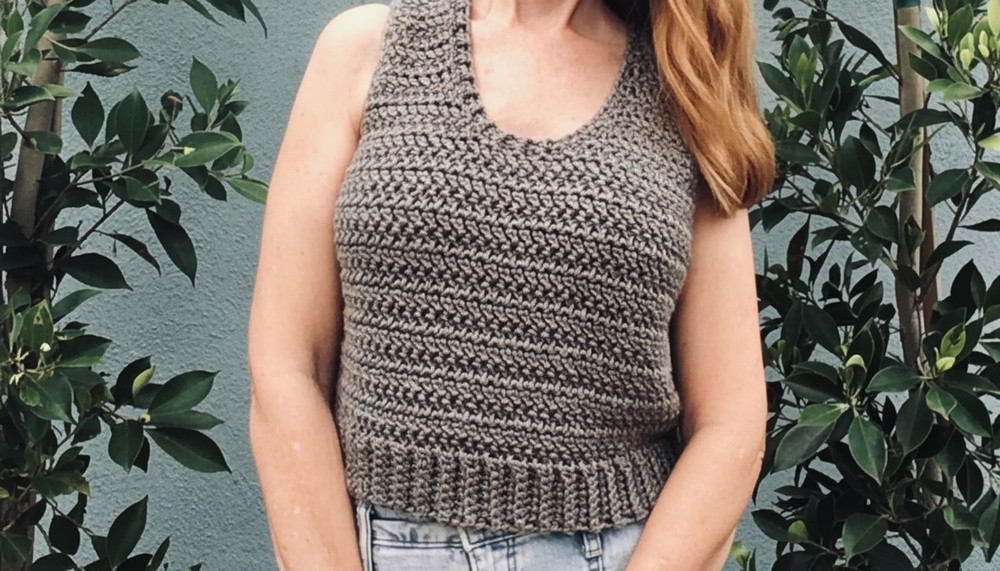
Lightweight Free Crochet Tank Top Pattern for Warm Days
Soft and breezy style shines with this free crochet tank top pattern, made for comfort and charm so you can feel confident in every outfit.
Sunshine on your skin feels even better when soft yarn wraps around you in a simple, beautiful design made just for comfort. Light as a feather, this gentle top feels cool and makes moving freely so easy, giving you confidence wherever you go. With easy shapes and pretty stitches, the crochet tank top pattern lets anyone create a stylish and practical piece that suits everyday adventures or special moments.
How to Crochet a Tank Top – Free Pattern Guide
Bright colors or soft tones make each top unique, and you can pair it with skirts, shorts, or even layer it under a jacket on chilly days. Stretchy straps and a smooth finish feel gentle on the skin and look lovely in any setting. This crochet tank top pattern is perfect for learning new skills and creating clothing you are proud to wear. Its beauty shines through the simple lines and open design, giving you both comfort and charm in one wearable treasure, loved by everyone who tries it.
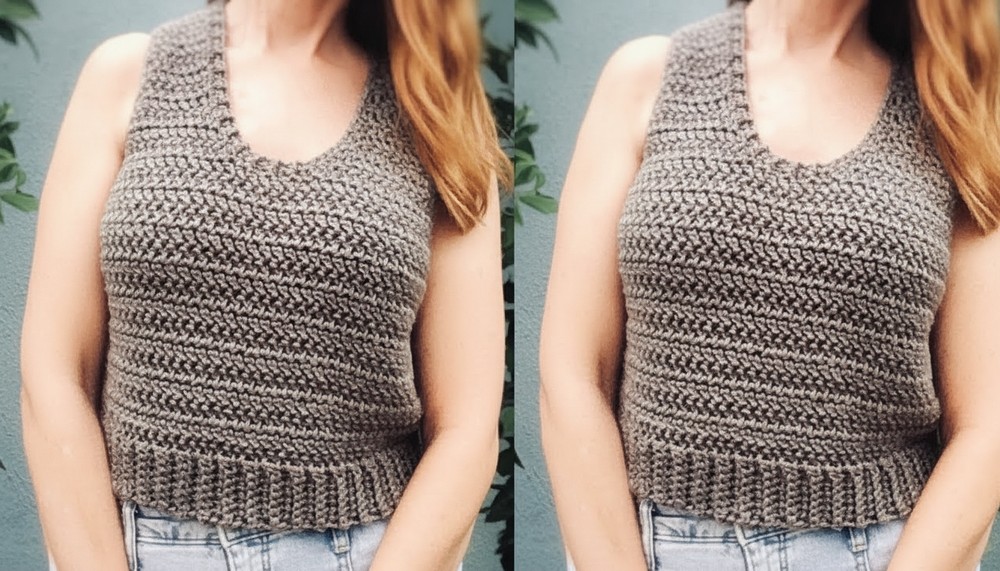
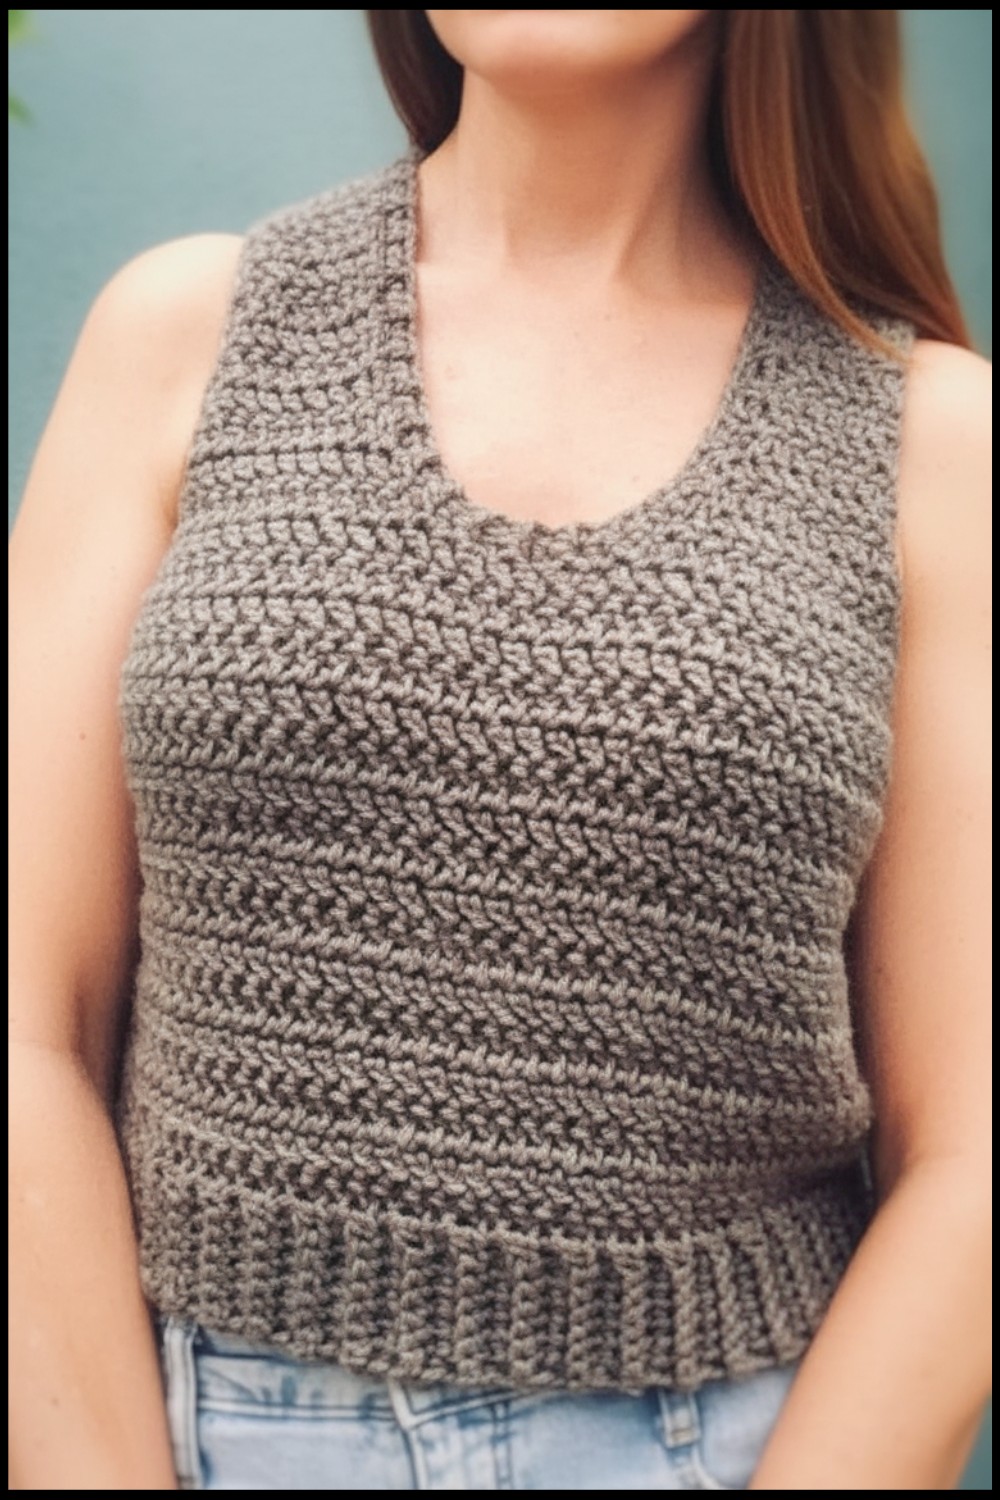
Herringbone Tank Top Crochet Pattern
Materials
- Yarn: Size 4 (Worsted Weight) yarn, approx. 200–300g depending on size
- Hooks:
- Size K (6.5 mm)
- Size J (6 mm)
- Size I (5.5 mm) (for neckline trim)
- Scissors
- Yarn needle (for seaming and weaving in ends)
- Stitch markers (optional)
- Measuring tape
Key Abbreviations (US Terms)
- ch = chain
- st(s) = stitch(es)
- sc = single crochet
- hdc = half double crochet
- sl st = slip stitch
- RS/WS = right/ wrong side
- FPHDC = front post half double crochet
- BPHDC = back post half double crochet
Special Notes
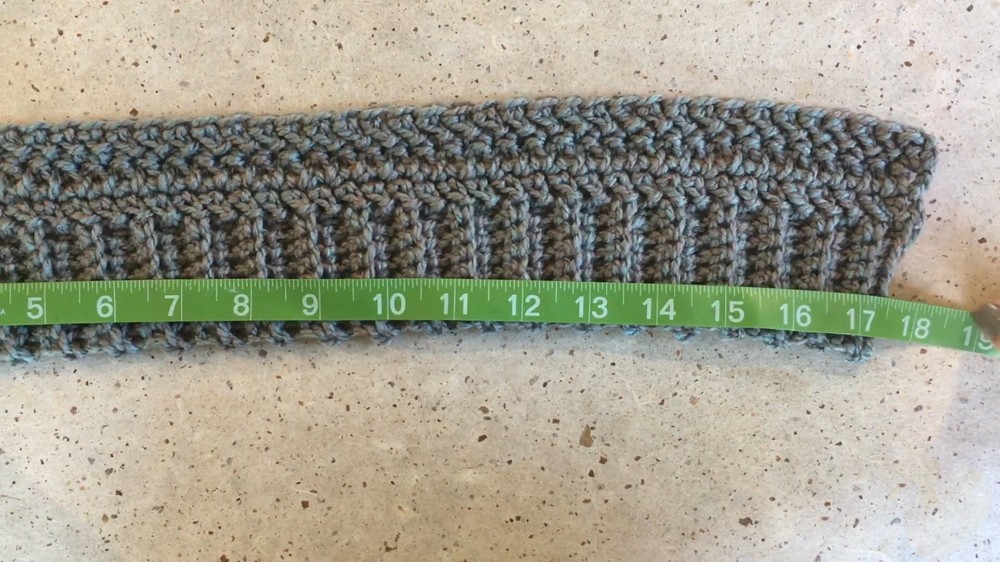
- Sample size: Small (approx. 18” wide, see instructions to adjust width)
- Gauge: Not specified; measure actual size after ribbing to ensure fit.
- Ribbing is worked widthwise first, then body is worked along the ribbing’s side.
- Herringbone Double Crochet is the primary stitch for body.
- Neckline and armholes are finished with post stitch and single crochet edging.
Special Stitches
Herringbone Double Crochet (HBdc)
- Yarn over, insert hook in stitch, yarn over, pull through stitch and the first loop on your hook (like a sl st).
- Yarn over, pull through one loop (ch 1).
- Yarn over, pull through remaining two loops.
Extended Single Crochet (for last st in HBdc row)
- Insert hook into final stitch, yarn over, pull up a loop.
- Chain one (yarn over, pull through first loop).
- Yarn over, pull through both loops on hook.
Pattern Instructions
1. Bottom Ribbing (Make 2 panels: Front & Back)
With size J/6 mm hook:
- Ch 8.
- Row 1: Sc in 2nd ch from hook and in each across (7 sts). Ch 1, turn.
- Row 2: Sc in back loop only (BLO) of each st across (7 sts). Ch 1, turn.
- Repeat Row 2 until ribbing measures your desired width (even number of rows: e.g., 46 rows ≈ 17”–18”).
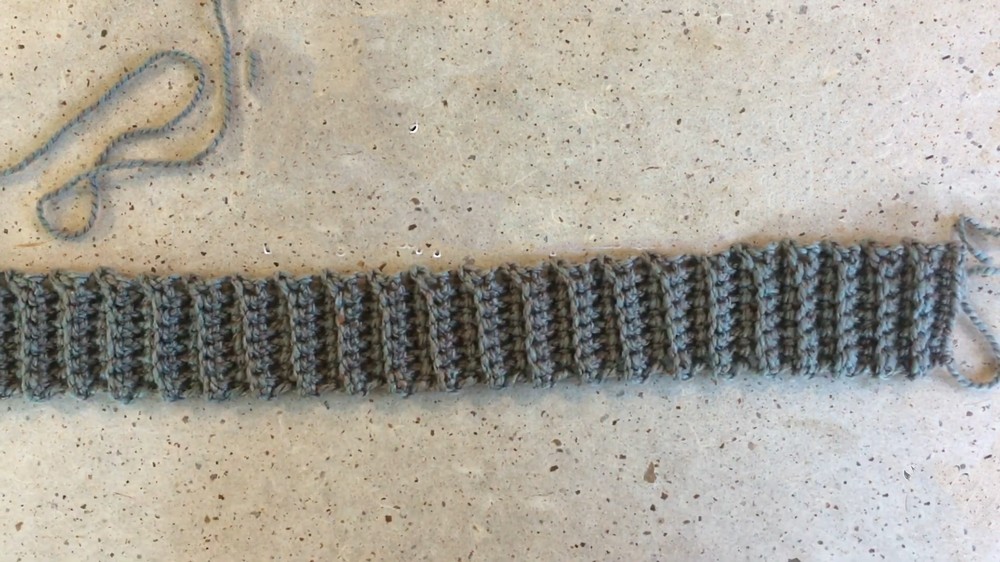
- Note: Body will add ~2” in width.
- Do not fasten off.
2. Body (Herringbone Double Crochet)
Switch to size K/6.5 mm hook.
- Row 1 (Set-up Row):
- Ch 1; turn to work across long edge (side) of ribbing.
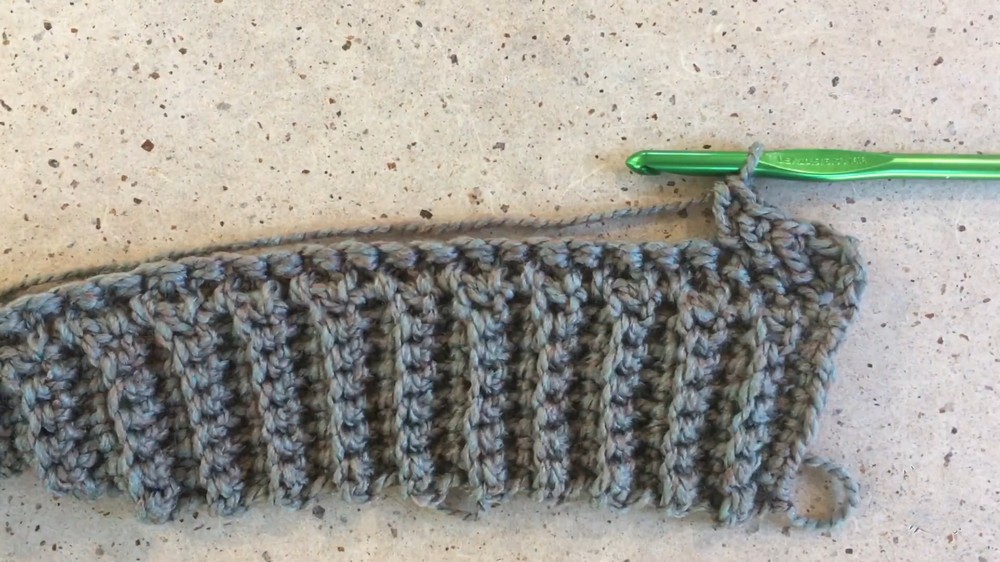
- Work 1 HBdc in each row end across ribbing (aim for center of each rib ridge), ending with an extended sc in the last stitch. (E.g., 45 HBdc + 1 extended sc = 46 sts per row for 46-row ribbing.)
- Ch 1; turn to work across long edge (side) of ribbing.
- Row 2:
- Ch 1, turn. HBdc in each stitch across; end with an extended sc in final stitch.
- Repeat Row 2 until work measures 8 inches tall (or desired armhole depth).
- Check width: Should measure about 18” for a Small (adjust ribbing as needed before proceeding).
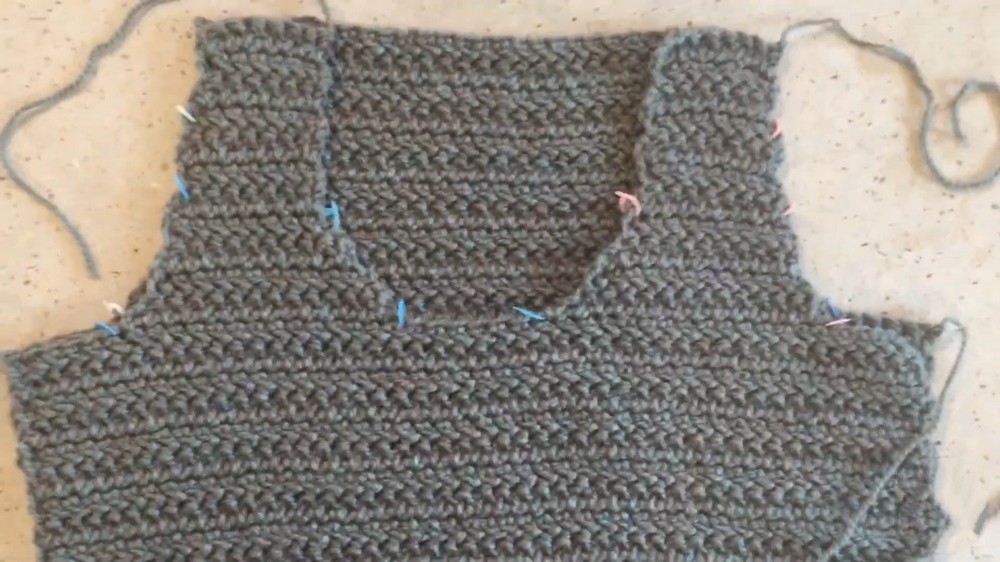
3. Armhole & Neckline Shaping
Front (and Back, with different shaping as noted)
- When body is correct height, fasten off leaving long tail.
- Mark armhole/neckline:
- Use stitch markers to mark in from each side (e.g., 6 stitches from each edge for armholes, 6 in the middle for neckline).
- Straps/Arm Shaping:
- Rejoin yarn at first armhole marker on RS, ch 2 (does NOT count as st).
- HBdc in each st to last two sts before next marker.
- For last two sts: Start HBdc in penultimate st, leave unfinished; insert into final st, pull up loop, ch 1, YO, pull through all 3 loops together (decrease).
- Ch 2, turn.
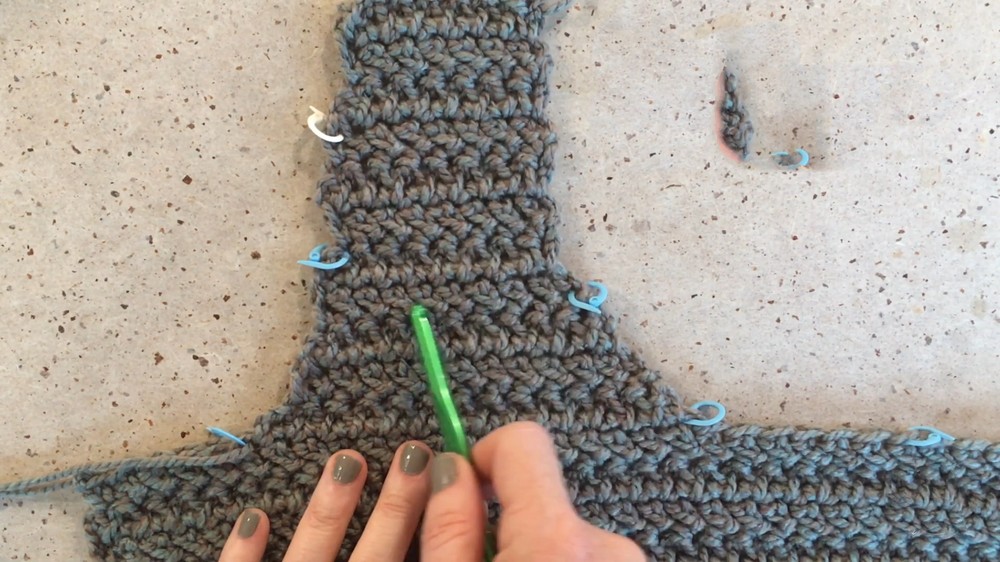
- Next row: Begin with decrease (as above), HBdc across to last two sts, decrease.
- Continue shaping as:
- Rows 1–2: Decrease at both ends
- Rows 3–4: Decrease at neck only
- Row 5: Decrease at armhole only
- Even rows as needed (final straps should have ~7 sts)
- Repeat same for opposite side of front and for back, adjusting shaping to your preference (back scoop or straight).
4. Seaming
- With WS together, seam shoulders and side seams using yarn needle and long tails.
5. Neckline Trim
Switch to size I/5.5 mm hook.
- Join with sl st at back neck (slightly off-center).
- Ch 1, hdc evenly around entire neckline; join with sl st.
- Next round:
- Ch 1 (do not turn), FPHDC around next st, BPHDC around next st, rep from * to * around, join with sl st.
- Fasten off, weave in ends.
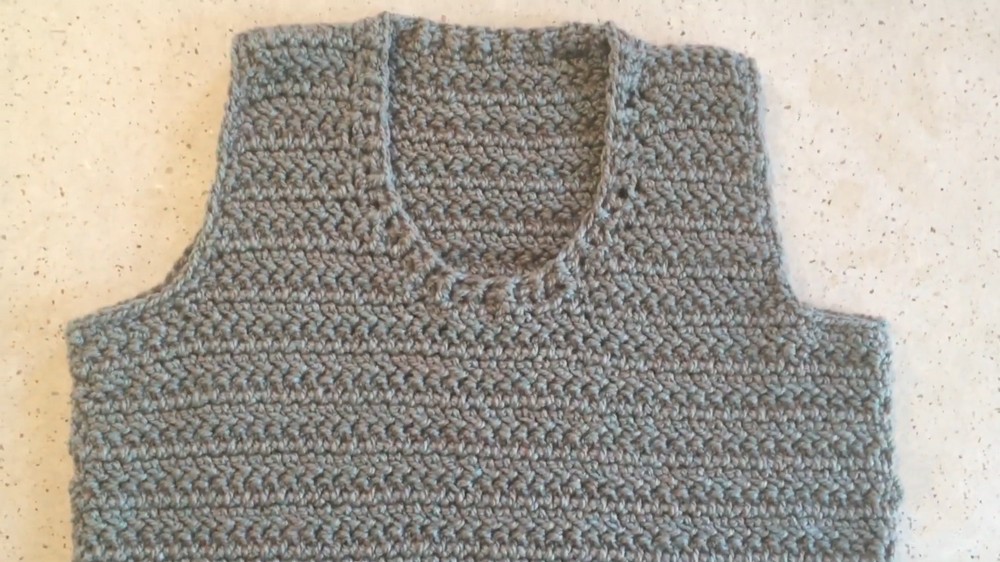
6. Armhole Edging
- With same I/5.5 mm hook, sc evenly around each armhole opening; join with sl st.
- Fasten off, weave in all ends.
Conclusion
You have completed a modern herringbone tank, perfect for layering in any season! Adjust size by changing ribbing length and/or body rows as desired.
Pattern Correction & Tips
- Correction: Remember to keep body row count identical for front and back and double-check shaping rows.
- Tip: For a custom fit, block your pieces before seaming.
Always check tank top width after a few rows of herringbone stitch—adjust ribbing if needed. - Neat Edges: Use a beginning chain-1 on every HBdc row and end with an extended sc for clean, straight sides.
- Yarn Choice: Use a true worsted-weight yarn for best stitch definition and drape.