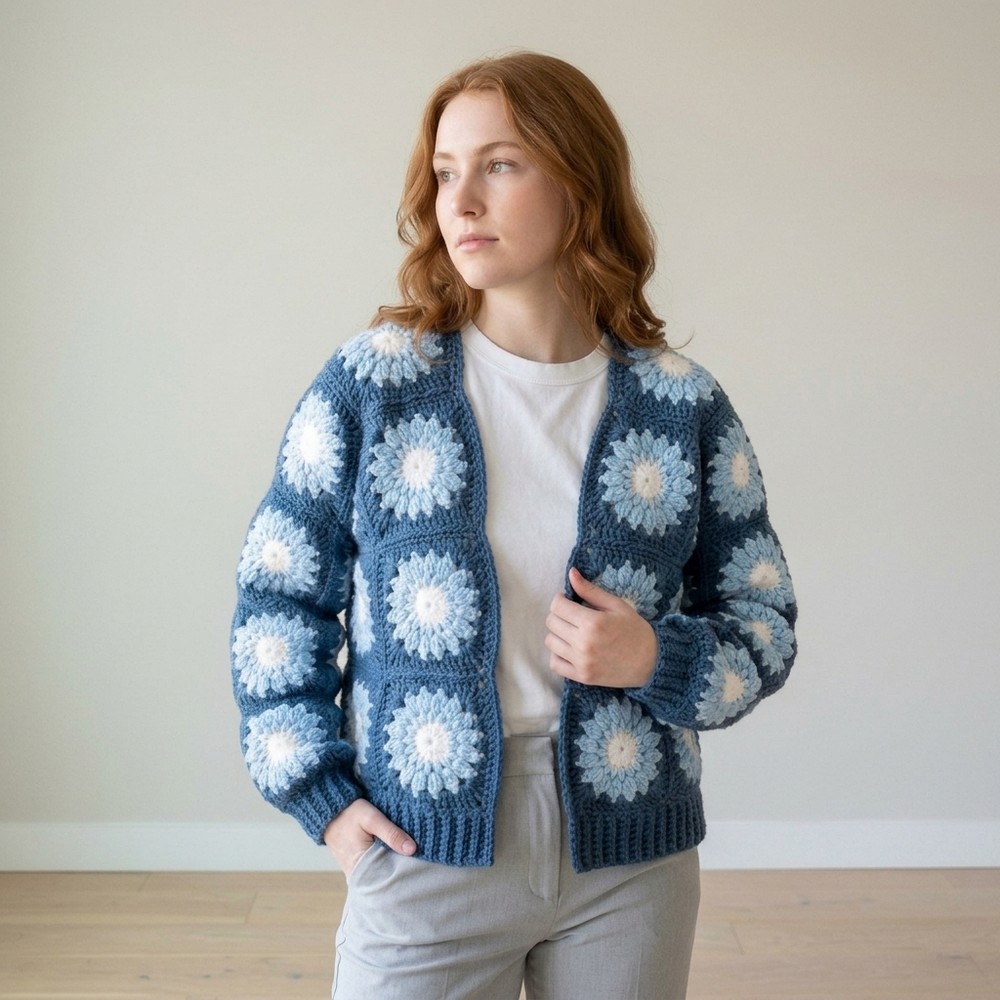
Crochet Sunflower Cardigan Free Step by Step Pattern
Enjoy cozy comfort with this free crochet sunflower cardigan pattern that creates sunny style spreads warmth and complements every look.
Sunlight seems to shine through every thread as a cheerful piece takes shape with warmth and charm. The Crochet Sunflower Cardigan pattern transforms simple materials into a bright and inviting garment that feels cozy and looks full of life. Its sunflower-inspired details add a touch of nature’s beauty, making the cardigan perfect for casual outings, layering over everyday clothes, or gifting to someone who appreciates cheerful style. The soft texture and thoughtful design provide comfort while allowing freedom of movement, so it is practical as well as attractive.
Crochet Sunflower Cardigan – Free Crochet Pattern
The instructions are simple enough for beginners, offering a satisfying project that results in a wearable piece filled with personality. Each part of the cardigan adds color, charm, and a sense of accomplishment, giving the wearer both style and comfort. This handmade creation combines warmth, creativity, and visual appeal, making it a joyful addition to any wardrobe.
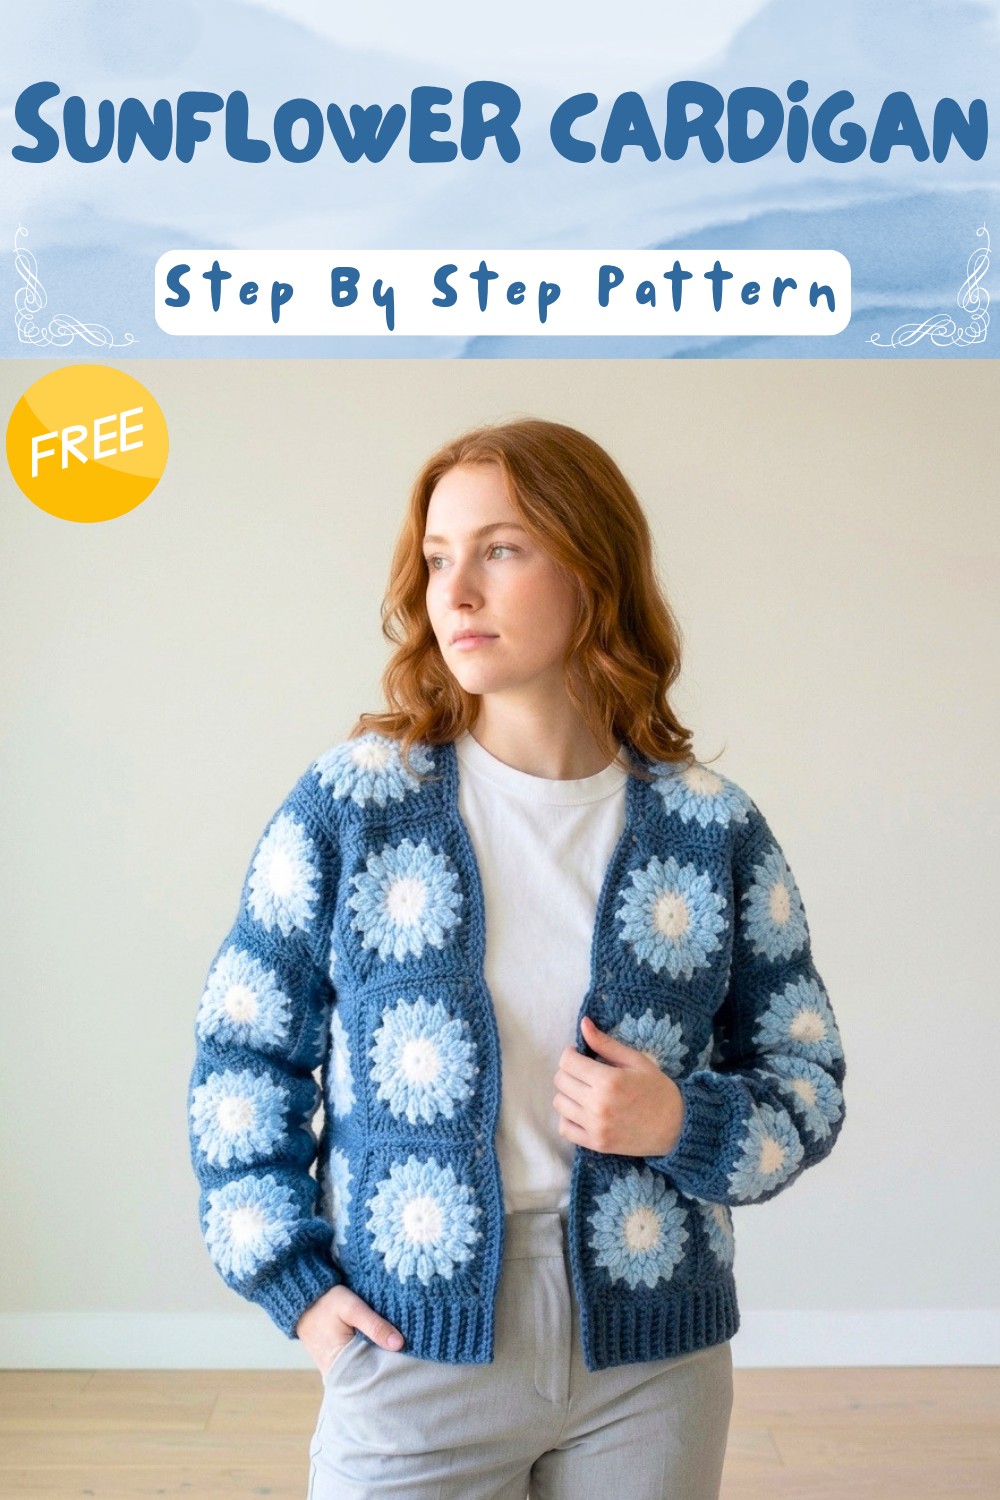
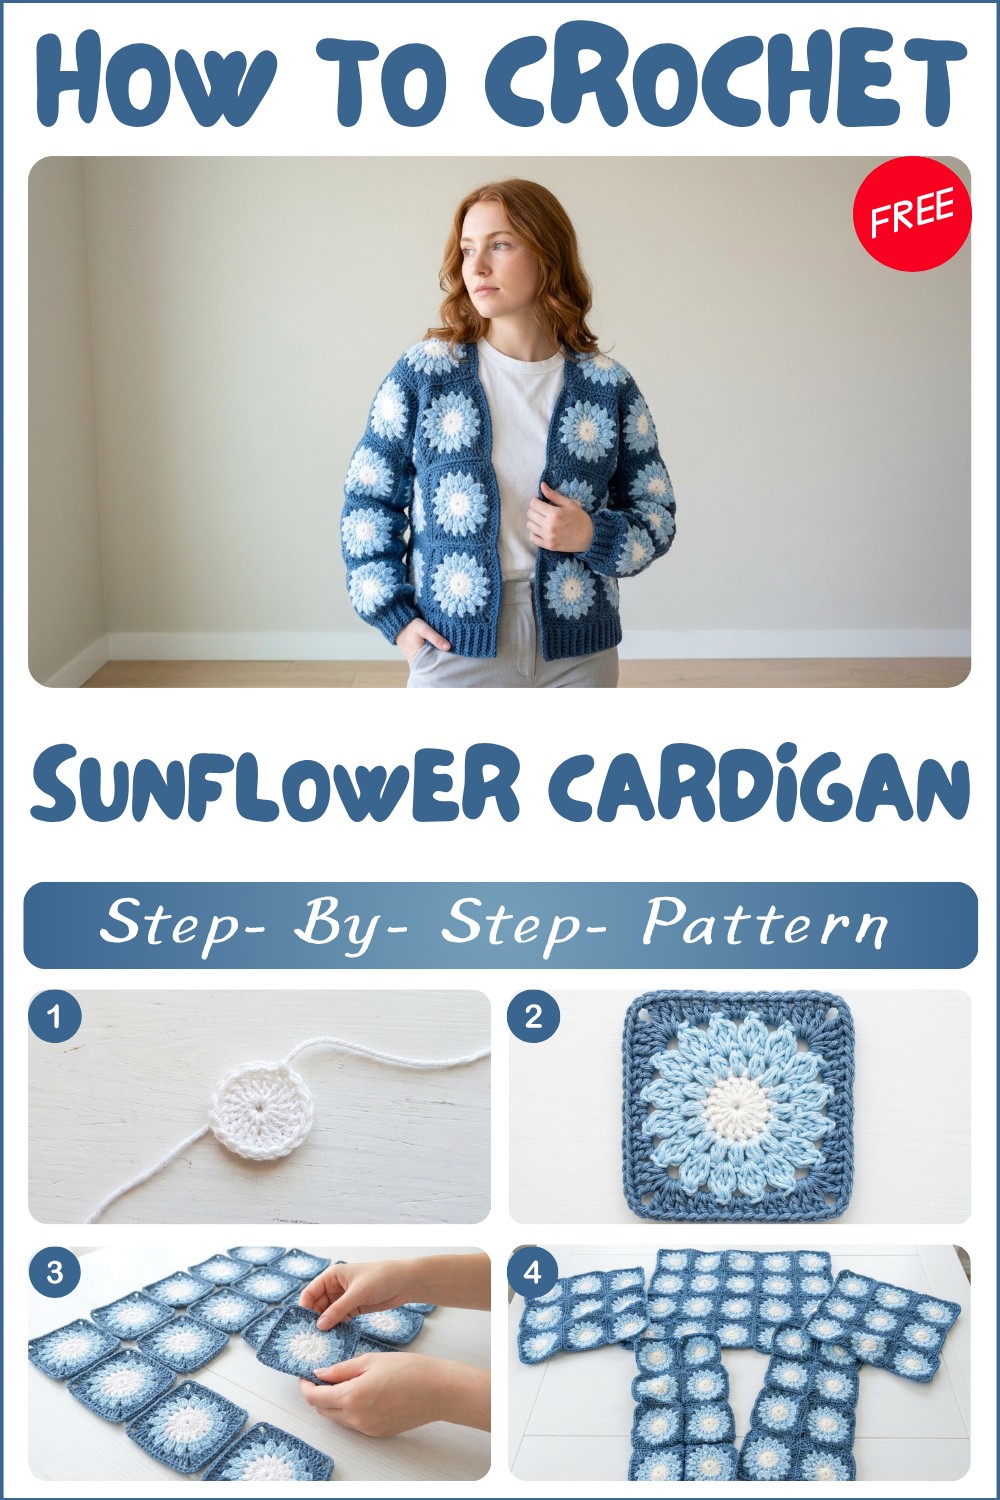
Sunflower Granny Square Cardigan—Step-By-Step Pattern
Pattern Notes
- Sweater is made from flower granny squares sewn together; construction is highly modular.
- Make all squares before assembling, then join in panels (back, fronts, sleeves).
- Granny squares use a mix of stitches: magic ring, double crochet, puff stitch, unfinished double crochet, treble, double, and half double crochet.
- Ribbing and borders added at the end for a polished finish.
- Work all joining seams on the wrong side for neatest appearance.
- You may use either the crochet hook or yarn needle join method.
Quick Overview
Bring sunshine to your wardrobe with this Sunflower Granny Square Cardigan! Using the iconic granny square, but with a bold sunflower motif, this cozy, whimsical sweater is the perfect stash-buster and a sure conversation starter. Constructed from cheerful squares in rich brown, gold, and green, every step is beginner friendly. Make all your squares, seam them together, and complete with a ribbed border for the perfect fit. This tutorial walks you stitch-by-stitch through making each square, assembling panels, and finishing your sunflower cardigan.
Skill Level
Confident Beginner / Intermediate
You’ll need to know how to:
- Work in the round
- Magic ring
- Basic increases
- Puff stitches
- Join squares
If you’ve never tried these before, check out video tutorials for basics, and follow this pattern closely!
Materials
- Yarn (Medium/Aran/Weight 4):
- White (“soil brown”) for sunflower center
- Sky Blue for petals
- Dark green for leaves/border/joining/seams
- Hook: 5mm (US H/8) crochet hook
- Other:
- Scissors
- Yarn (tapestry) needle
- Clips or stitch markers (optional, to lay out squares)
Measurements / Sizing
- Each square is approx. 5 in. (13 cm) across.
- Sample (Size Small): uses 54 squares:
- 9 squares per sleeve
- 8 squares per front panel
- 20 squares for back panel
- Add/remove squares or use different weights/hook sizes to adjust finished dimensions.
- Layout: See assembly section for schematic.
Gauge & Stitch Pattern
- No strict gauge; each square should be close to 5” wide.
- If your squares are larger/smaller, adjust hook size.
- Main stitches: double crochet, puff stitch, treble crochet, half double crochet.
Stitch Abbreviations
- ch = chain
- dc = double crochet
- hdc = half double crochet
- tr = treble crochet
- sc = single crochet
- sl st = slip stitch
- MR = magic ring
- st(s) = stitch(es)
- rep = repeat
Special Stitches
- Puff Stitch (PS): Yarn over, insert hook in st, pull up a loop, [yarn over, insert hook in same st, pull up a loop] x2 (3 insertions, 7 loops on hook), yarn over, pull through all.
- Unfinished Double Crochet: Yarn over, insert hook, pull up loop, yarn over, pull through 2 loops; leave unfinished, repeat as instructed, then yarn over and pull through all loops on hook.
The Crochet Pattern!
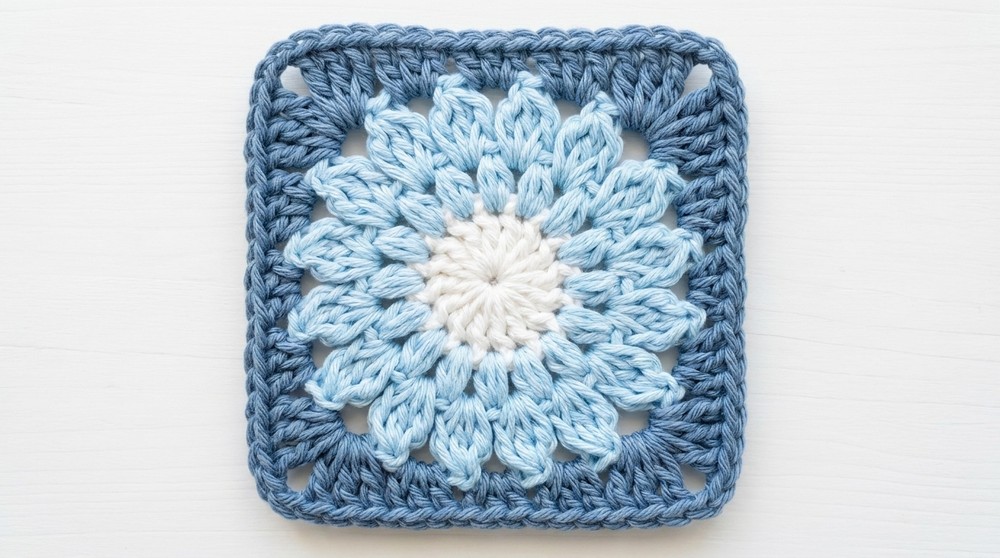
Making Sunflower Granny Square
A. White Center
- Form a Magic Ring:
Wrap brown yarn around two fingers. Insert hook under first strand, catch the second, form a “U,” then catch the rear strand and pull through to make a loop; slide off fingers. - Round 1:
- Ch 2 (does not count as st).
- Work 16 dc into the ring.
- Pull tail to close.
- Sl st into 2nd dc made.
- Fasten off brown, ch 1, and cut yarn.

B. Sky Blue Petal—Puff Stitch Round
- Attach yellow to any dc.
- Join:
- Create a slip knot with yellow.
- Insert hook into any dc, pull through sl knot.
- Ch 2.
- Puff Stitch in same st:
- Yarn over, insert hook, pull up loop (3 loops).
- Yarn over, insert hook, pull up loop (5 loops).
- Yarn over, insert hook, pull up loop (7 loops).
- Yarn over, pull through all 7 loops.
- Ch 1.
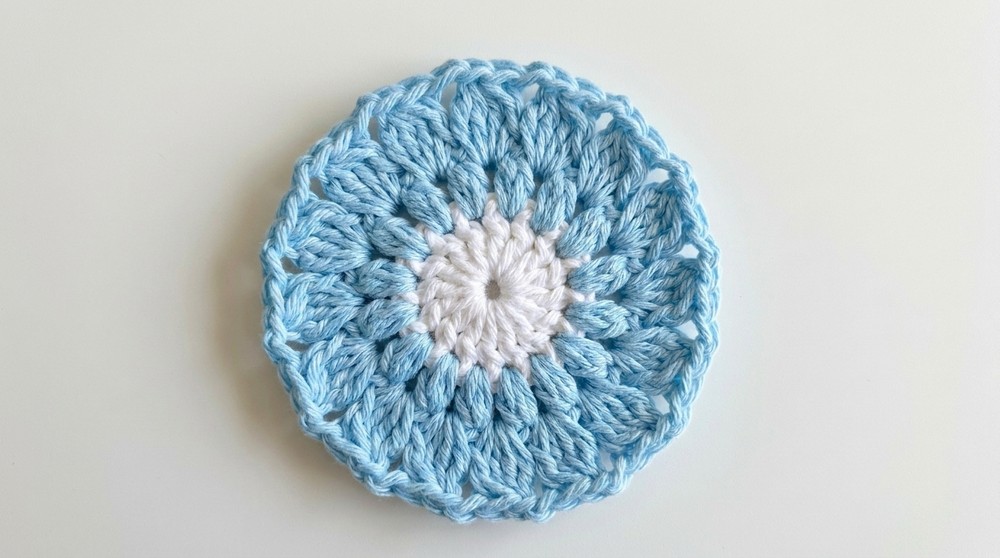
- Rep: Work a puff st (see Special Stitches) + ch 1 in each st around (16 total).
- At round end, sl st in first chain space.
C. Petal Round 2—Unfinished Double Crochet
- Ch 2.
- In each ch space, work as follows:
- In same ch space, [Yarn over, insert, pull up loop, yarn over, pull through 2] x4 (do NOT finish any dc; after 4 you have 5 loops on hook).
- Yarn over, pull through all 5 loops.
- Ch 2.
- Repeat around (1 petal in each ch-space).
- After last petal, ch 2, and sl st into first chain space of round.
- Fasten off yellow.
D. Dark Green Sunflower Square Border
- Join green yarn in any chain space.
- Secure with knot if desired.
- Ch 4 (counts as first tr).
- In same ch space, work (tr, tr) (3 total tr).
- Ch 2 (corner space).
- In same chain space: (tr, tr, tr) (making 6 tr in total with ch-2 in between).
- In next ch space: 3 dc.
- In next ch space: 3 hdc.
- In next ch space: 3 dc.
- Next ch space: Repeat (corner)—6 tr with ch-2 in middle as before.
- Continue this way around square—each corner is: [3 tr, ch 2, 3 tr], short sides are [3 dc, 3 hdc, 3 dc].
- At round end, sl st into top of beginning ch-4.
- Fasten off, weave in all ends.
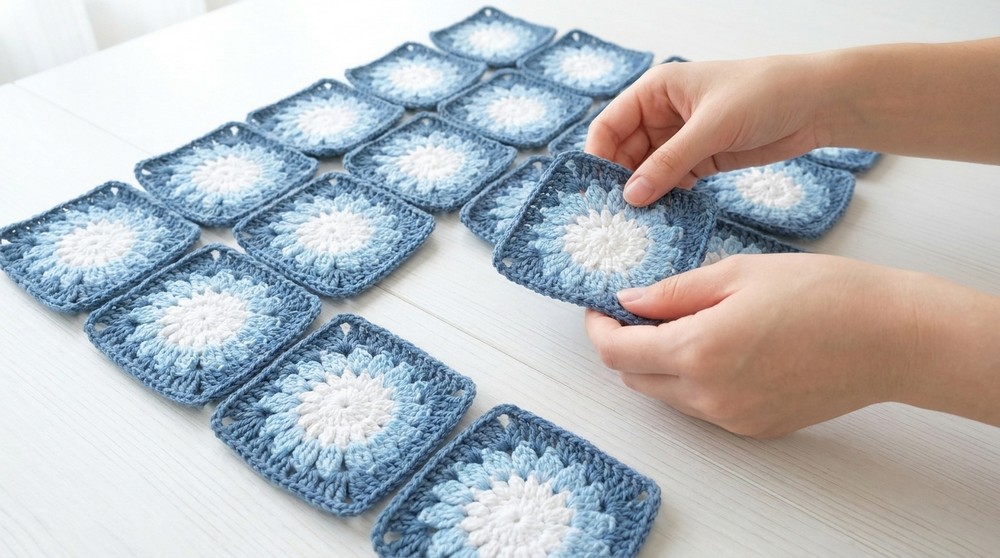
How Many Squares?
- Make a total of 54 squares for a small (you may need more for larger sizes):
- 9 per sleeve (18 total)
- 8 per front panel (16 total)
- 20 for back panel
How to Join Squares
A. Crochet Hook Method:
- With wrong side facing you, align two squares at edge.
- Attach green yarn with a slip knot to hook.
- Insert hook into back loops of both squares along edge (see V-shapes).
- Pull working yarn through both loops and the loop on hook (sl st).
- Continue across edge.
- Attach next square, repeating as above. Join vertically/horizontally as preferred.
B. Yarn Needle Method:
- Thread green yarn on needle.
- With wrong sides together, pick up outer/top loops only.
- Pull through, tie to secure.
- Work across squares, sewing panels as desired.
- This method creates a flatter, more invisible seam but requires more cutting/reattaching yarn.
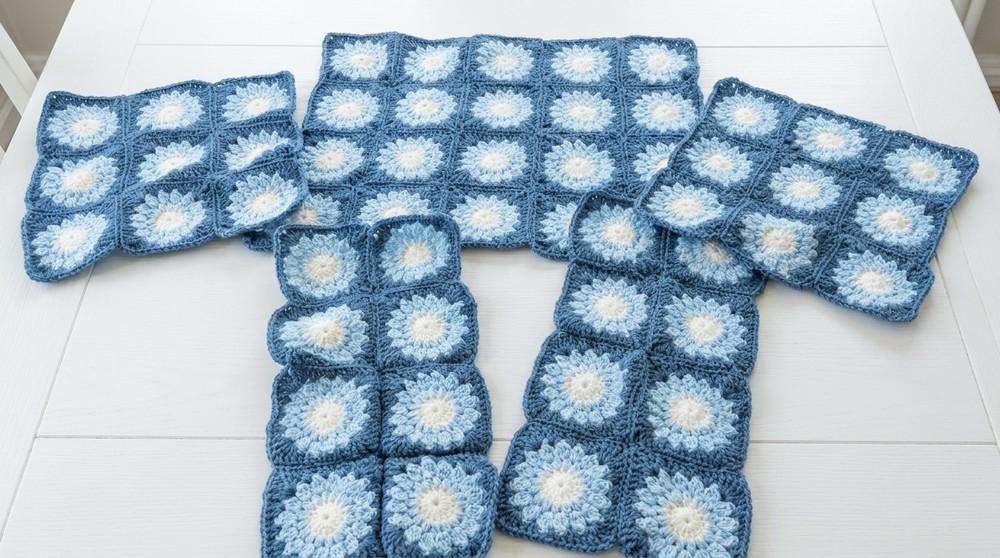
Assembling Panels and Sleeves
- Lay out all joined squares as follows:
- Back: 20 squares in rectangle.
- Fronts: 8 squares each, sewn to top sides of back panel.
- Sleeves: 9 squares sewn in strip, then to bodily panels.
- Sew or crochet fronts to top of back.
- Fold and attach sleeves by matching center three squares on panel.
Ribbing and Finishing Edges
- Attach green yarn to bottom/edge of cardigan.
- Ch 1, sc evenly around entire lower edge.
- Bottom Ribbing:
- Ch 8 (adjust as desired).
- hdc in back loops only to end, sl st into next st on edging.
- At start of each new row, sl st into next 2 sts, hdc back across in BLO.
- Continue back and forth for entire hem.
- Cuff Ribbing (optional):
- Repeat above for sleeves, or add 2 rows dc for a flared cuff.
Assembly & Finished Size
- Sew all panels (back, fronts, sleeves) with squares wrong side (WS) together.
- Attach sleeves to main body last, lining up center of sleeve strip with body seam.
- Ribbing is added at the end to body hem and sleeve cuffs.
- Finished size (S) is approx. 5”/13cm per square; adjust number/arrangement for your size.
- Try on for fit before seaming sides and sleeves completely.
- Weave in all ends on inside.
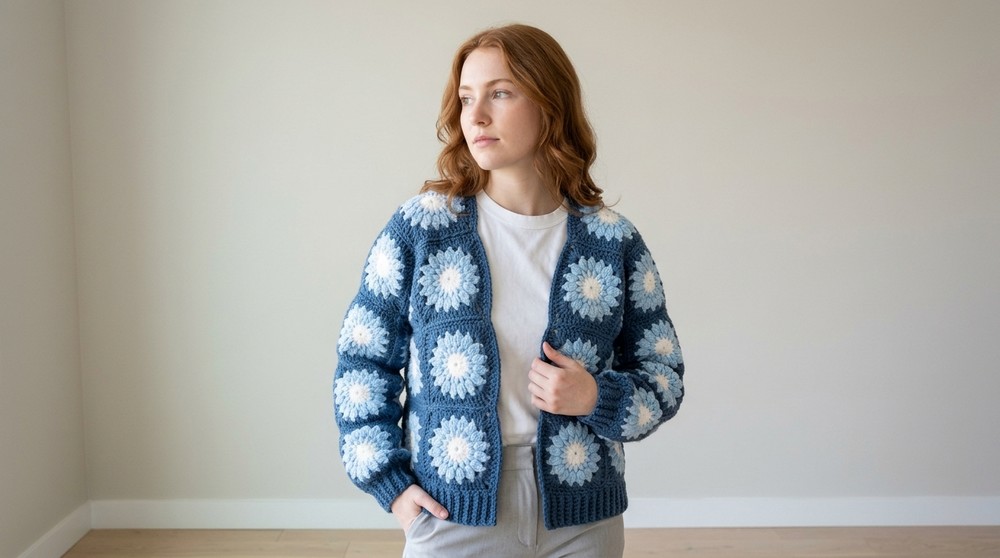
The Sunflower Granny Square Cardigan—A Cozy, Whimsical Classic
Enjoy this detailed guide to making your sunflower granny square cardigan! With vivid flower motifs, customizable sizing, and robust techniques for seaming and finishing, this project will be a cherished, handmade wardrobe staple. Adjust color, hook size, or yarn weight for unique results.