Ruffle Crop Top Crochet Pattern – Free and Easy Guide
Show your unique style with this free crochet ruffle crop top pattern perfect for creating effortless charm & fresh look for any warm-weather.
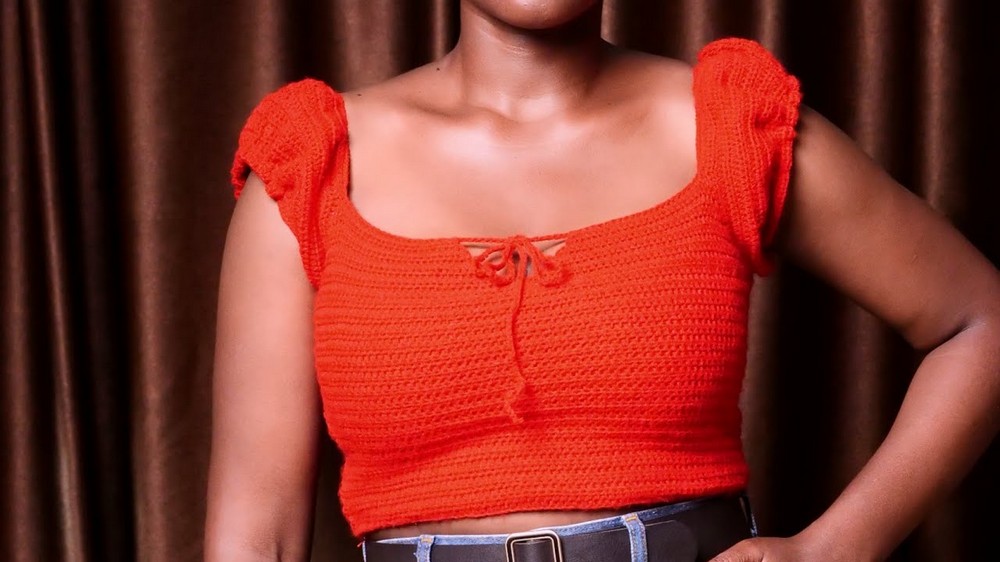
A soft breeze carries the joy of wearing something made by hand as gentle ruffles spill down a pretty top and bring out smiles wherever you go. The crochet ruffle crop top pattern is special for its playful frills that add a touch of beauty and style to any outfit. It is made to fit different shapes and can be worn with jeans skirts or shorts for fun outside or cozy days at home.
Crochet Ruffle Crop Top Pattern Free for Summer
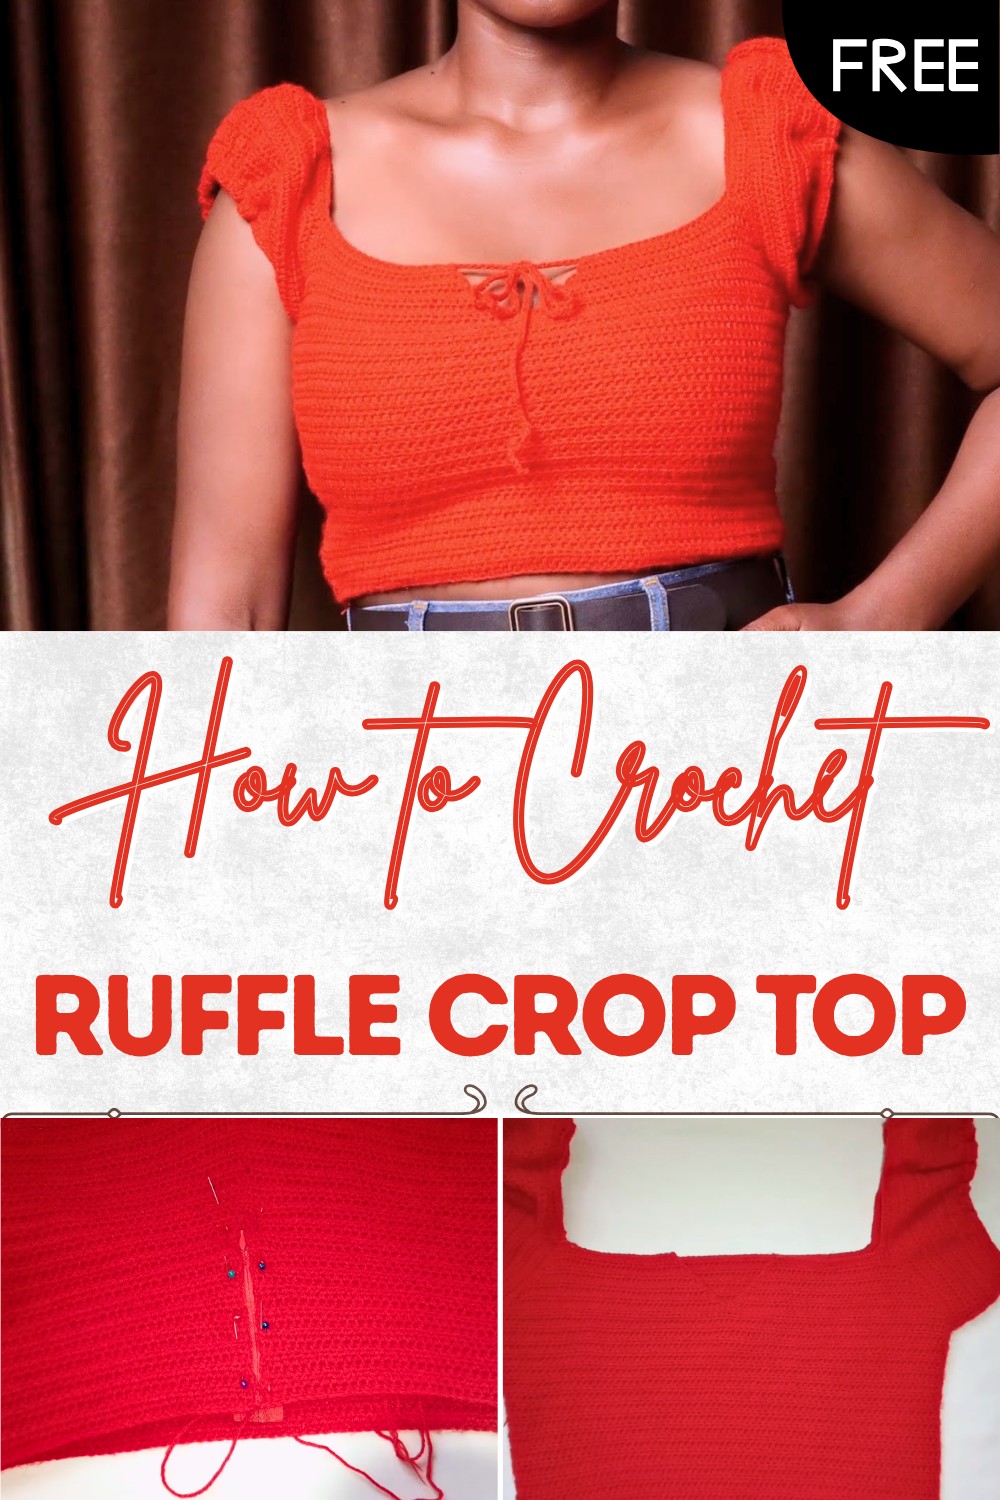
Its light feel keeps you cool and comfy all day and the lovely ruffles offer a sweet and fancy look that stands out with little effort. Making this top is a way to show your creativity as you pick your favorite color and make something unique. Simple to wear and easy to love it brings happiness in both its soft texture and cheerful appearance making every moment brighter.
Crochet Zippered Bishop Sleeve Top Pattern
Materials
- Yarn: Medium weight yarn (category 4) or yarn of your choice (approx. 400–500g for a small/medium adult)
- Hook: Size suited for yarn (sample uses 4.0 mm; adjust as needed)
- Measuring tape
- Stitch markers (optional but helpful)
- Scissors
- Yarn needle (for seaming and weaving ends)
- Sewing needle & matching sewing thread (for zipper)
- Pins (for positioning zipper)
- Zipper: Length equal to top front (approx. 14–18″ for average sizes)
Key Abbreviations (US Terminology)
| Abbreviation | Meaning |
|---|---|
| ch | chain |
| st(s) | stitch(es) |
| sl st | slip stitch |
| hdc | half double crochet |
| inc | increase (2 hdc in same st) |
| dec | decrease (see special notes) |
| rep | repeat |
| RS | right side |
| WS | wrong side |
Special Notes
- Adjust hook size to obtain desired gauge and drape.
- The foundation chain length should be your waist measurement minus 1 inch (for stretch).
- The pattern is highly adjustable—try it on as you go.
- The “bishop” style comes from sleeve width and ruffling.
- The zipper should match the length of your center front opening.
- Use stitch markers to divide and shape the neckline.
- For best fit, measure your work frequently.
Pattern Instructions
1. Bodice Band (Waist Section)
Foundation:
- Ch enough to measure 1 inch less than your waist circumference (e.g., for a 25″ waist, ch to 24″).
- Tip: Your measuring tape may start at “2” if you’re copying the demonstration.
- Row 1: Yarn over, hdc in 3rd ch from hook and in each ch across.
- Rows 2–14:
- Ch 2 (counts as st), turn.
- Skip the first st, hdc in each st across (to maintain straight edges).
- Work a total of 14 rows, or until band measures approx. 4 inches wide.
2. Joining the Waistband
- Fold band with RS together. Join ends by inserting hook through both ends (loop to loop), sl st to join.
- Ch 2. Turn work so your next row begins at the seam.
3. Bodice Construction & Increases (Torso Section)
Alternating Increase Rows:
- Row 1:
- Ch 2,
- Skip first st, hdc in each st across.
- Row 2 (Increase Row):
- Ch 2, turn.
- Hdc in first st (inc), hdc to where you want an increase, inc (place increases evenly 4 times per row: at start, 2 midpoints, and end).
- Don’t repeat increases at the exact same spots every row; stagger them for even shaping.
- Row 3:
- Ch 2, turn.
- Skip first st, hdc in each st across. No increases.
- Rows 4–27 (or until desired length):
- Rep one row with increases, one row without, alternating for a gentle a-line fit.
- At the end, you should have 12 rows beyond joining (for the midsection) + rows with increases for the bust; try on for fit.
- At this point, your piece should measure approx. 6.5″ tall and stretch to fit your bust (e.g., 14″ flat, up to 16″ stretched).
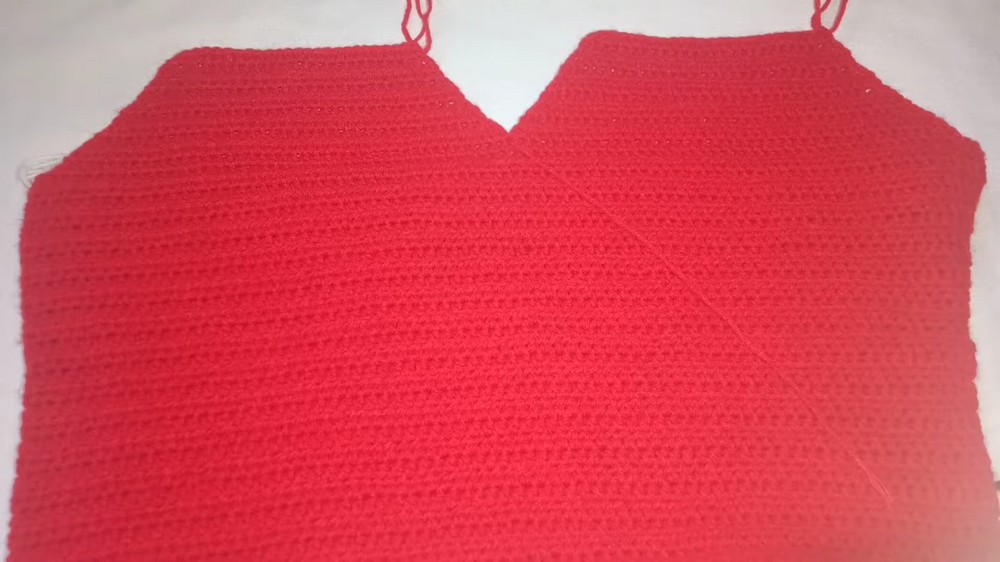
4. Dividing For Neckline and Armholes
- Divide Bodice:
- With measuring tape, find and mark the center front and sides.
- Mark the division for the front neckline:
- Use different color yarn or stitch markers.
- Shape Front V:
- At the center front, you create a V by leaving the central stitches unworked on subsequent rows, splitting the two “cups.”
- On each new row, sl st into first 2 sts of the front (“cup”) and start hdc in third st.
- Work hdc to next marker, stopping 2 sts before end of cup; leave those 2 unworked for shaping.
- Rep next row: Ch 2, turn. Skip first st, hdc across to center, dec at mid-V (see decrease below).
- Decrease (dec): Yarn over, insert hook in next st, pull up loop (3 loops on hook), yo, insert in next st, pull up (4 loops), yo, pull through all loops.
- Continue shaping (repeat):
- One decrease at V each row, decreasing on both sides until cups slope naturally and fit over the bust. (Repeat 8 rows or as needed).
- One decrease at V each row, decreasing on both sides until cups slope naturally and fit over the bust. (Repeat 8 rows or as needed).
5. Back Neck & Shoulder Shaping
- Rejoin Yarn 3 sts from center back (where markers indicate).
- Ch 2, work hdc across back section, ending 3 sts before other side marker.
- On each row, dec at both ends (leaving 2-3 unworked at each edge).
- Continue until back side matches front in length and width.
- Fasten off.
6. Shoulder Straps
- At each neckline/shoulder point, sl st into first 2 sts.
- Ch 67 (or to desired strap length).
- Across to opposite front (skip first 2 sts there), sl st to secure strap.
- Turn, sl st in each of the 2 adjacent sts to reinforce join.
- Ch 2, hdc in each ch along strap.
- Join with sl st at base. Fasten off.
7. Bishop Sleeve Ruffles
Work for both armholes:
- With RS facing, attach yarn at side seam under arm.
- Ch 2, and hdc evenly around arm opening (approx. 2 hdc per row edge).
- Work 12 hdc, then increase by working [2 hdc in next st] until only last 12 sts remain. Work hdc in final 12 sts.
- Join round with sl st.
- Ch 2, hdc around for 12 more rows (no increases).
- Pull up working yarn, thread onto yarn needle, and whipstitch through row ends to gather ruffles at the shoulder. Pull gently, adjust ruffles for even fullness, and sew in place. Repeat for other sleeve.
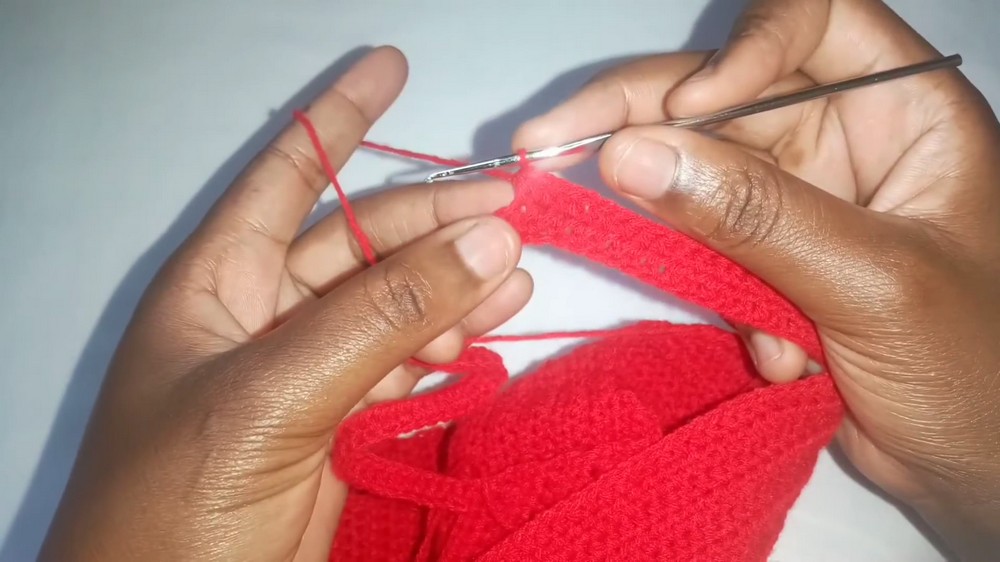
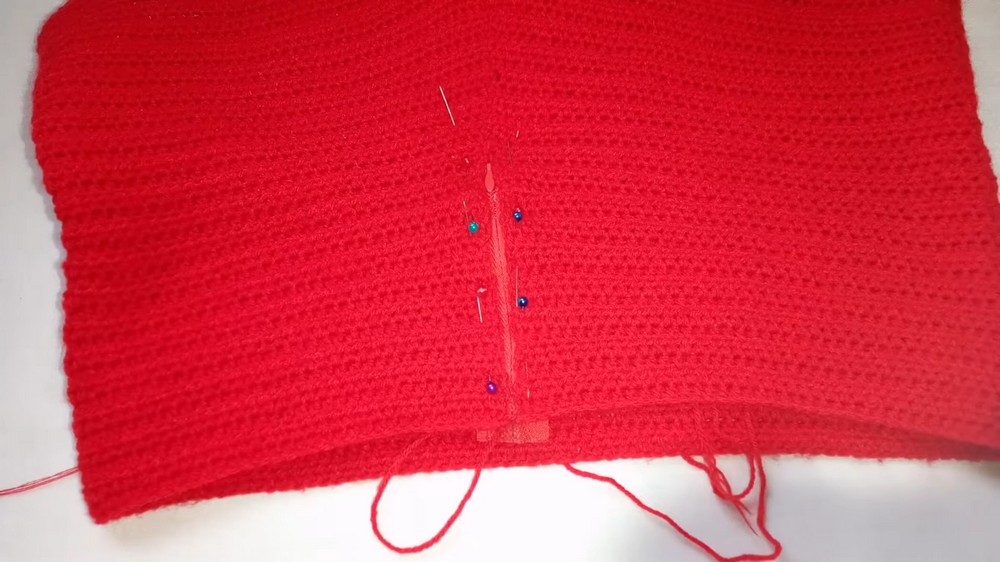
8. Zipper Attachment
- With RS up, pin zipper evenly between front opening edges.
- Using sewing needle and thread, sew zipper to inside edge of top with small, neat stitches.
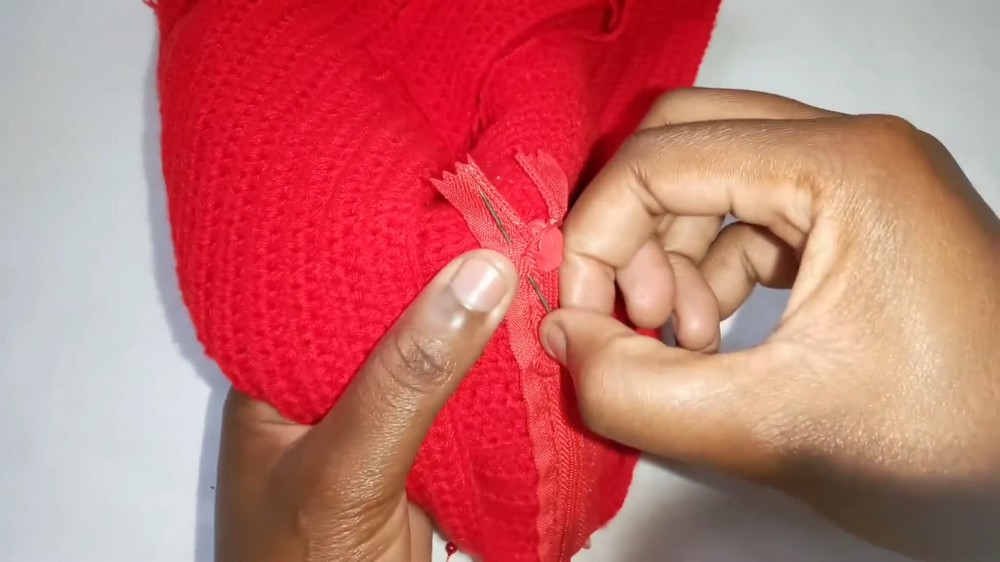
- Work from WS to hide sewing.
- Sew both sides.
9. Finishing
- Weave in all ends using a yarn needle.
- If desired, add chain ties at neck for decoration.
- Block lightly if needed.
Conclusion
You have completed your crochet bishop sleeve top with ruffles and zipper closure. This design is modern, flattering, and functional with dramatic ruffled sleeves and a secure, customizable fit. The zipper allows for easy wearing and a contemporary look.
Pattern Corrections & Tips
- Pattern Correction: Make sure slip stitches and decreases match on both sides of cups and back to prevent unevenness.
- Tip: Attach zipper with pins before sewing to ensure it stays straight.
- Tip: For neat edges, always start with ch 2 as your first hdc. This helps keep the front edge of the work clean.
- Tip: For extra stability, topstitch the zipper close to the edge after initial sewing.
- Tip: Try on as you go for best fit—add or remove rows as needed.
https://youtu.be/-RoXOa_DTdo