How to Crochet Heart Applique Bracelet Pattern for Stylish Girls
Brighten your outfit instantly with the Free Crochet Heart Applique Bracelet Pattern for a handmade pop of love and color.
There’s something so charming about crocheting accessories that come straight from the heart—literally! This heart applique bracelet pattern is a delightful project that adds a touch of handmade love to your style. Crocheted with a delicate and lightweight yarn paired with a 1.5 mm or 1.75 mm crochet hook, this pattern is customizable in size, color, and design. The sweet little hearts are connected by chains, giving the bracelet a dainty and elegant appearance. Whether you’re creating it in classic pinks and reds for a romantic touch or experimenting with vibrant blues and yellows for bold, playful vibes, this project lets your creativity shine.
Creative Crochet Heart Applique Bracelet Pattern Free Guide for Special Occasions
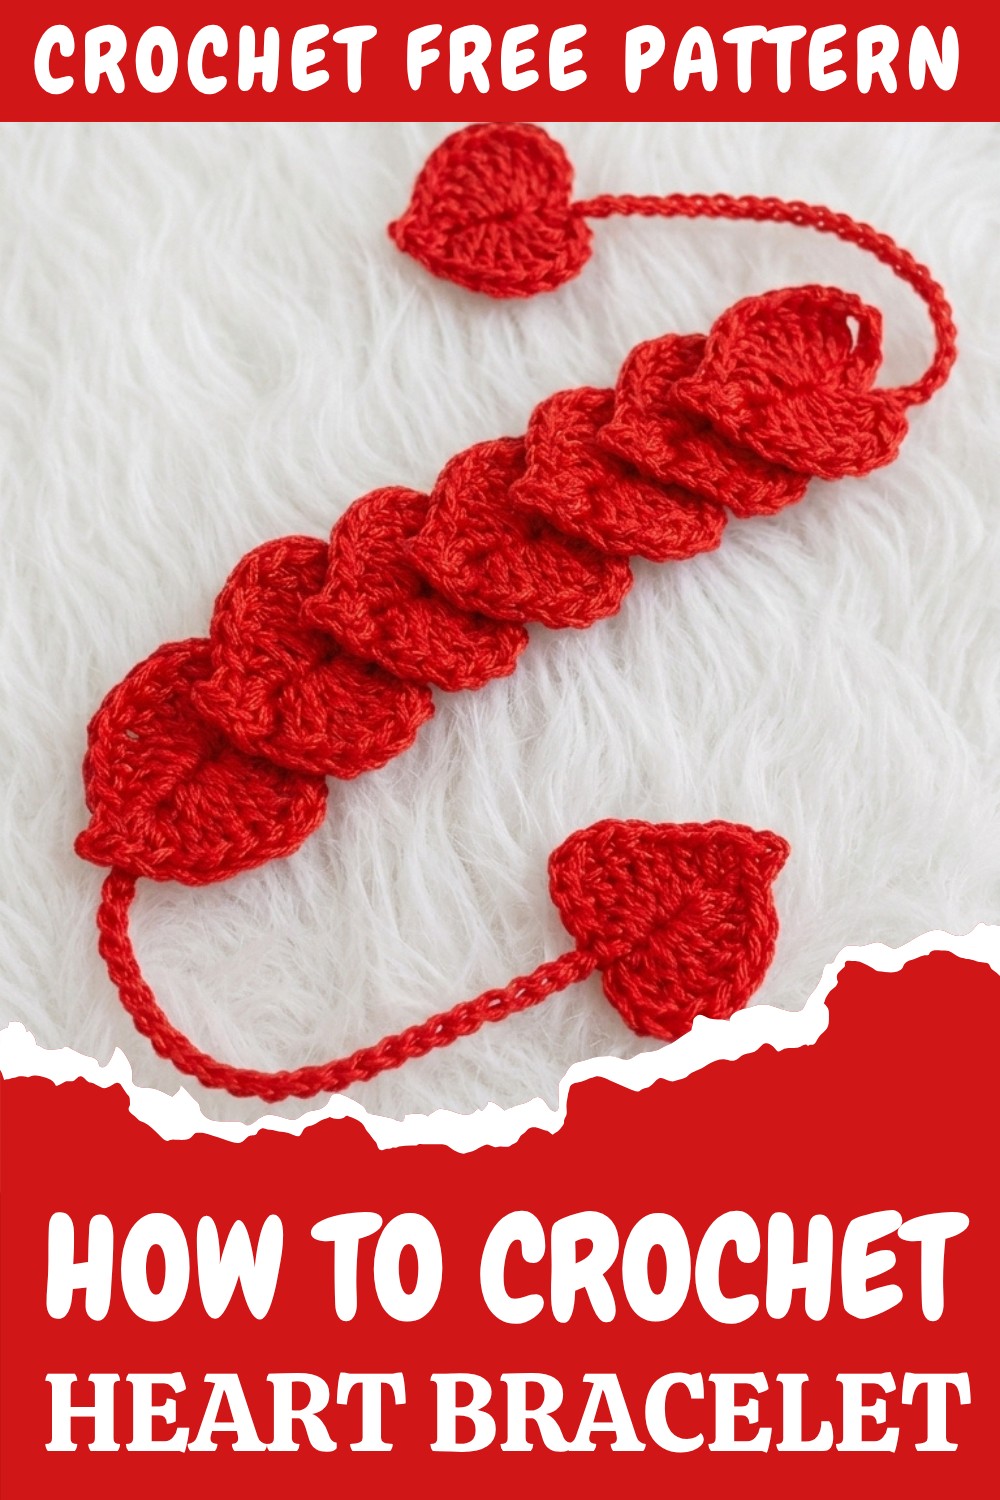
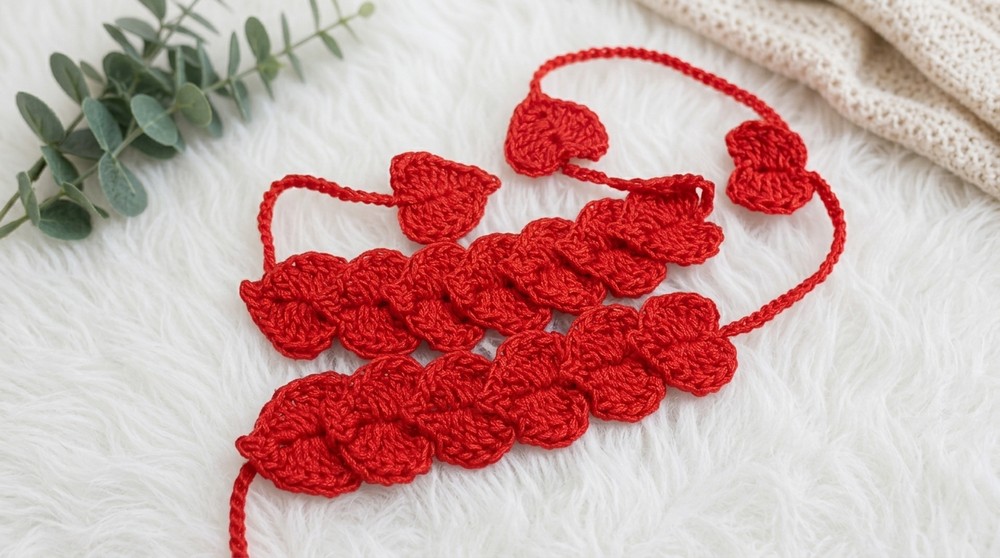
The pattern features common beginner-friendly stitches like double crochet (dc) and picot stitches to create the intricate curves and details of the hearts. Picots provide the perfect edging for those tiny appliques, making them truly stand out. The finished piece is versatile, too! You can wear it as a bracelet, use it as a hair accessory, or even adjust the length for headbands and belts. Gifting this bracelet to someone special or even adding it to your crochet market inventory, it’s functional, lightweight, and a true conversation starter.
What Else You Can Create from This Pattern:
- Headbands: Lengthen the piece to create heart-detailed hair accessories.
- Belts: Add more hearts and chains for stylish dress accessories.
- Garlands: Use the hearts to crochet decorative buntings or wall art.
- Gift Wrap Accents: Attach heart appliques as tags or embellishments for presents.
- Bag Charms: Turn the pattern into cute dangles for purses or backpacks.
Why This Project is Fun and Practical
- Minimal materials are needed, great for using up yarn scraps.
- Perfect for gifting and selling due to its cute and trendy appeal.
- Easy to customize with several uses beyond just bracelets.
Enjoy experimenting with different colors and sizes as you make these adorable crochet hearts!
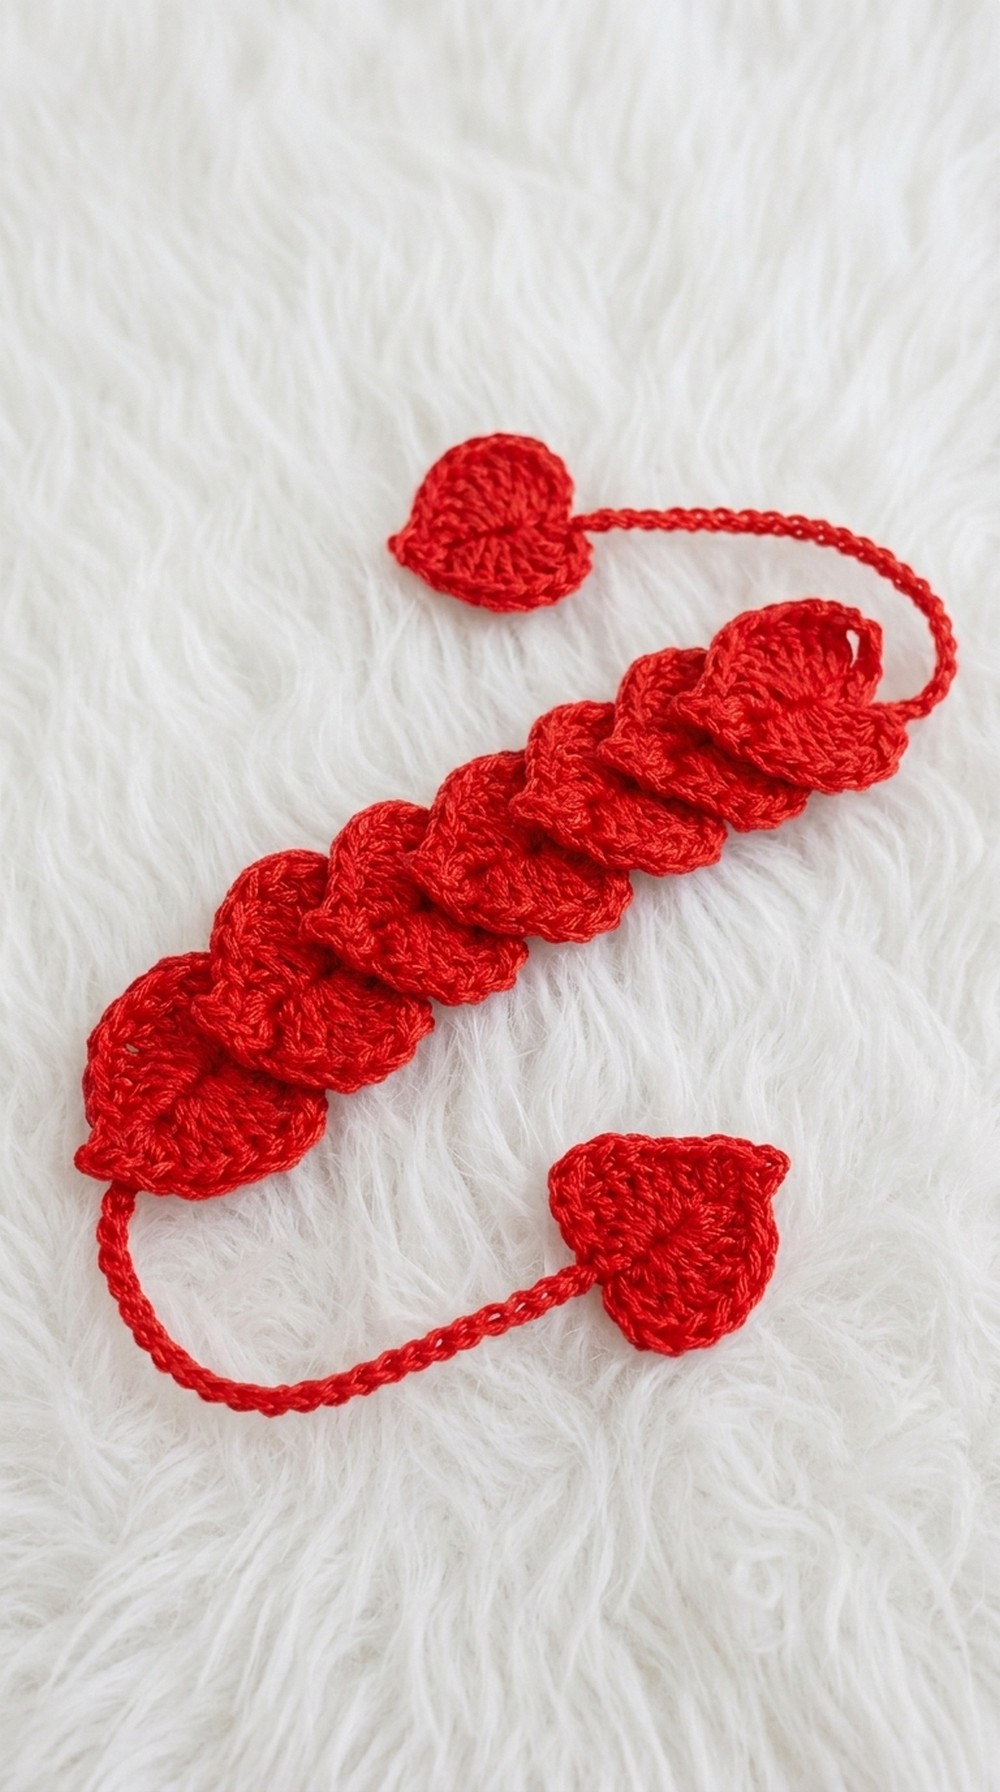
Crochet Heart Bracelet Pattern
This delicate crochet project features charming little hearts that can be used as a bracelet, headband, or even a belt accessory. The pattern is beginner-friendly, uses fine yarn, and creates delightful textured hearts, perfect for personal use or gifting. Adjust the number of hearts or chains for different sizes and styles.
In this tutorial, you’ll learn how to crochet a beautiful and versatile heart-shaped trim that can be customized into a bracelet, headband, or belt. The pattern showcases simple yet stunning stitches, finished with picot details to add elegance. The pattern is lightweight, making it perfect for both adults and children.
Skill Level: Beginner
Crochet Terminology: US Terminology
Materials & Tools
- Yarn: Fine yarn approximately 1.50 mm to 1.75 mm thickness. (Brand used: Ulali or similar weight yarn is ideal.)
- Hook: 1.50 mm or 1.75 mm crochet hook.
- Yarn needle: For attaching and weaving in ends.
- Scissors: For trimming excess yarn.
Gauge
Since this is a small project, the gauge isn’t crucial, but maintaining even stitches is important for consistency.
- Approximate gauge: 5 double crochets in 2 cm.
Abbreviations
- ch: Chain
- sc: Single crochet
- dc: Double crochet
- sl st: Slip stitch
- picot: Picot stitch (a decorative stitch formed by chaining and slip stitching into a previous chain)
- rep: Repeat
What You Will Learn from This Pattern:
- How to crochet double crochet stitches for shaping hearts.
- Adding picot stitches to create textured and decorative edges.
- Techniques for assembling connected heart appliques into bracelets or other accessories.
- How to hide loose ends and perfect the final piece for a polished look.
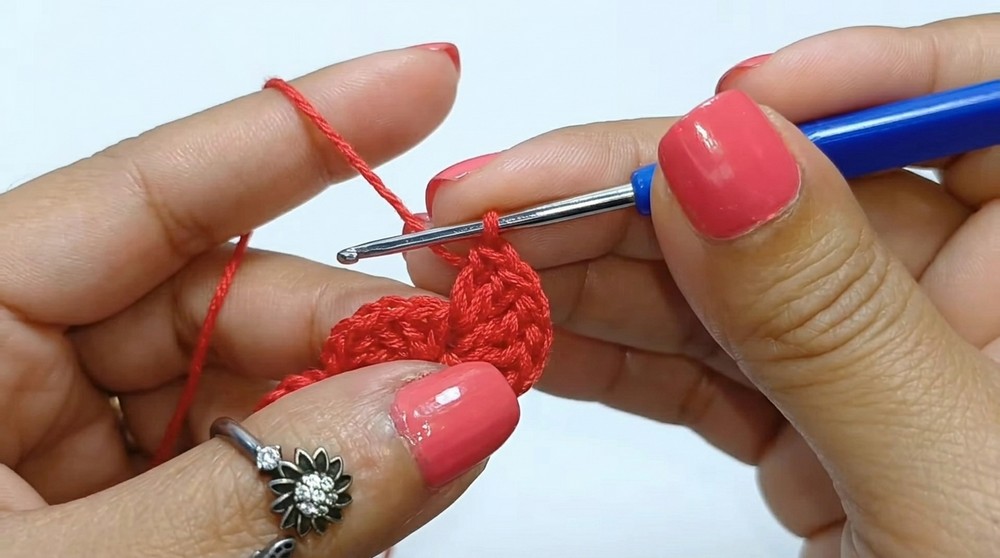
Special Stitch Instructions
Picot:
- Chain 1, slip stitch (sl st) into the base stitch to create a small knot-like decorative bump.
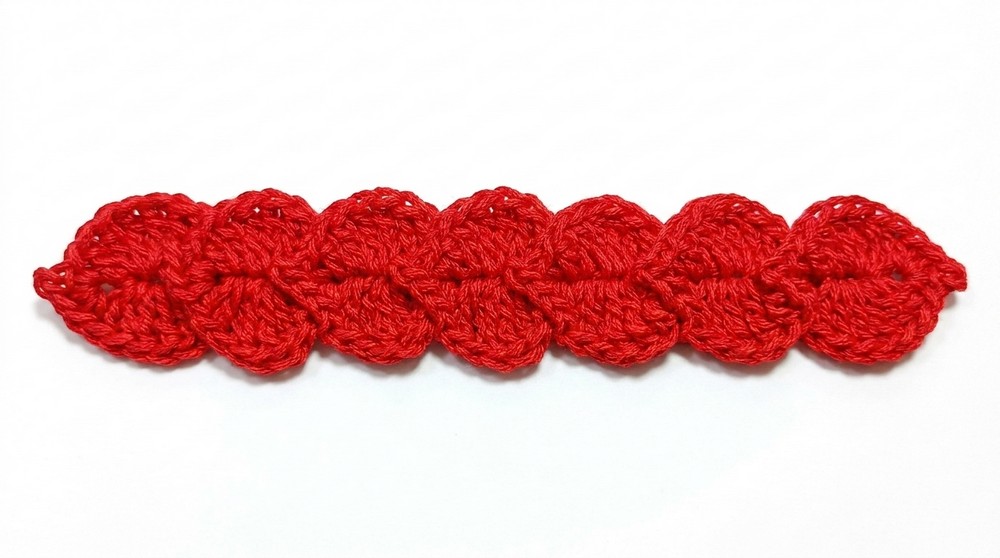
Finished Size
- Length: Adjustable; the number of chains and hearts determines the length.
- Standard bracelet with 7 hearts: Approximately 22 cm.
- Headband with more hearts: Size varies based on head circumference, typically 45–55 cm for adults.
Pattern Instructions
1. Starting with Chains
- Start by making a slip knot on your hook.
- Chain 25 ch for the bracelet clasp base. If you want a longer pendant-style end (e.g., for a headband or belt), chain 30–40 ch instead.
For beginners: Begin with a simple chain to serve as the base, adding more chains for longer projects.
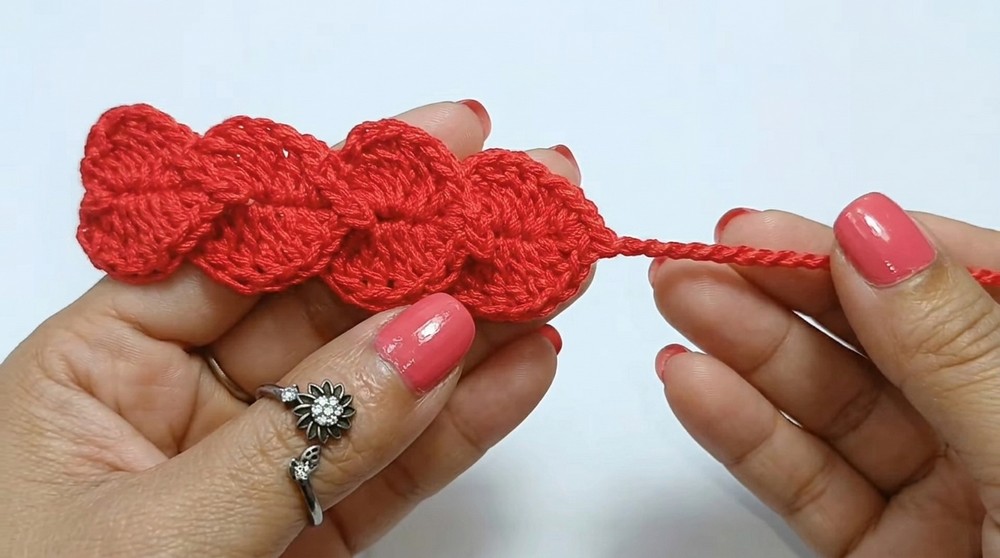
2. Creating the First Heart
- Form the base for the heart:
- Add 7 chains to the existing foundation (this creates the first heart’s base).
- Build the first half of the heart:
- Start working in the 5th chain from the hook.
- Crochet 5 dc in the same chain (this forms the curve of the heart).
- Start working in the 5th chain from the hook.
- Midsection:
- In the next chain, crochet an increase of 2 dc in the same stitch.
- In the last chain, crochet 2 sc followed by a picot (ch 1, sl st into 2nd sc).
- Second side of the heart:
- Turn your work and crochet back along the current row:
- In the same space as the 2 sc, 2 sc.
- In the next stitch (where the increase is), crochet 2 dc.
- In the final chain where you began, crochet 5 dc, 2 ch, 1 sl st to complete the heart shape.
- In the same space as the 2 sc, 2 sc.
- Turn your work and crochet back along the current row:
Summary for beginners: Create a curve with 5 dc, add some detail with sc and picots, and then mirror the steps back to complete the heart shape.
3. Continuing the Sequence of Hearts
- Connecting the next heart:
- Chain 7 to create a new heart foundation.
- Repeat the same sequence as above, working in the 5th chain from the hook for the next heart.
- Repeat the steps for building the heart:
- In the 5th chain: 5 dc.
- In the 6th chain: 2 dc (increase).
- In the 7th chain: 2 sc + 1 picot.
- Turn and repeat the pattern for the second side.
- Continue this pattern for as many hearts as you need:
- Standard Bracelet: 7 hearts.
- Headband: 10–12 hearts.
- Belt: Adjust based on desired length.
For beginners: Repeat the heart sequence connected by chains, ensuring uniform stitching for a symmetrical design.
4. Ending the Project
- After completing the last heart, chain 25 ch (or the same number as you started with) to match the other end of your trim.
- Fasten off and leave a yarn tail for sewing or weaving in.
Tip: Ensure you cut enough yarn to securely attach the base ends or add closures if needed.
5. Assembly & Finishing
- Hiding the Ends:
- Use a yarn needle to weave in all loose ends on the back of the fabric for a clean finish.
- Align the Hearts:
- To ensure both ends of the bracelet/headband face upwards, attach the last heart with a few stitches using a yarn needle.
- Optional Enhancements:
- For a bracelet: Sew on a clasp or buttons for easy wearing.
- For a headband: Use elastic or ribbon to close the loop.
- For a belt: Add extra chains to tie or make a knot-like finish.
Non-pattern readers: Focus on hiding the yarn tails and ensuring all hearts face the same direction for a polished result.
Customization Options
- Longer Pendant: If you want a longer end, increase the number of chains (e.g., 30–40 ch).
- Heart Count: Add more hearts for longer accessories like headbands or belts. Reduce the heart count for a child-sized bracelet.
- Use Different Yarn: Experiment with thicker yarn for a chunkier version or metallic thread for an elegant look.
Starting & Stitches Used
To begin, create a foundation chain for the base. Each heart is made using double crochet (dc), single crochet (sc), and decorative picot stitches. Mirror the sequence for a symmetrical shape. Hearts are connected with chains, making the project modular for any size.
Final Thoughts
This crochet Heart Applique Bracelet is a fun and creative way to experiment with textured designs. By following simple steps, you can create personalized accessories for yourself or as gifts. The project is versatile, making it perfect for any level of crochet enthusiast.