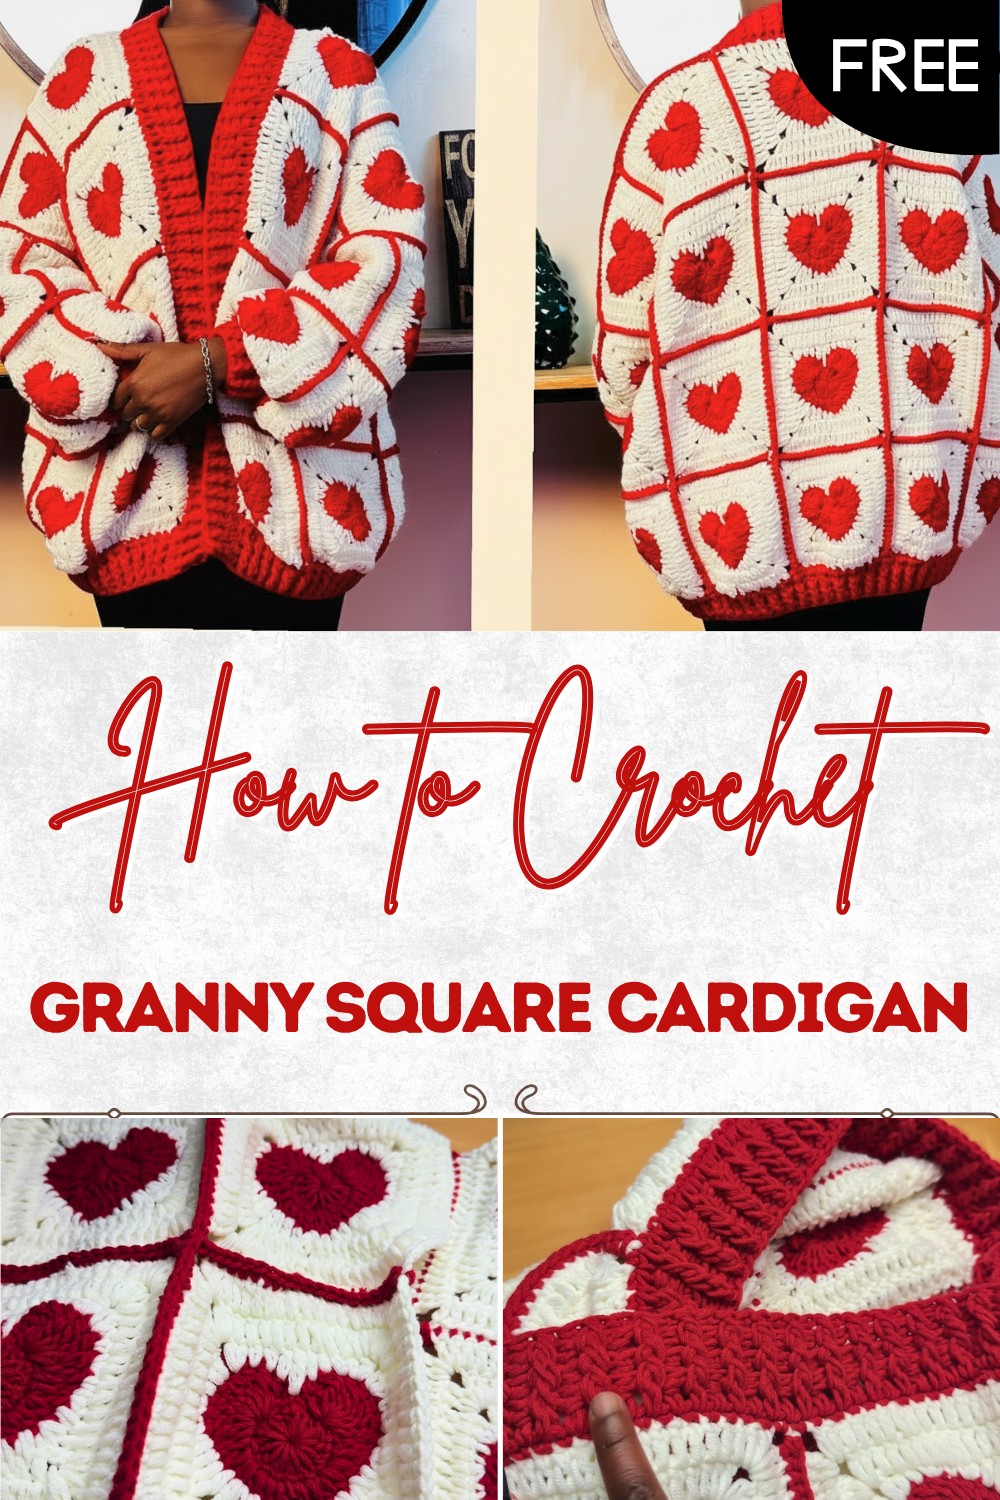
Free Crochet Granny Square Cardigan Pattern With Boho Touches
Slip into the charm with this Free Crochet Granny Square Cardigan Pattern that turns every outfit into a burst of color & warmth you’ll love.
Soft colors and cozy textures bring warmth to anyone who wears a cardigan made from pretty granny squares. Each square shines with its own pattern and together they form a patchwork of joy that stands out in any crowd. A crochet granny square cardigan pattern gives you the chance to mix favorite shades and soft yarns so every piece is full of personal charm. Wrapping up in one makes chilly days gentler and outings brighter because the design works well for any age or shape.
Free Crochet Granny Square Cardigan Pattern With Simple Assembly
This pattern also uses simple methods that don’t need any special skills so everyone can join in and make something lovely and useful for themselves or loved ones. The beauty of this garment comes from its timeless look with playful touches and the fun keeps going as each new square adds its own story. Wearing or giving a cardigan like this turns every moment into something special.
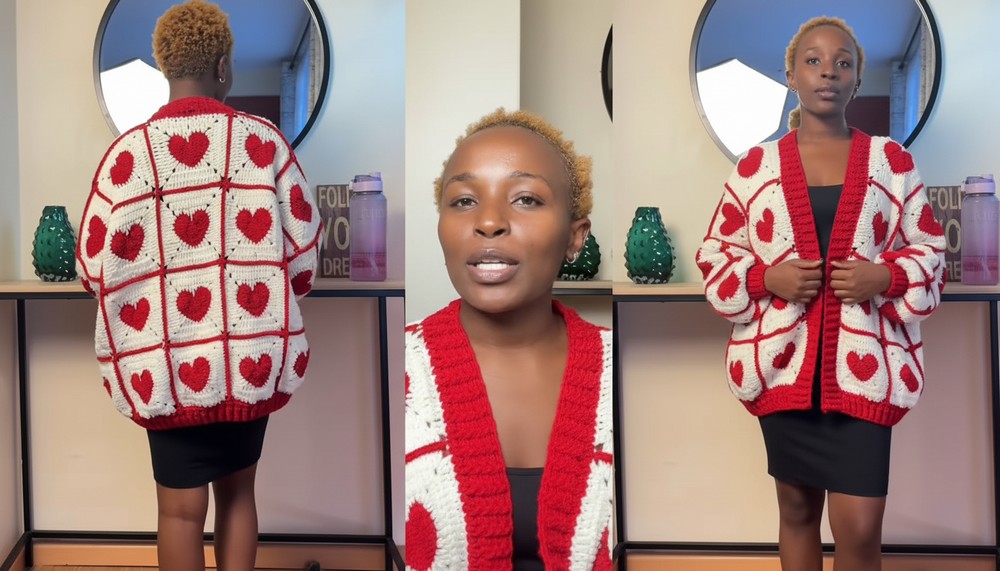
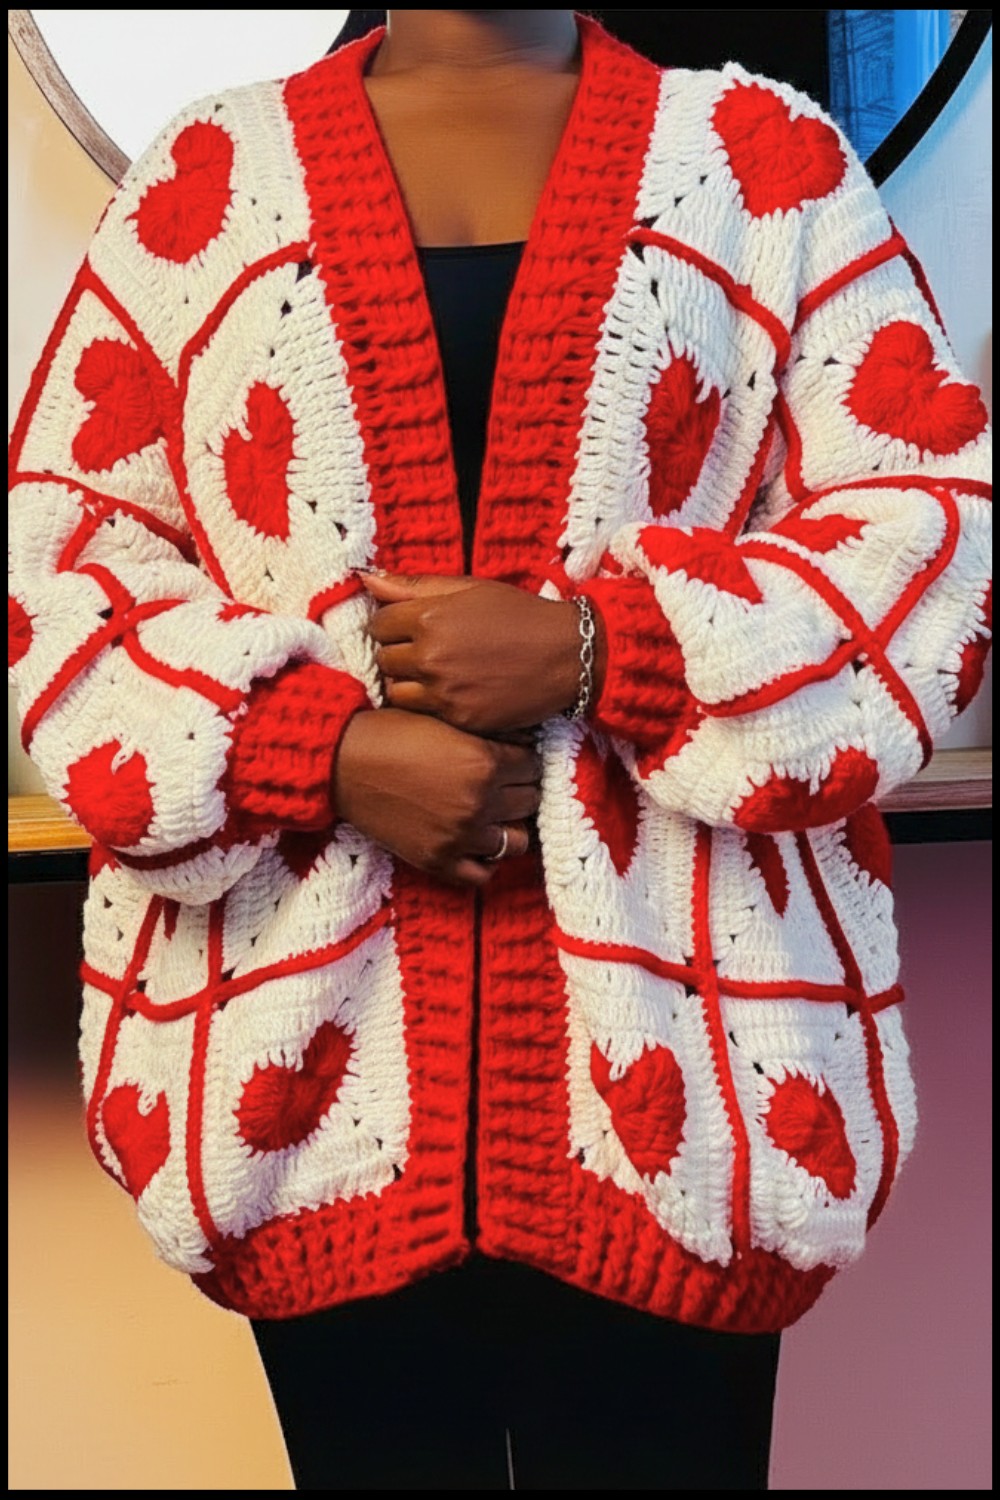
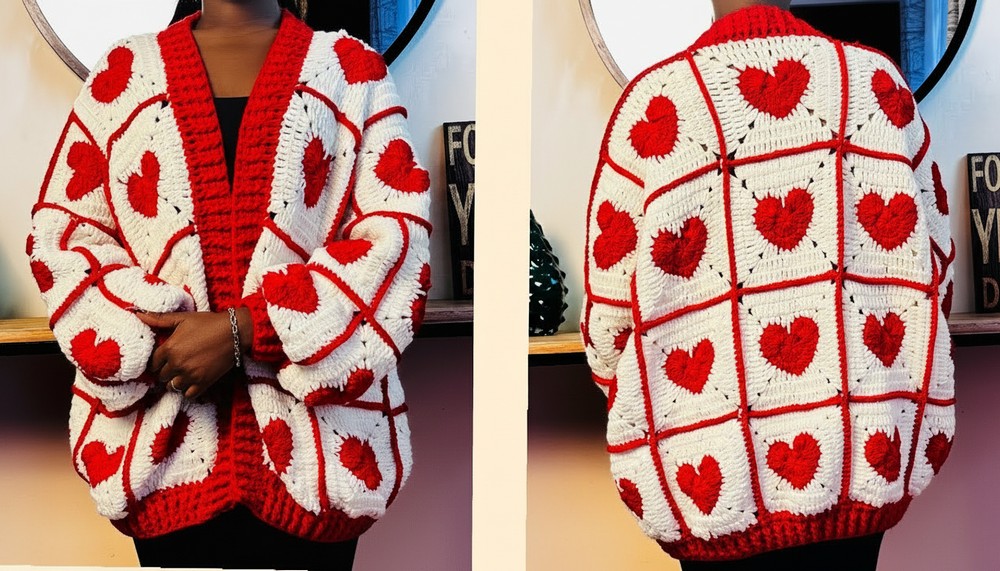
Heart Granny Square Cardigan Pattern
Materials
- Yarn: Worsted weight yarn—example uses Super Saver (Milk fiber and acrylic blend, 200g balls):
- Approx. 3 balls red
- Approx. 3 balls white
- Hook: 3.5 mm crochet hook
- Notions:
- Scissors
- Measuring tape
- Tapestry needle
- Stitch markers
Key Abbreviations
- ch – chain
- sl st – slip stitch
- sc – single crochet
- hdc – half double crochet
- dc – double crochet
- tr/dtr – treble/triple crochet
- sp – space
- st(s) – stitch(es)
Special Notes
- The sample cardigan is approx. 24” long and fits up to a women’s US size Large. For a smaller or larger size, make fewer/more granny squares or adjust their size.
- Each heart granny square measures about 6″ (after border), not stretched.
- The cardigan is seamed with single crochet stitches for a decorative effect.
- Total granny squares used:
- Body: 36 squares
- Sleeves: 12 squares (6 per sleeve)
- Grand total: 48 granny squares
Instructions
1. Heart Granny Square Motif
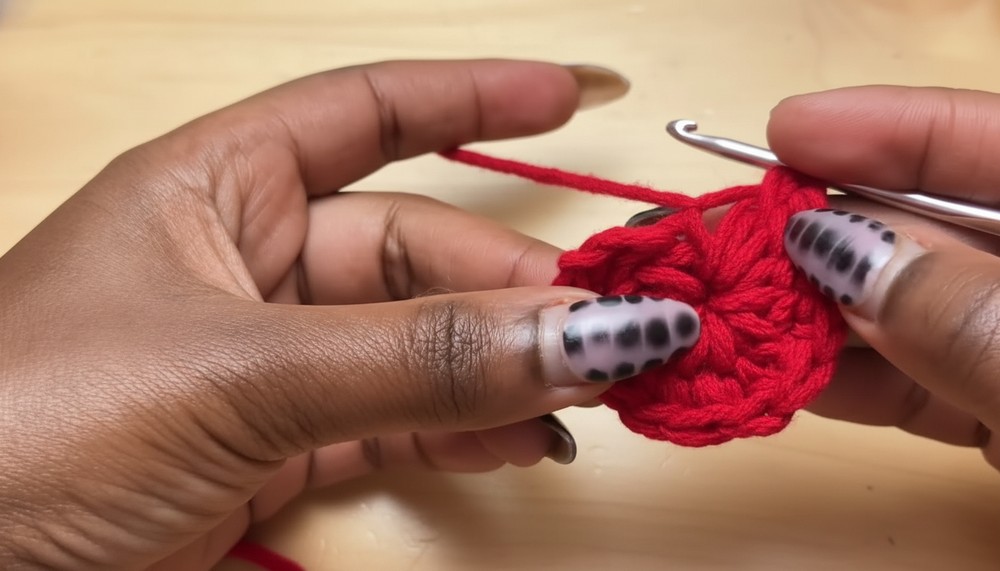
A. Make the Heart Center (Red Yarn)
- Ch 4, sl st to first ch to form a ring.
- Ch 3 (counts as 1st dc). Work 12 dc inside ring. (13 total including starting ch-3.)
- Sl st to top of starting ch-3 to join.
B. Make Top Left Curve of Heart
- [Yarn over twice for each tr.]
- Skip next st, in the next st, work 8 tr (all in the same st) to form top left curve.
- In the next st: dc.
- In the next st: dc and hdc in same st.
- In next st: 2 hdc in same st.
- Next st: hdc and dc in same st.
- Next st: dc and hdc in same st.
- Next st: 2 hdc in same st.
- Next st: hdc and dc in same st.
- Next st: dc.
C. Make Top Right Curve of Heart
- In next st: 8 tr (all in the same st).
- In last st: sl st to finish, fasten off red.
Your motif will look like a heart.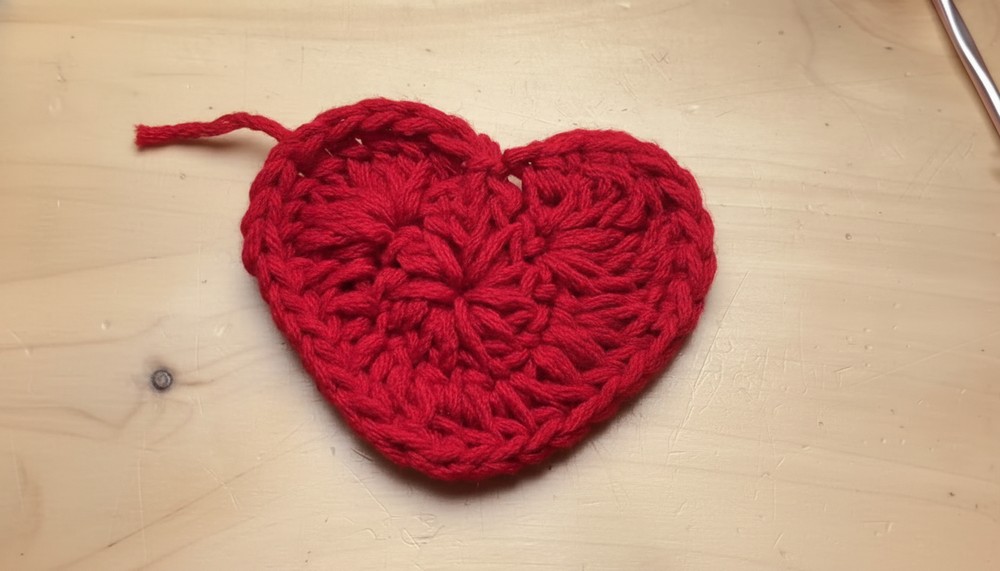
2. Turn Heart into Square (Border Row — White Yarn)
- Count and join yarn (with a slip stitch) at the 15th st from the beginning. (This will be at the heart “dip.”)
- Sc in same st.
- In next st: sc.
- Next st: hdc.
- Next st: dc.
- Next st: dc and tr in same st.
- Ch 3 (corner).
- Next st: tr and dc in same st.
- Next st: dc.
- Next st: hdc and sc in same st.
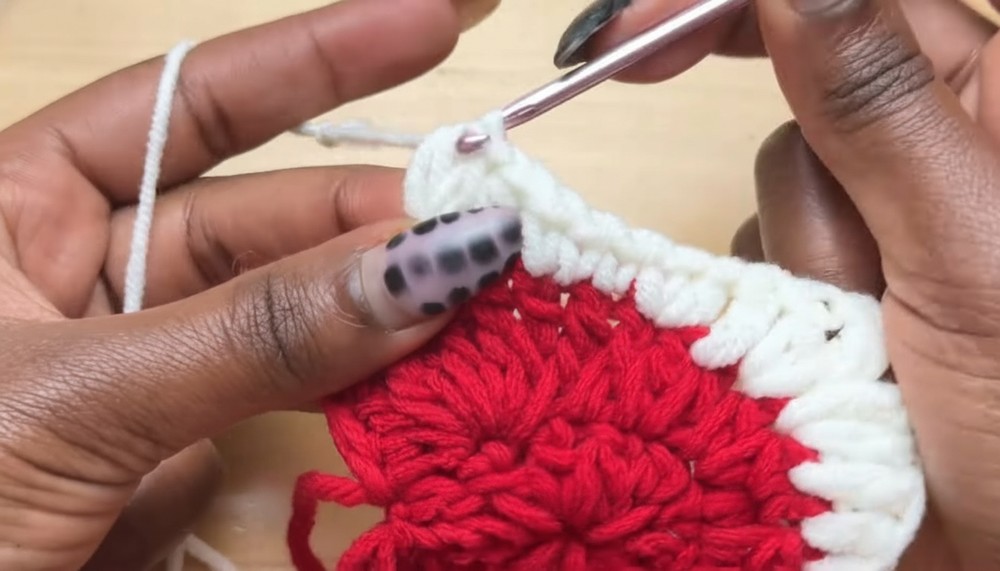
- Next st: sc.
- Next st: 2 sc in same st.
- Next st: hdc.
- Next st: hdc and dc in same st.
- Ch 3 (corner).
- Next st: dc and hdc in same st.
- Next st: hdc.
- Next st: dc (continue evenly around heart).
- Next st: tr (pass hook through the middle point of heart).
- Next st: tr.
- Next: (hdc).
- Next: (hdc and dc in same st).
- Ch 3 (corner).
- Continue across, mirroring the first side of the heart.
At each corner: (dc, hdc, ch 3, dc, hdc) in same stitch.
- Work dc in each st down the sides, adjusting as needed to square off the shape.
End of round: sl st to join. Count: each side should now have 19 sts between each corner ch-3 space. Square should measure approx. 6″.
3. Second Border Round (White)
- Ch 3 (counts as dc), dc in each st around, (2 dc, ch 3, 2 dc) in each corner ch-3 sp.
- End of round: sl st to join, fasten off and weave in ends.
4. Make All Needed Squares
- Make 48 squares total (36 for body, 12 for sleeves).
- Ensure hearts all face same direction (upwards)—especially important for seaming!
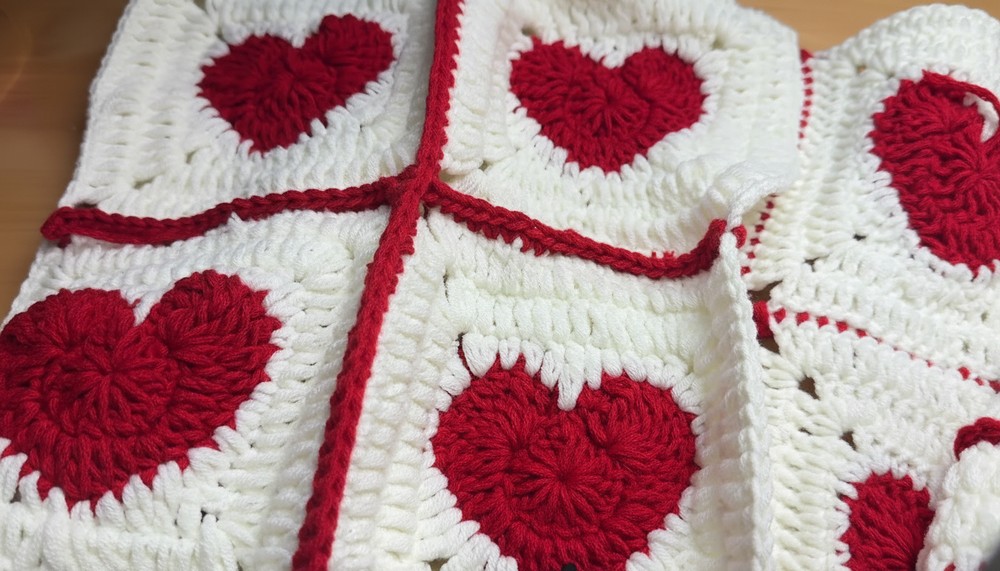
5. Assembly
Body Panels
- Back: 4 squares wide x 5 squares tall (20 squares)
- Front Left: 2 squares wide x 4 squares tall (8 squares)
- Front Right: 2 squares wide x 4 squares tall (8 squares)
- Shoulders: Join 2 squares each front to 2 squares on back at the top edges using sc join in red yarn.

Side Seams
- Leave armhole space—starting at bottom edge, sc join up sides, leave top 9-10 sts or about 1.5 squares open for sleeve.
Sleeves
- Join 6 squares in a long strip per sleeve, close to form a tube before or after attaching.
- Attach sleeve tube to armhole using single crochet; ease in evenly, match joining points.
- Seam underarms.
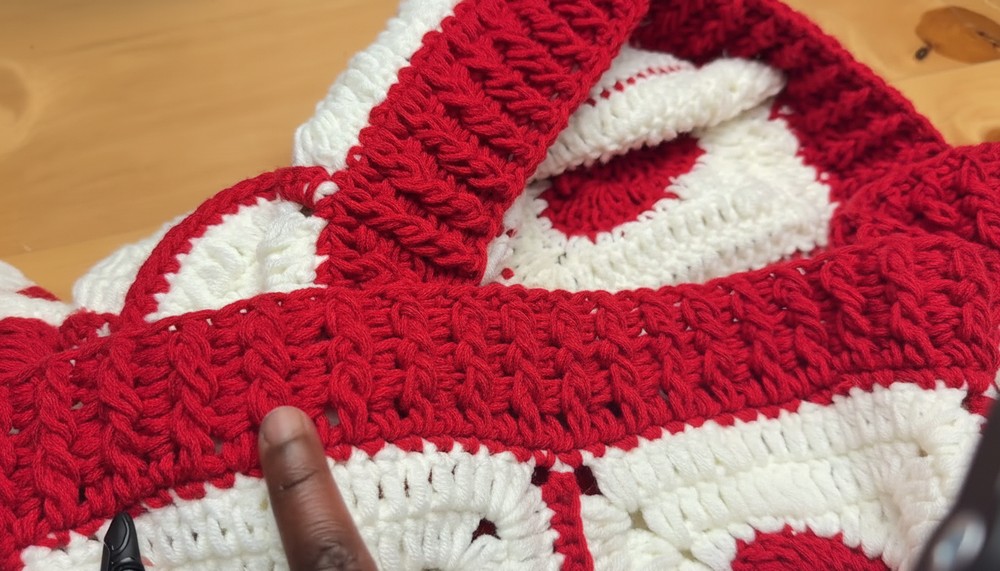
6. Cuffs & Hems (Red)
At Cuff and Bottom Hem
- Join red at cuff or hem edge.
- Row 1: Sc in corner, skip next st, sc in next st, repeat around, join.
- Row 2: Sc in first st, sc in next st, skip st, sc in next 2, repeat around, join.
- Row 3: Ch 3, dc in every st around, join.
- Rows 4-7: Alternating front post double crochet (fpdc) and back post double crochet (bpdc) for ribbed effect, repeat for 4 rows. Fasten off and weave in ends.
7. Button Band/Neckline Trims (Optional)
- Pick up and work sc evenly along each front edge (in white or red).
- After every 4 sc, skip a st to prevent ruffling.
- After 1 row of sc, add 1 row of dc, then 3-4 rows of alternating fpdc and bpdc for rib effect as for cuffs/hem.
Pattern Corrections & Tips
- Correction: Each side of the square should have 19 stitches (adjust slightly if needed to keep square flat).
- Sizing: For smaller size, make fewer squares, or make smaller squares (fewer border rounds or use smaller hook).
- Tip: Always lay out all squares first to ensure color and heart orientation for a symmetric look.
- If your seams are too visible or gappy, try whip stitch with tapestry needle instead of sc join.
Conclusion
This beautiful, beginner-friendly Heart Granny Square Cardigan is a superb stash-buster, allows easy adjustments, and brings a custom look to any wardrobe. By mastering the heart motif and simple seaming, you can easily make the cardigan your own size and colorway. Add button bands or keep it open for versatility.