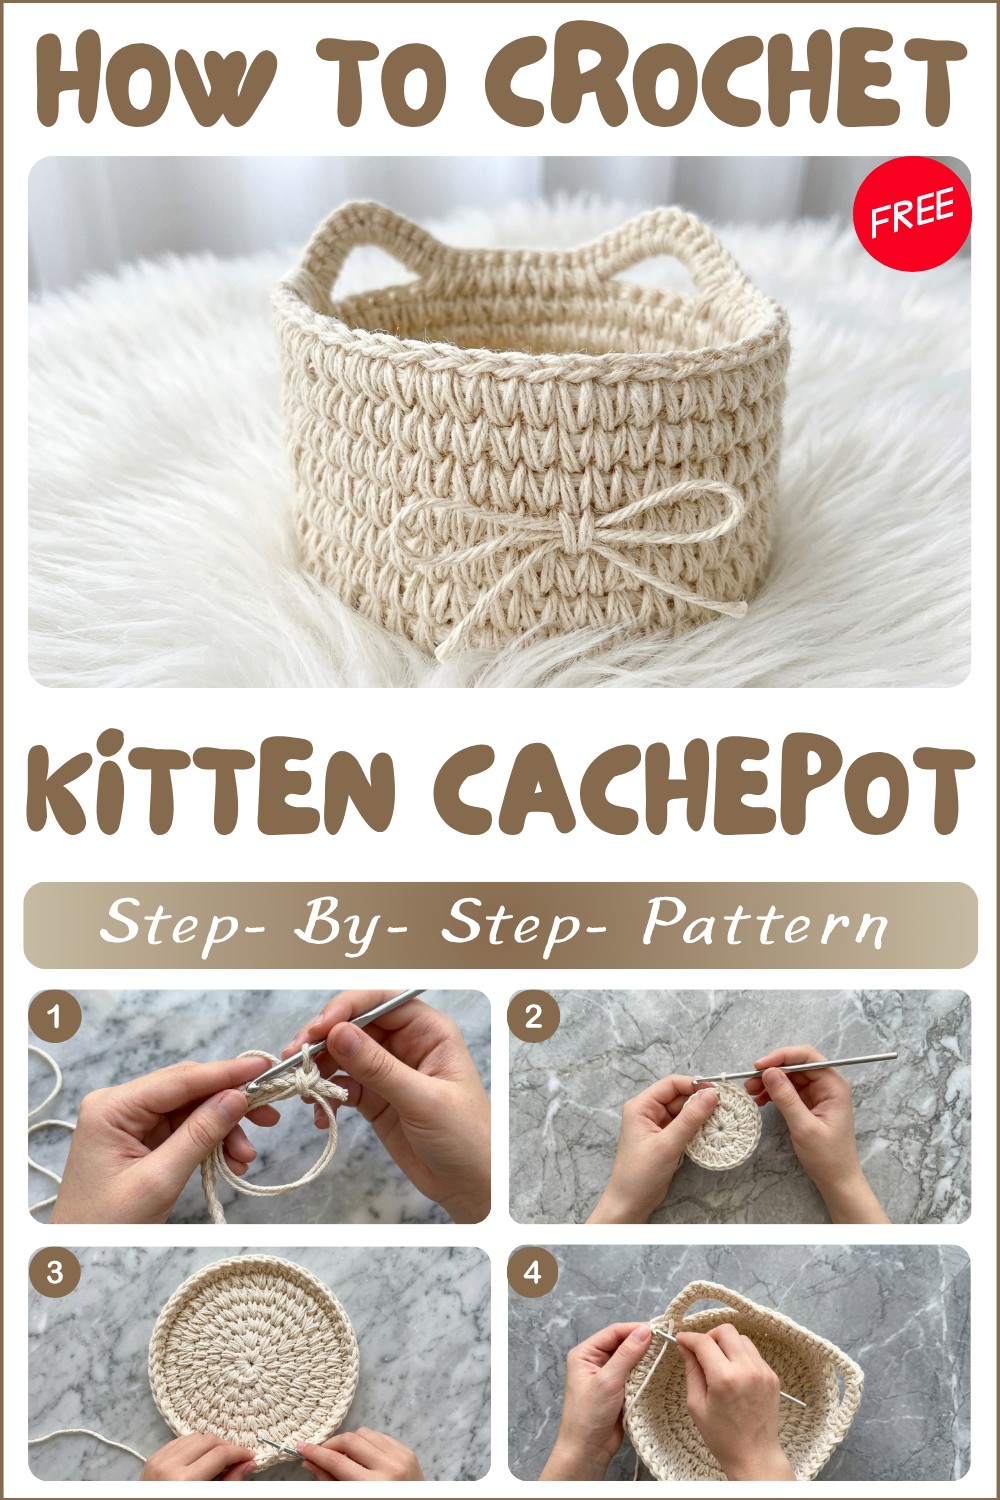
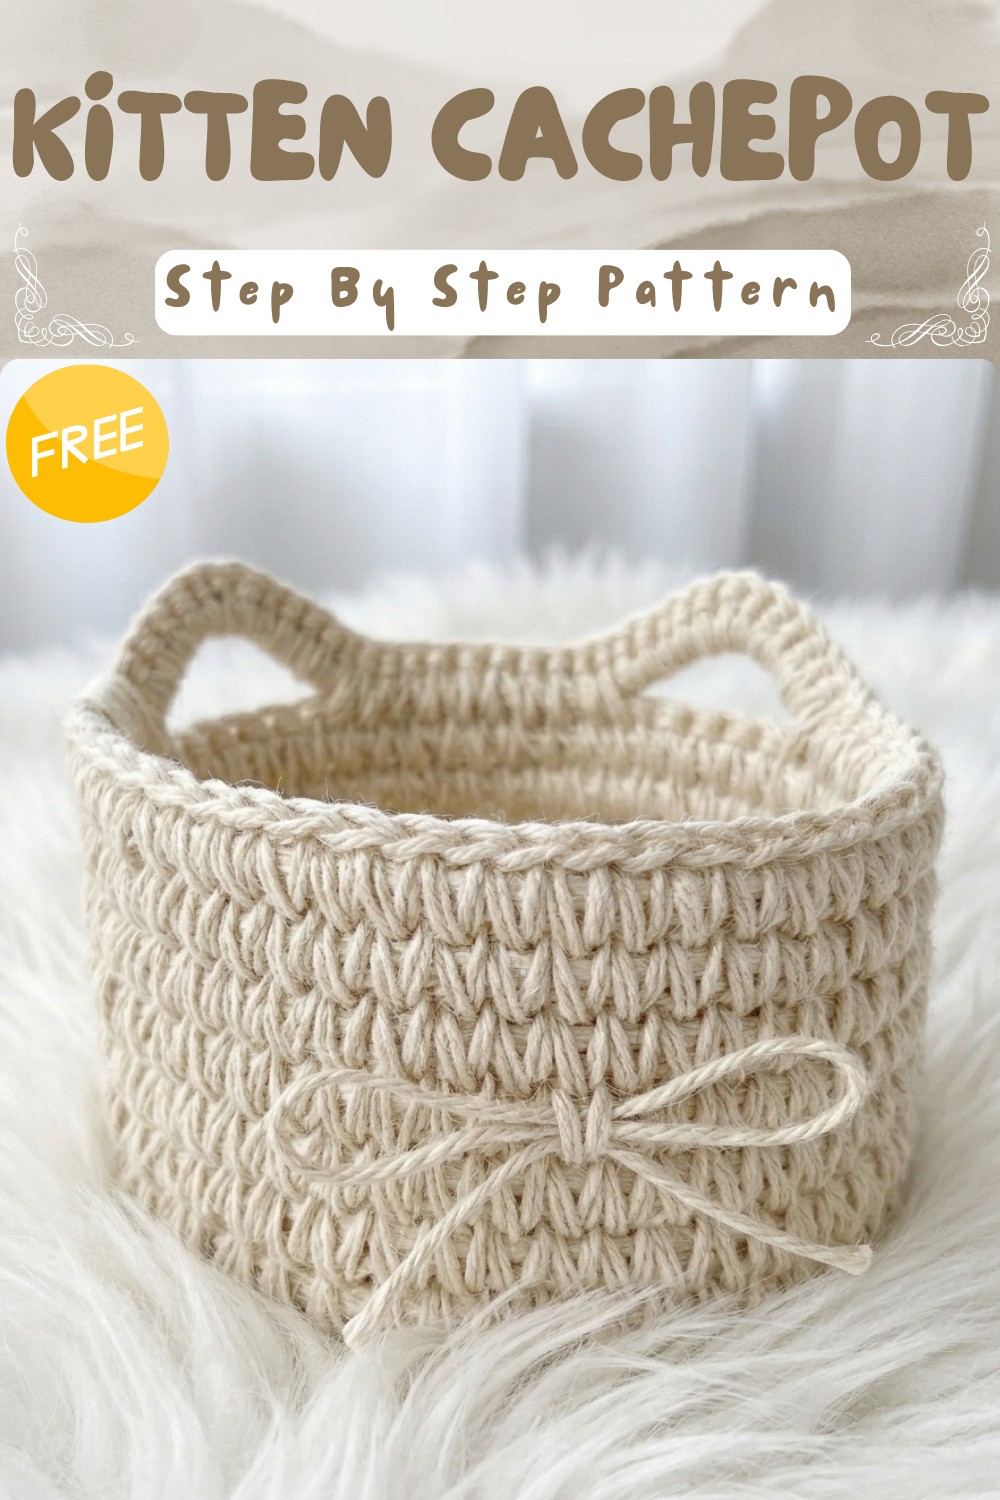
Easy Crochet Kitten Cachepot Pattern for Adorable Storage
Add a playful touch to your décor with this Free Crochet Kitten Cachepot Pattern, featuring adorable kitten ears and rustic natural fibers.
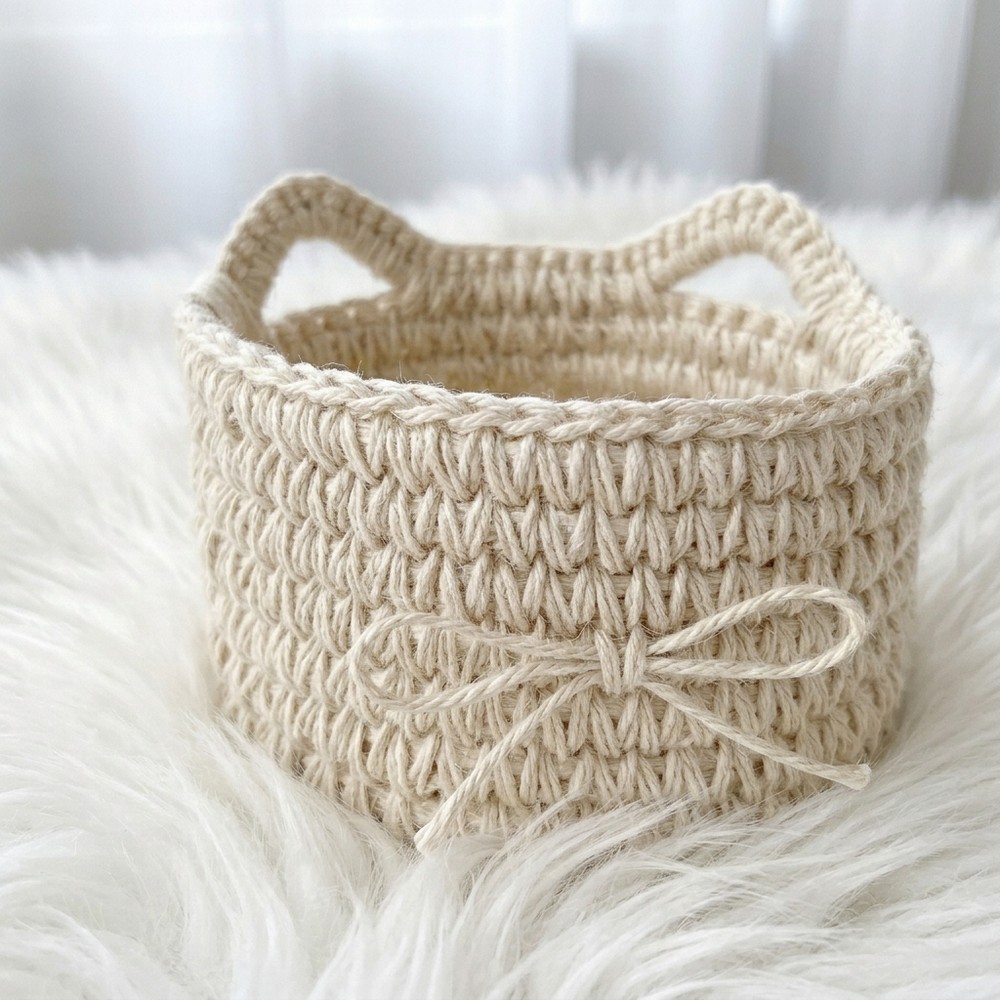
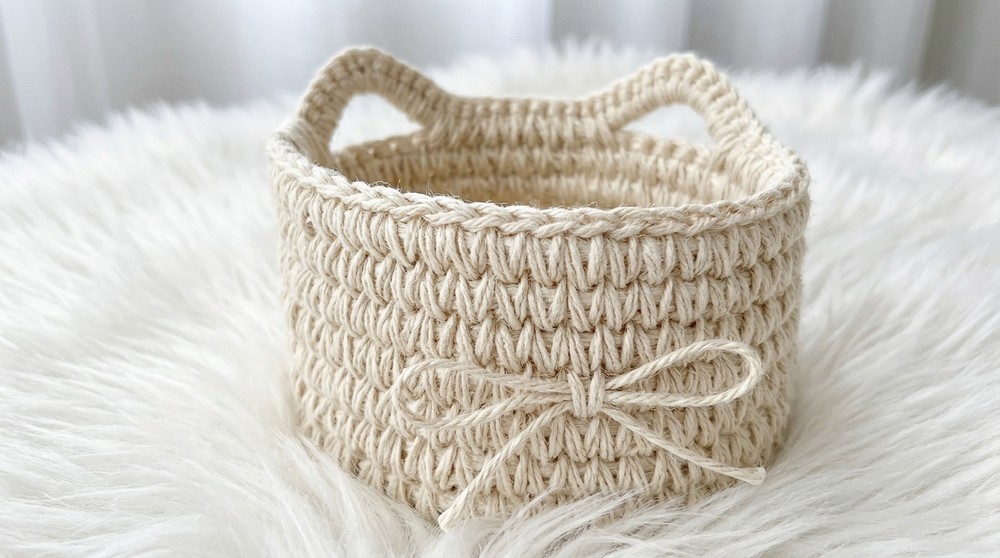
The playful and sturdy design of a crochet basket with kitten-shaped ears makes it a standout project for beginners and crochet lovers alike. This pattern allows you to crochet a structured and decorative piece that is full of character and charm. With its adorable features, including soft kitten ears and the option to add a whiskered mustache for extra flair, it’s an excellent choice for organizing, decorating, or gifting. The complete project features a sturdy structure that maintains its shape beautifully.. Whether making it tall, wide, or small, the sizing is flexible, ensuring it works for both practical and decorative uses.
How to Crochet a Kitten Cachepot Pattern for Cute Plant Holders
For successful results, try to maintain loose tension and avoid overly tight stitches, which could hinder the ability to pull through easily or make the structure look flattened. The project is beginner-friendly and easy to adapt with minor adjustments to the base size, height, or fine details. This basket combines functionality with adorable design, making it an item you’ll use and admire often.
Cat-Ear Basket (or Scarf Basket) with Natural Fibers: Crochet Pattern
Create a chic and sturdy crochet basket with adorable cat ears using natural fiber yarn and a thick cord base. Perfect as storage, a decorative basket, or for creative projects, this basket’s rustic texture and whimsical ears make it a standout piece. The pattern is customizable for any size, simple enough for adventurous beginners, and offers a highly versatile base for further design (add mustaches, faces, or whiskers if desired). Worked continuously in the round with centered (waistcoat) stitches around a core cord for structure, this project delivers beauty and function in one.
Pattern Notes
- This pattern uses the “waistcoat stitch”, also known as the centered single crochet, for a tight, knit-like finish.
- The basket is crocheted around a thick cord (e.g., shear cord or sisal rope). The crochet stitches cover the cord for structure.
- Construction is spiral/continuous rounds (do not join rounds; use a stitch marker to track).
- Use two strands held together for the yarn for added thickness and sturdiness.
- Ears are worked directly onto the rim by changing to a smaller hook for a firmer finish.
- Size is easily adjusted by increasing or decreasing the number of increase rounds for the base, then crocheting as many even rounds as desired for the wall.
- Substitute other strong, rustic yarns or cord types as needed (rami, jute, cotton string).
- Optional: Add facial features (mustache, whiskers) by knotting or sewing on threads at the end.
Skill Level
Advanced Beginner to Intermediate
Must be comfortable working in the round, using the magic ring, and making increases. Some experience with the waistcoat stitch or working around a cord is helpful.
Materials
- Natural fiber yarn: Rami, jute, sisal, or sturdy cotton string (#8 or doubled finer yarn)
- Cord for base/walls: Shear cord or sisal rope, 2 cm (0.75”) thick
Available at hardware/construction stores; 10–16 mm recommended thickness - Crochet hooks:
- 1 x 6 mm or equivalent (for main body, adjust for thickness)
- 1 x 4 mm/US G (for ears/tighter top edge)
- Stitch marker
- Masking tape or duct tape (for binding cord ends)
- Scissors
- Yarn needle (for weaving/finishing)
- Measuring tape
- (Optional) Label, contrasting yarn for facial details
- (Optional) Basket accessories: felt, thread for whiskers, etc.
Measurements / Sizing
- Base diameter: approx. 17 cm (6.7”), adjustable
- Height: approx. 12–14 cm (4.7–5.5”) (customizable)
- Cord thickness: 2 cm (0.75”) recommended
(Schematic suggestion: a round cylinder basket with cat ears on rim; base size sets finished basket size.)
Gauge
- Gauge not critical—basket should be tight and sturdy, stitches snug around cord.
Stitch Abbreviations
| Abbr. | Stitch |
|---|---|
| ch | Chain |
| sc | Single crochet |
| inc | Increase (2 sc in same st) |
| sk | Skip |
| sl st | Slip stitch |
| st(s) | Stitch(es) |
| rep | Repeat |
Special Stitches
Magic Ring: Adjustable ring for starting in the round.
Waistcoat Stitch (Centered Single Crochet):
Insert hook between the “legs” of the single crochet stitch below (not in the top loops, but through the “V” at the front), yarn over, pull up a loop, yarn over, pull through two loops.
(Works best if stitches are not too tight.)
Working Around a Cord:
With yarn held double, work stitches enclosing the thick cord throughout for structure.
The Crochet Pattern
Preparation
- Cord Prep:
- Trim each cord end diagonally for a taper.
- Wrap end with masking tape or duct tape to prevent fraying.
- Cut cord length appropriate for desired basket base circumference, plus extra for edging.
- Yarn:
- Hold two strands together throughout for a thick, sturdy fabric.
- Use natural fiber yarn for best results.
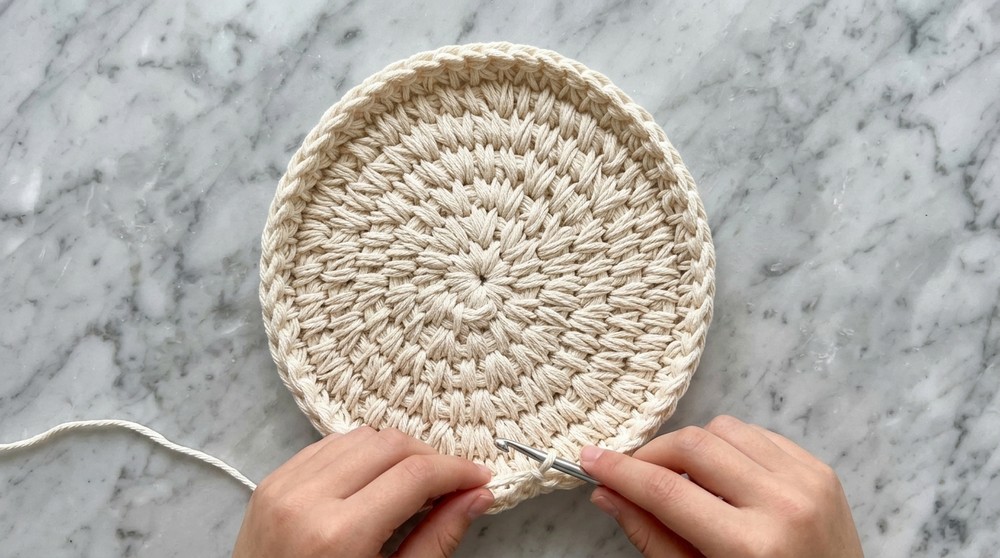
Base (Worked in Spiral Rounds, Covering Cord)
Start with 6 mm hook (or as needed for your materials):
Round 1 – Magic Ring
- Make a magic ring with your doubled yarn.
- Into the ring, crochet 9 sc (not too tight), working over both tail and ring.
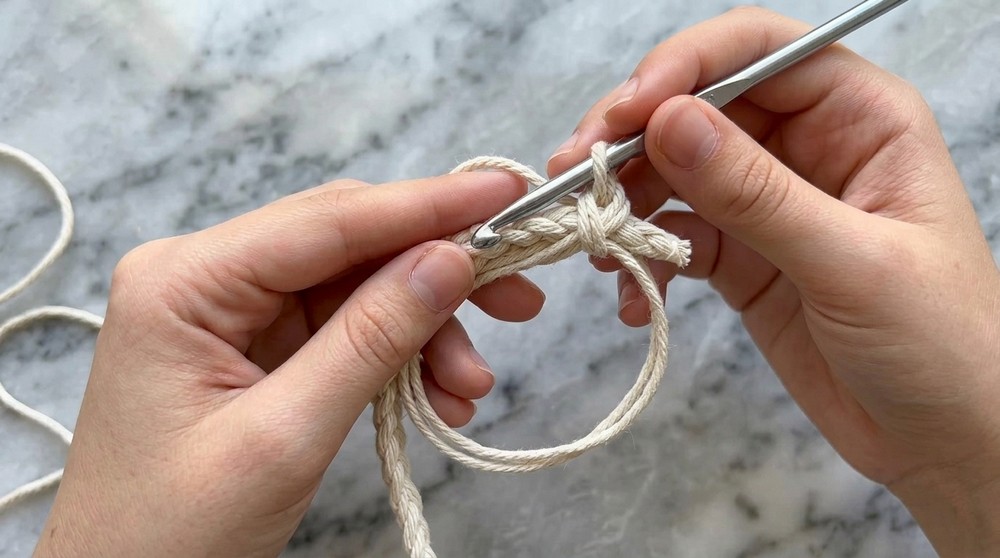
- Tighten ring, pull tail to close snug.
- Place marker in first st.
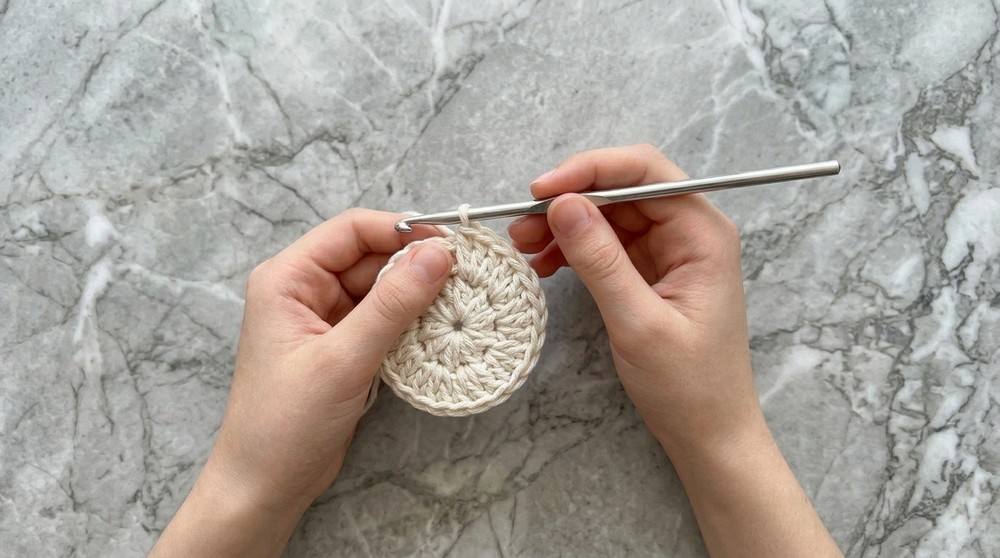
Round 2
- 2 waistcoat sc in each st around (working into center “V” of previous row)—18 sts.
- Continue positioning cord at center and keep stitches evenly snug around it.
Round 3
- *1 waistcoat sc in next st, 2 waistcoat sc in next st; rep from * around – 27 sts.
Round 4
- *1 waistcoat sc in next 2 sts, 2 waistcoat sc in next st; rep from * around – 36 sts.
Round 5
- *1 waistcoat sc in each of next 3 sts, 2 waistcoat sc in next st; rep from * around – 45 sts.
Round 6 and on
- Continue increase rounds for desired base size:
- Each round increases the number of sc between increases by one (i.e., next would be 4 sc, then 2 sc in next st…).
Tip: If you want a larger base, keep increasing in this way. Finished base sample: ~17 cm with 6 rounds.
Stop increases at diameter desired for your basket.
Walls (Work Even, No Increases)
- Once your base is the desired size, continue to work waistcoat sc into each st around—no more increases.
- For first wall round, make sure cord is positioned up and at the back of stitch heads, to build a vertical wall.
- Continue around and around, forming the basket sides by working centered sc into each st.
- Occasionally adjust stitches so the cord remains taut and the wall forms straight up (not flaring out or caving in).
- Work six wall rounds (or as tall as desired).
Cat Ears (Switch to 4 mm hook for denser ear shape)
At last wall round:
- Ear 1:
- At chosen spot, switch to 4 mm hook.
- Work 6 sc around the cord only (not into basket edge)—this forms one ear “side.”
- Ch 1 (for point), then 6 more sc around the cord for ear “other side.”
- Sk 4 sts at basket edge; continue with wall stitch pattern.
- Work 10 sc (in centered sc) on the rim between ears.
- Repeat Ear instructions for Ear 2.
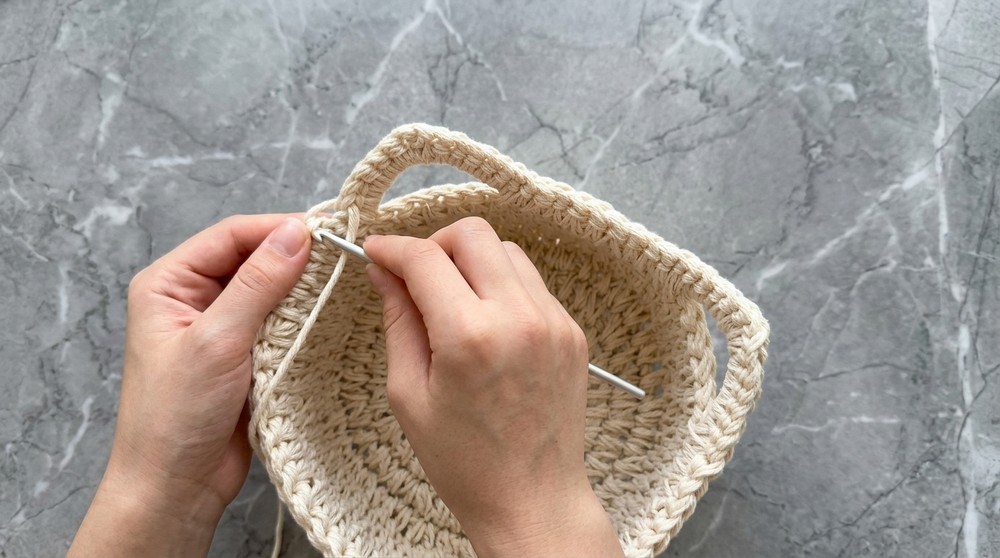
- Sk 4 sts; continue work to end of round, finishing a few sts before/after ear as needed.
Finishing the Rim and Endings
- Cut cord straight and tape end.
- Work last 2-3 sc directly onto rim (as far as cord reaches).
- For clean finish, work 1-2 sc with only yarn, no cord, to cinch if needed.
- Cut yarn, leaving long tail.
- Use yarn needle to weave end back into inside stitch heads for invisibility.
- Use small hook or needle to tuck in cord end between stitches, securing with tape if necessary.
Assembly & Finished Size
- Add optional accents:
- Use split yarn or contrasting threads for mustache or whiskers by pulling thread through basket wall and tying small knots.
- Sew or glue a tag/label at the rim edge.
- For a face, embroider or attach felt pieces for eyes and nose.
- Typical dimensions:
- Base diameter: 17 cm (customize via base rounds)
- Height: 12–14 cm (customize via wall rounds)
- Ears: Positioned opposite, each over 12 sc (6+1+6)
- Cord thickness: 2 cm for maximum structure
- To block baskets: Stuff with towels or paper, then use a steam iron to gently heat-shape (avoid melting synthetic ropes/yarn).
- Care: Keep dry; spot-clean as needed to preserve fiber and cord strength.