Blossom Crochet Blossom Top Pattern Perfect For Parties
Fresh flower style blooms on every outfit with the Crochet Blossom Top Pattern that makes you shine bright and feel special at every occasion.
Do you want to wear something that feels like sunshine and flowers every day? Bright colors and soft flower designs make your outfit fresh and happy. You can wear this beautiful top at family gatherings casual outings beach parties or even on simple everyday walks and it is sure to catch everyone’s attention. With simple details and pretty flower shapes linked together, the Crochet Blossom Top pattern fits any age and style.
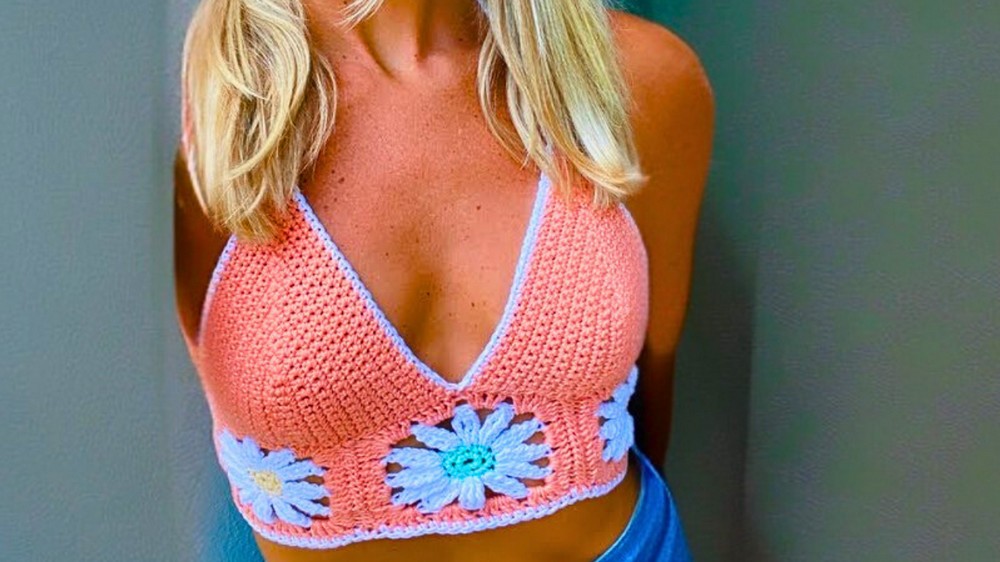
Refresh Crochet Blossom Top Pattern That Changes Your Look
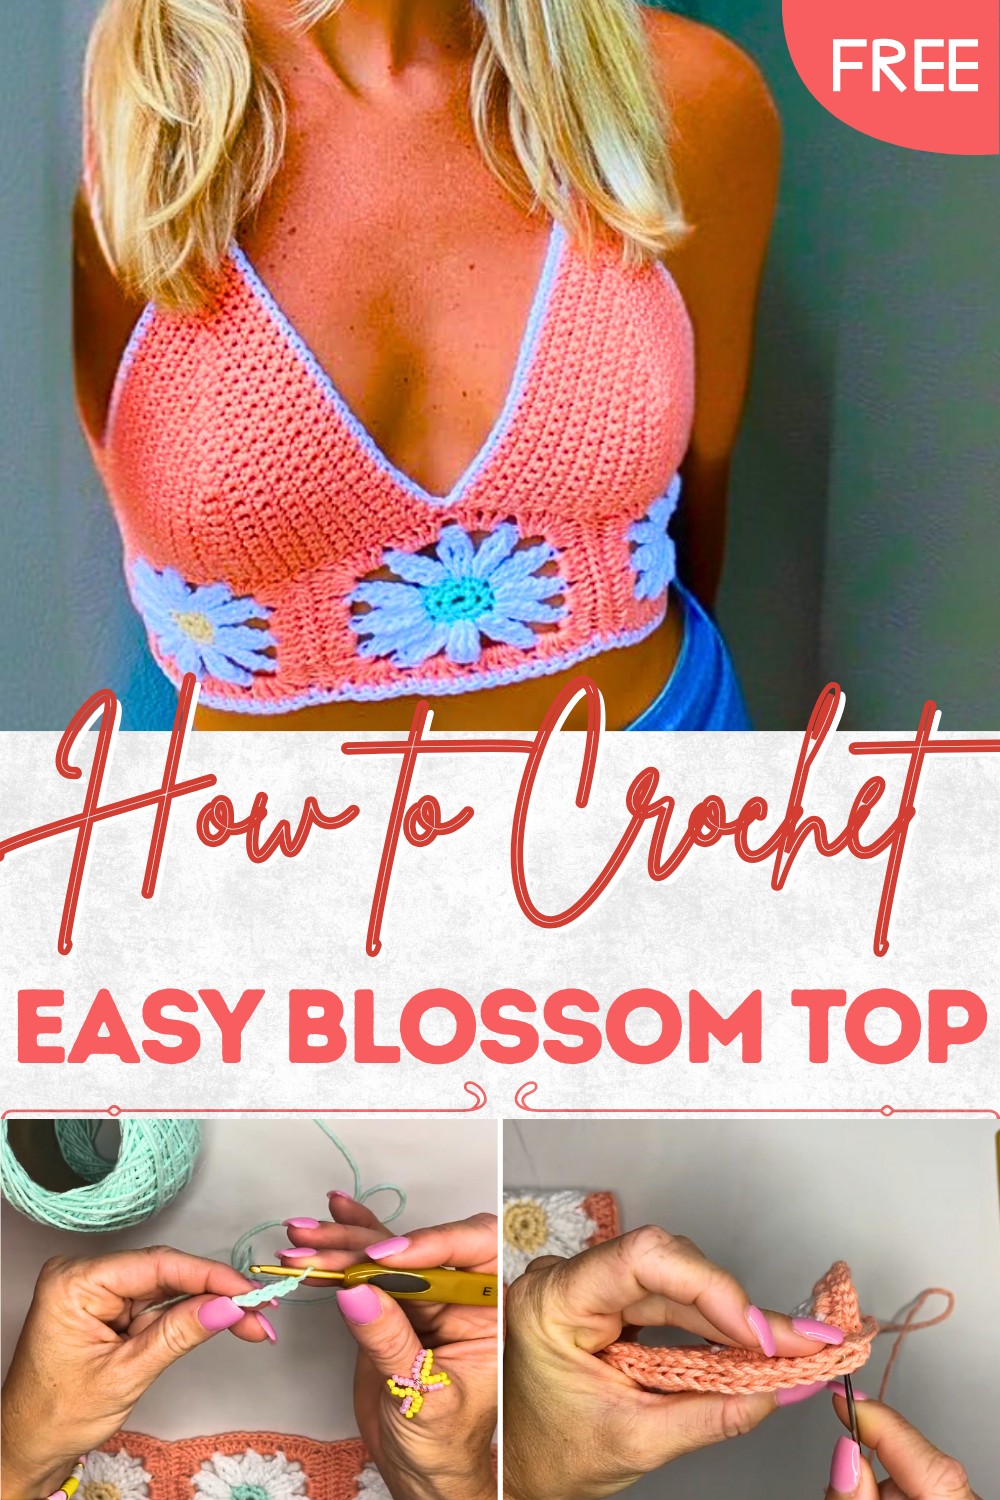
Light yarn makes you feel cool and comfortable on warm days while keeping you looking lovely and relaxed. This top is easy to wear for anyone even if you are new to stylish clothes and it gives you confidence wherever you go. Pair it with jeans loose pants or a skirt and you are ready for any special moment. Choose your favorite colors and let your happy side shine easy and bright.
Materials
- Yarn: DK weight yarn (sample uses Circulo Natural Cotton; approx. 7–8 oz depending on size)
- Fiber content: 100% cotton recommended for warm climates, but any DK weight yarn is suitable
- Crochet Hook: Size E (3.5 mm)
- Notions:
- Measuring tape
- Yarn needle
- Scissors
- Stitch markers
Key Abbreviations (US Terms)
| Abbreviation | Description |
|---|---|
| ch | Chain |
| st(s) | Stitch(es) |
| sl st | Slip Stitch |
| sc | Single Crochet |
| dc | Double Crochet |
| dtr | Double Treble Crochet |
| MR | Magic Ring |
| inc | Increase (2 sc in same st) |
Special Notes
- The sample uses three colors: center, petal, and main.
- Gauge is approximately 4″ per square, but variations will not greatly impact fit.
- Custom fit is achieved by your own bust measurements and triangle size.
- All joins are made with right sides facing together for a smooth finish.
Pattern Instructions
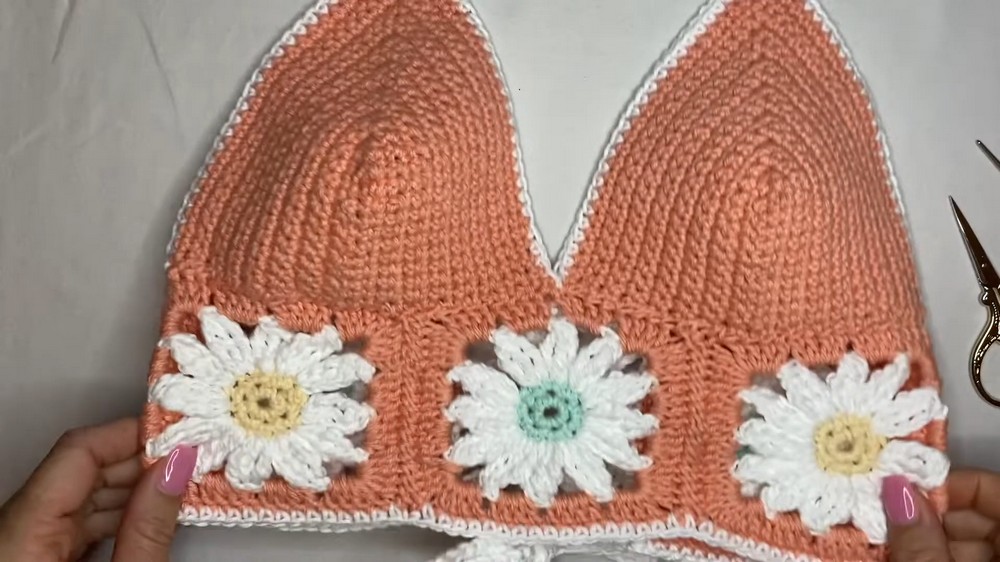
1. Flower Square (Make 5)
A. Center of Flower (Color A)
- Make a slip knot.
- Ch 4, join with a sl st in the first ch to form a ring.
- Ch 1, work 6 sc into the center of the ring. Join with a sl st to the first sc.
- Ch 1, 2 sc in the same st (inc), 2 sc in each st around (total 12 sc). Join with a sl st to the first sc.
- Cut yarn and fasten off.
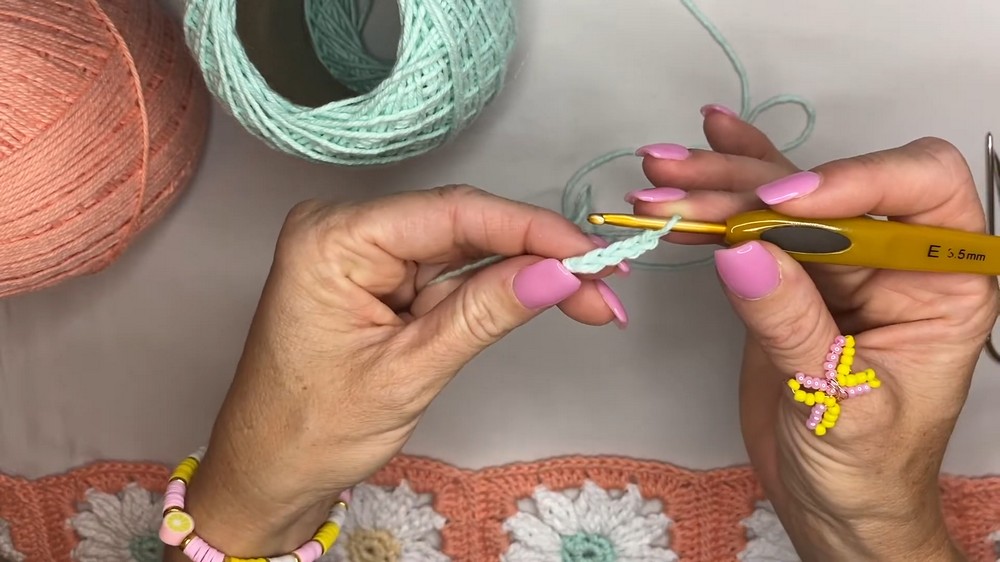
B. Petals (Color B)
- Join new color in the same st where you ended the previous round.
- Ch 4.
- In the same st:
- 2 dtr TOG (see below for dtr TOG explanation), leaving last loop of each on hook, then pull through all loops (this forms the first petal base).
- Ch 3.
- In the next st:
- 3 dtr TOG (yarn over 3 times, insert, pull up, [yo, pull through 2] three times, leaving last loop on hook for each dtr, repeat 3 times, then pull through all loops).
- Ch 3.
- Repeat Step 5 all the way around (total 12 petals). Ch 3 after last petal, join with sl st to top of the first petal.
- Fasten off.
Double Treble Crochet Together (dtr TOG): Yarn over 3 times, insert hook in st, yo, pull up a loop, [yo, pull through 2] three times (2 loops remain). For next dtr, repeat previous, leaving last loop each time until all are on the hook, yo, pull through all loops.
C. Forming the Square (Color C)
- Join main color in any ch-3 space of the previous round.
- Ch 3 (counts as first dc), 3 dc in same space, ch 2, 4 dc in same space (corner made).
- Next ch-3 space: 4 dc.
- Next ch-3 space: 4 dc.
- Next ch-3 space: 4 dc, ch 2, 4 dc (corner).
- Repeat steps 3–5 until all 4 corners are made and sides are filled.
- Join with sl st to top of beginning ch 3, fasten off.
Each square should measure about 4 inches.
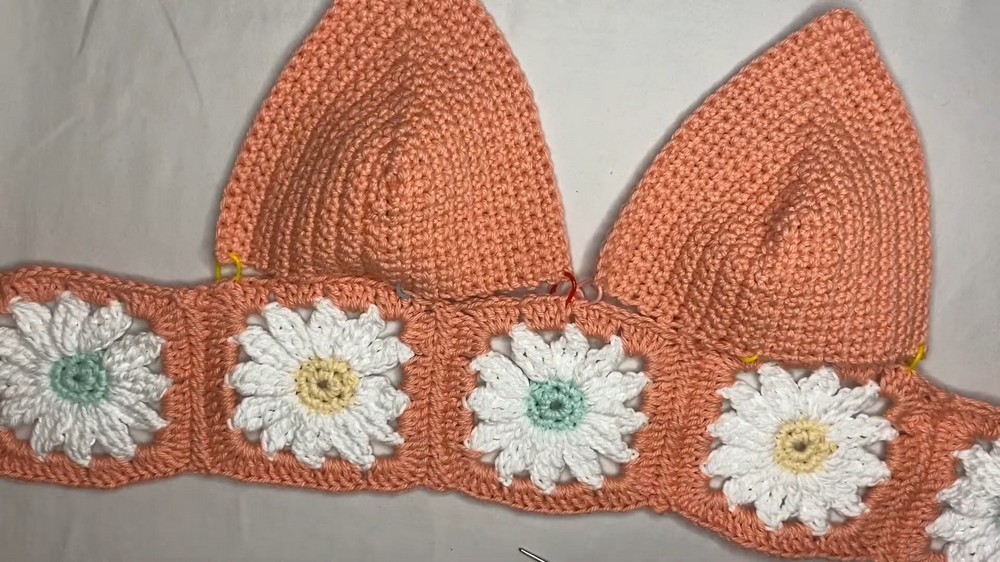
2. Joining Squares
- Arrange 5 finished squares in a row, right sides facing each other.
- Using whip stitch (or your preferred seaming method), sew squares together into a strip (the “band” of the top).
- Cut a 12–15” strand of yarn, thread through a yarn needle.
- Insert needle through corners (matching both squares), whip stitch through all 4 loops, continue across each seam.
- Cut a 12–15” strand of yarn, thread through a yarn needle.
- Fasten off and weave in ends.
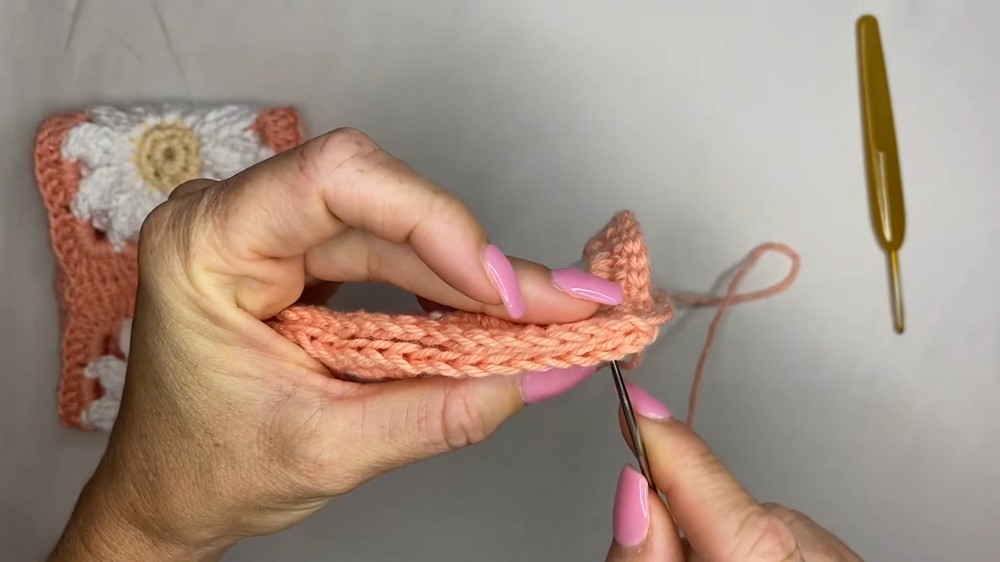
3. Triangle Cups (Make 2)
Each triangle is sized to your needs. Use a measuring tape to measure from the base of your breast/nipple up for best fit.
- Ch as many as needed to reach your measurement (for example, about 12 ch ~2.5” for an A-cup, but adjust as desired).
- Row 1: Sc in 2nd ch from hook and each across (place stitch marker on stand-by).
- In the last ch, work 3 sc (this forms the apex), place a stitch marker in the center of the 3 sc, turn.
- Work along the bottom of the foundation chain, sc in each st.
- Ch 1, turn.
- Sc in each st up to the marker, remove marker, work 3 sc in that marked st, place marker in the center st of these 3, sc down other side.
- Ch 1, turn.
- Repeat Step 6, always putting 3 sc in the marked st, moving marker to center of the increase each time, until triangle is desired size (try on for best fit, and count your rows to make a matching second triangle).
- Fasten off and weave in ends.
4. Attaching Cups to Band
- Lay out joined squares and place triangle cups on top, positioning edges neatly along the band.
- Use stitch markers to pin cups in place (centered as desired, typically at the center or close together).
- With a long strand of yarn and yarn needle, whip stitch cups to band, right sides facing together.
- Fasten off and weave in ends.
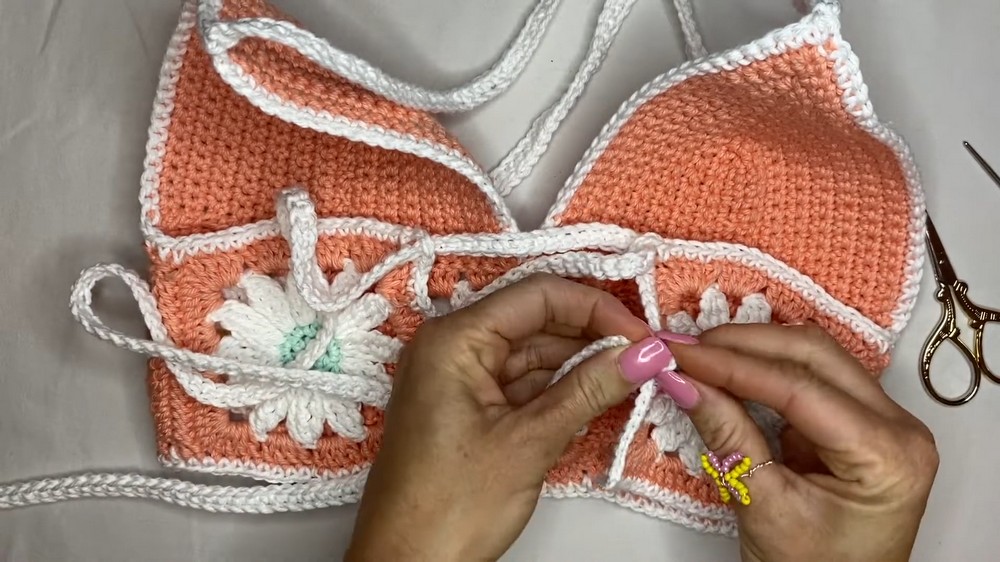
5. Border and Neck/Shoulder Straps
A. Border
- Join desired border color (sample uses white) at top corner of the band on the right side.
- Ch 1, sc in each st across the band and up the side of the triangle.
- At top corner of triangle, work sc, then ch 65 (or as long as desired for your neck strap).
- Sc in 2nd ch from hook and each ch back to the triangle apex.
- Sl st back into same top st of the triangle.
- Continue sc down the opposite side of the triangle.
- Repeat for other triangle cup (sc along band, up triangle, ch 65 for other neck strap, sc back to the top of triangle, sl st into same st, sc down the side, and along band if needed).
- Fasten off.
B. Back Loops (for Lacing Closure)
- At band edge, sc in corner, ch 4.
- Next 7 sts: sc in each.
- Ch 4, sc in next 7 sts.
- Ch 4, sc in the last corner.
- Turn, ch 1, work a row of sc across the whole band edge and loops.
- Repeat the above loops for the other end of the band.
6. Back Lacing Strap
- With main or border color, ch 200 (or desired length; longer for wider circumference).
- Sc in 2nd ch from hook and in each ch across.
- Fasten off.
- Fold strap in half, and use either a hook or stitch markers to weave through the ch-4 loops on both sides in a criss-cross (shoelace) fashion.
- Knot each end of the strap to prevent unraveling.
7. Finishing
- Weave in all ends securely.
- Try on top and adjust straps as needed for perfect fit.
- Block gently for best square shape (optional).
Conclusion
The Blossom Flower Top is a vibrant, fully adjustable summer garment. With careful measurements, your top will fit comfortably and securely. The detailed floral squares and laced closures provide both visual charm and ease of wear.
Pattern Corrections & Tips
- Triangle Cups: For additional coverage, simply work more rows on each triangle and keep track to ensure both are identical.
- Straps: Adjust chain lengths for your preference; longer or shorter depending on comfort.
- Joining: Always join pieces with right sides facing for a seamless finish.
- Back Lacing Strap: To prevent strap slipping through loops, knot securely at each end after weaving.
- Finishing: If your squares or triangles curl, block them flat before assembly for best results.