Enchanting Crochet Pumpkin Granny Square Ideal for Fall Homes
Harvest cozy vibes with this Crochet Pumpkin Granny Square Pattern for a festive, charming accessory that enriches autumn projects.
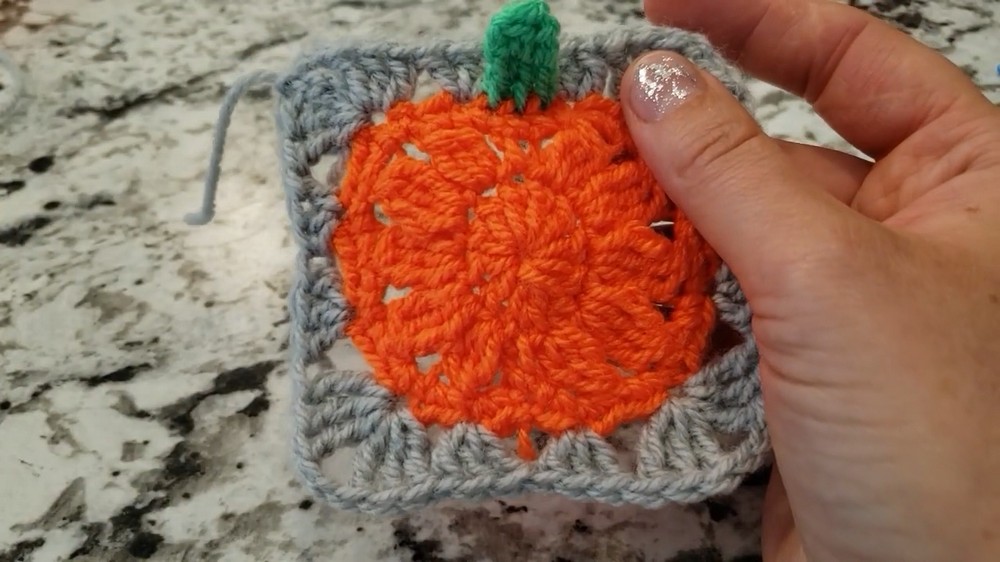
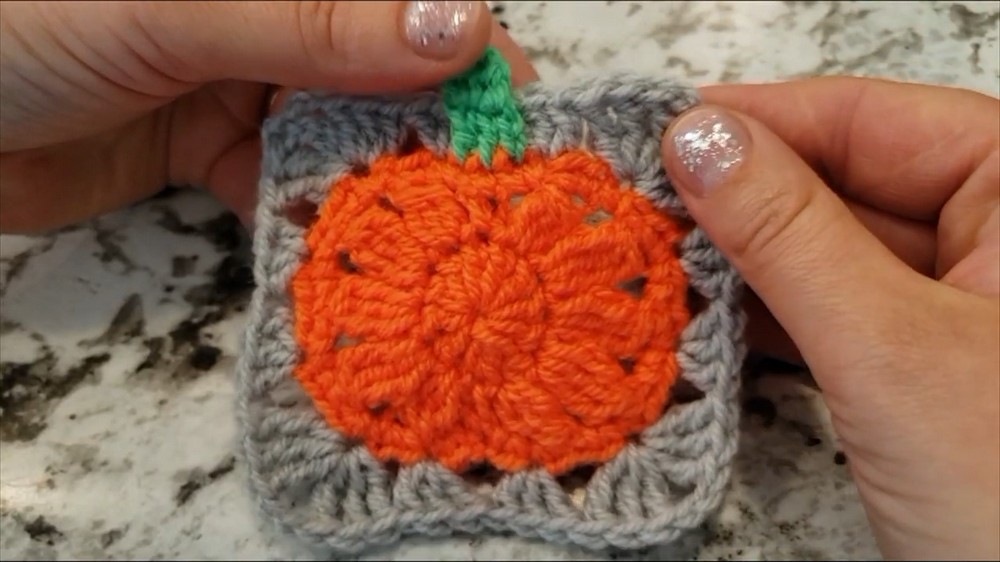
The charm of autumn often shines brightest in its smallest details, crisp leaves underfoot, golden hues in the fading light, and cozy textures that bring warmth indoors. The crochet pumpkin granny square captures that same refined seasonal beauty, pairing the timeless appeal of a classic square with the playful sophistication of a pumpkin motif. Its structure offers both elegance and versatility, making it ideal for blankets, throws, cushions, or table accents that instantly add character to a room.
Artistic Crochet Pumpkin Granny Square for Autumn Charm
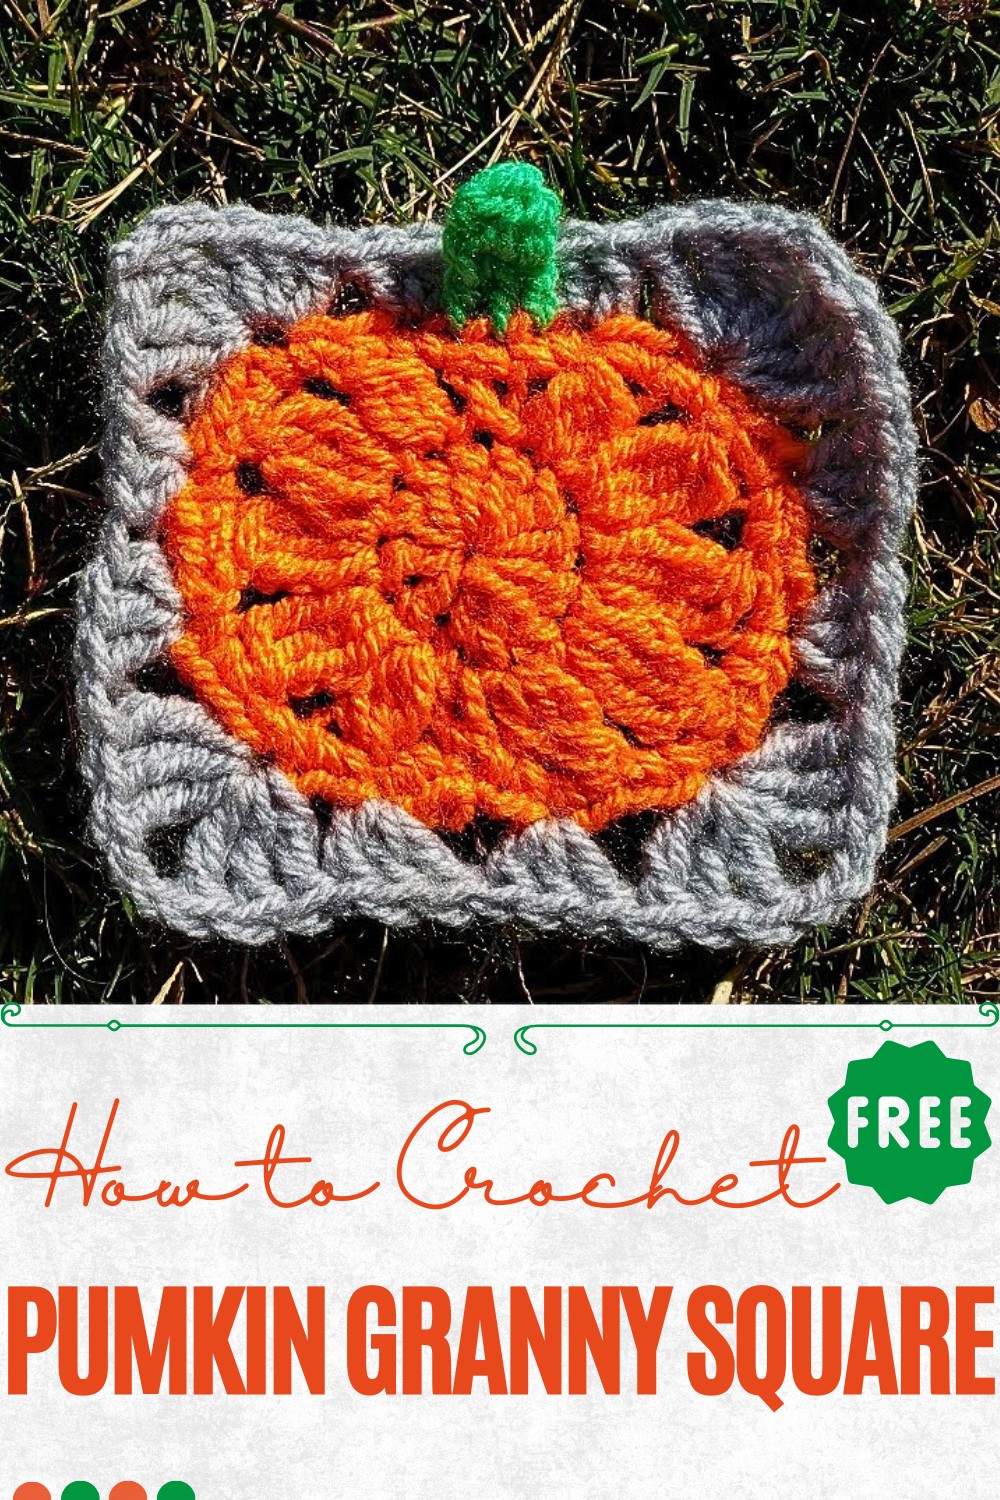
The bold pumpkin shape rests harmoniously within the balanced frame of the square, creating a piece that feels both artistic and functional. Each stitch contributes to a texture that is sturdy yet graceful, offering lasting durability without losing its delicate charm. Beyond décor, it carries an inviting spirit—perfect for personal keepsakes or thoughtful handmade gifts that speak of care and style.
When joined together, the squares form larger pieces that radiate warmth while maintaining a refined seasonal touch. Whether used as subtle accents or centerpiece projects, they enhance spaces with their unique combination of rustic inspiration and classic appeal. The crochet pumpkin granny square stands as a timeless motif—interesting in detail, elegant in style, and endlessly versatile in its uses.
Materials Needed
- Yarn:
- Three different yarn colors (suggested: orange for the pumpkin, green for the stem, and another color for the square border).
- The tutorial uses textured yarn for a fuller effect.
- Hook:
- A crochet hook (size not explicitly mentioned, but typical sizes like 4.0 mm or 5.0 mm work well depending on your yarn).
- Tools:
- Scissors.
- Yarn needle to weave in ends.
Special Features
- Magic Ring Start: The pumpkin begins with a magic ring, which ensures a neat and tight center for the design.
- Combination of Stitches: It features double crochet, treble crochet, and clusters of stitches joined together, making the square visually dynamic and textured.
- Customization Opportunity: The design can be adapted in size and color to fit other projects or personal preferences.
- Granny Square Format: Combines seasonal design (pumpkin) with the versatility of a traditional granny square layout.
Level of Difficulty
Beginner to Intermediate (Beginner-friendly with intermediate-level techniques explained clearly):
Although the pattern involves a few specialized techniques like the magic ring and joined clusters, the instructor provides clear guidance, making it approachable for beginners with a basic crochet foundation.
Step-by-Step Instructions
1: Crocheting the Pumpkin
- Create a Magic Ring:
- Form a slip knot by looping the yarn as demonstrated in the video. Adjust the loop to create the magic ring.
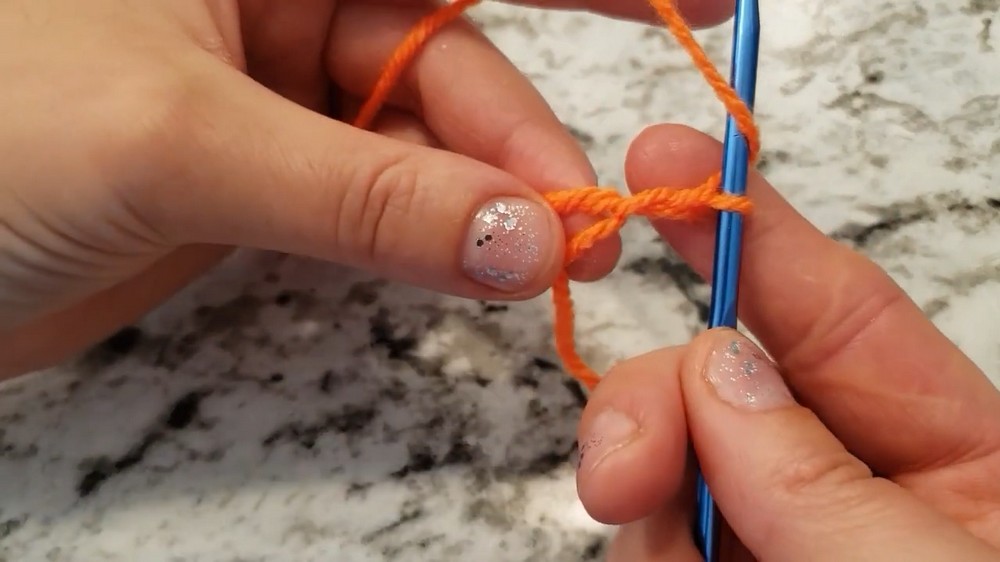
- Form a slip knot by looping the yarn as demonstrated in the video. Adjust the loop to create the magic ring.
- First Row of Double Crochets (DC):
- Chain one after forming the magic ring.
- Crochet 11 double crochets (DC) inside the ring.
- Pull the tail of the magic ring to tighten the center.
- Join the row by making a slip stitch into the first stitch.
- Forming the Pumpkin Shape:
- Clusters of Stitches:
- Chain one and add a single crochet in the same stitch.
- Cluster 1: In the next stitch, create three double crochets joined together. Chain two.

- Cluster 2, 3, 4: In subsequent stitches, make three treble crochets joined together, chaining two after each cluster.
- Add one more double crochet cluster at the end.
- Reverse for the Second Half:
- Repeat the same clusters in reverse order to complete the second side of the pumpkin.
- The sequence includes double crochet joined clusters, followed by three sets of treble crochet joined clusters.
- After the final treble cluster, finish with a single crochet.
- Clusters of Stitches:
- Outline with Single Crochets:
- Crochet two single crochets in each chain-2 space and the stitch where the clusters join.
- Continue around the pumpkin, securing the shape.
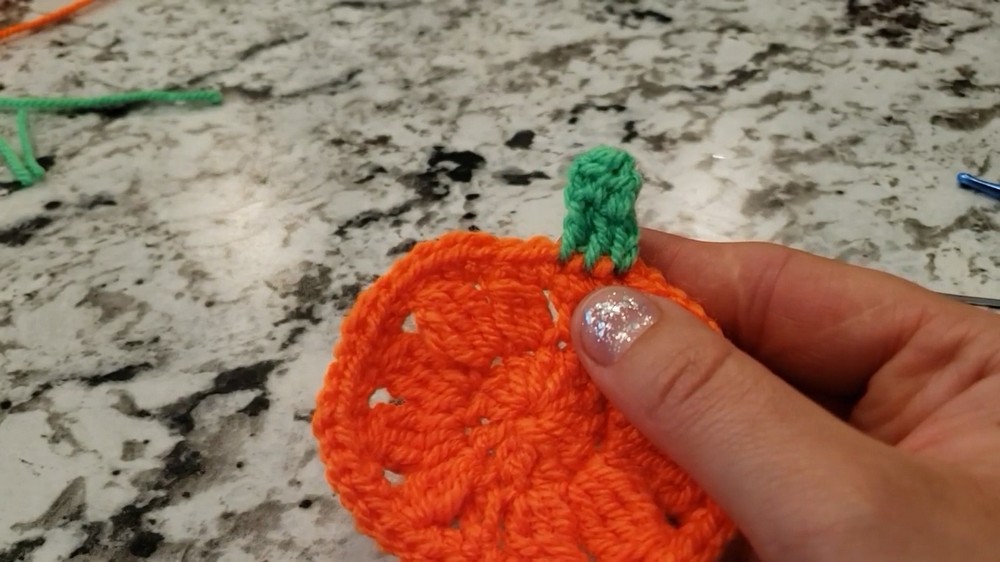
2: Adding the Stem
- Position the Stem:
- Identify two stitches at the top center of the pumpkin for placement.
- Crochet the Stem:
- Start by joining the green yarn to the pumpkin and chain two.
- Crochet one double crochet in the middle stitch and one in the next stitch, forming a vertical stem.
- Turn and work another row of double crochets.
- Join all the double crochets together to complete the stem.
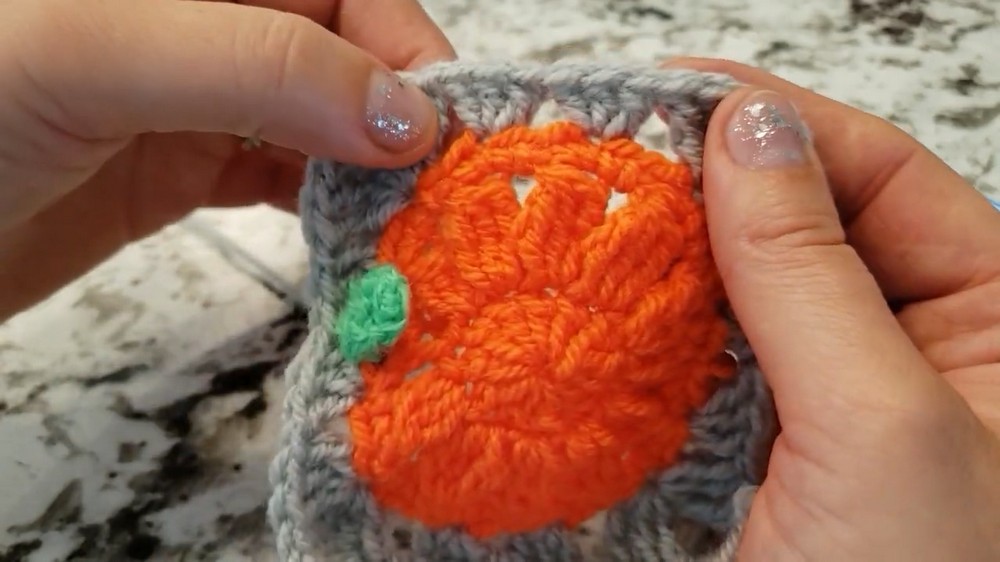
3: Transforming into a Granny Square
- Find Placement for the Granny Square Edging:
- Start in the space between the first cluster of three treble crochets and locate a stitch at the top.
- Begin the Edging:
- Introduce the next yarn color and chain three to count as your first treble crochet.
- In the same space, add two more treble crochets to form the first corner.
- Corners and Sides:
- For sides: Find spaces between clusters and work three double or half-double crochets depending on the position.
- For corners: Chain two in between clusters of three treble crochets worked in the same stitch to create square corners.
- Repeat this process around the pumpkin, anchoring the shape into a square.
- Finish the Square:
- When you reach the end, join the edging with a slip stitch in the third chain from the start. Cut and secure the yarn.
- When you reach the end, join the edging with a slip stitch in the third chain from the start. Cut and secure the yarn.
Tutor’s Suggestions
- Tighten the Magic Ring: Ensure the magic ring is pulled tightly to close the center gap completely.
- Stretch the Square: After completing the project, stretch the corners and sides to shape the square accurately.
- Blocking the Square: For a more polished look, wet block the square by lightly wetting it, shaping it, and letting it dry flat.
- Slow Down for Clusters: If you’re a beginner, slow down when working on joined clusters to maintain even stitch tension.
Uses of the Granny Pumpkin Square
- Festive Blankets: Combine multiple squares for a fall-themed or Halloween-inspired blanket.
- Pillowcases: Sew a few squares together for unique seasonal pillow covers.
- Decorative Layers: Use as coasters, placemats, or hanging decorations.
- Handmade Gifts: Ideal for personalized gifts, combining aesthetic appeal with functionality.
Tip
Work with High-Contrast Colors: When crocheting the pumpkin, use yarn colors that result in a clear distinction between the pumpkin, stem, and the square border. This enhances the overall design and structure.
Conclusion
This Granny Pumpkin Square Crochet pattern is a delightful project with endless possibilities. From learning new techniques like the magic ring and joined clusters to creating a festive design, this project combines creativity with practical skills. With a bit of practice, you can create multiple squares and use them in a variety of projects.