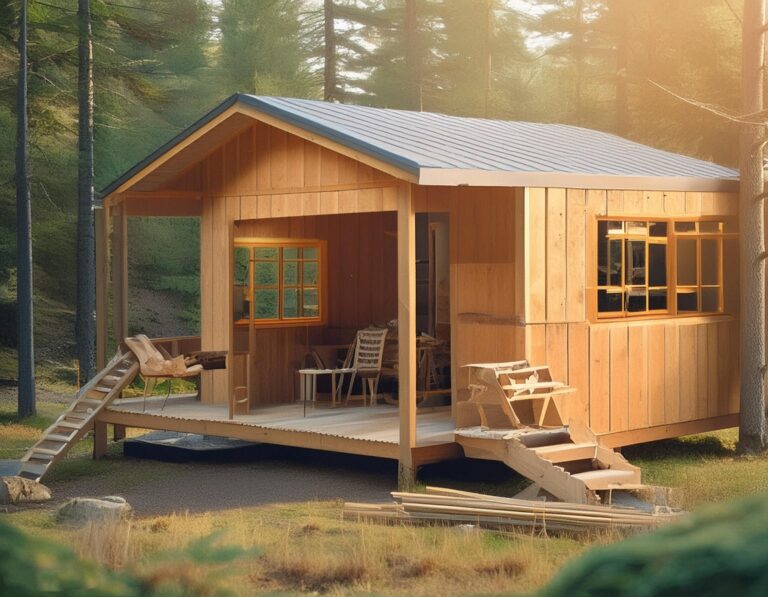
19 DIY Kitchen Shelves Ideas For Storage And Organization
Creating your DIY kitchen shelves can be fun and rewarding, especially when you see the results. The right shelf design can add a fantastic touch to your kitchen, offering additional storage space and an intriguing feature in the room. For a rustic or modern feel, you can use simple materials like wood or metal to help you experiment with shapes and sizes; floating or corner shelves can greatly use underutilized spaces.
Easy To Make Kitchen Shelve Ideas
Incorporating elements such as jar holders for your spices or hooks under the shelves for mugs can also make your DIY shelves more functional. Although making these kitchen shelves serves extremely well in many more fun ways, I hope you find them a great alternative to the store-bought shelving options.
Our Most Fun Kitchen Shelves Ideas Are Suitable For:
The kitchen shelves ideally serve small, open-concept kitchens; they maximize storage and display space. DIY shelves appeal to homeowners and tenants alike, offering budget-friendly decoration while increasing functionality. They can easily adapt to different themes, making them perfect for modern, minimalist, and urban designs. With the potential for personalization, DIY shelves create practical and unique kitchen spaces, enhancing organization, accessibility, and visual appeal.
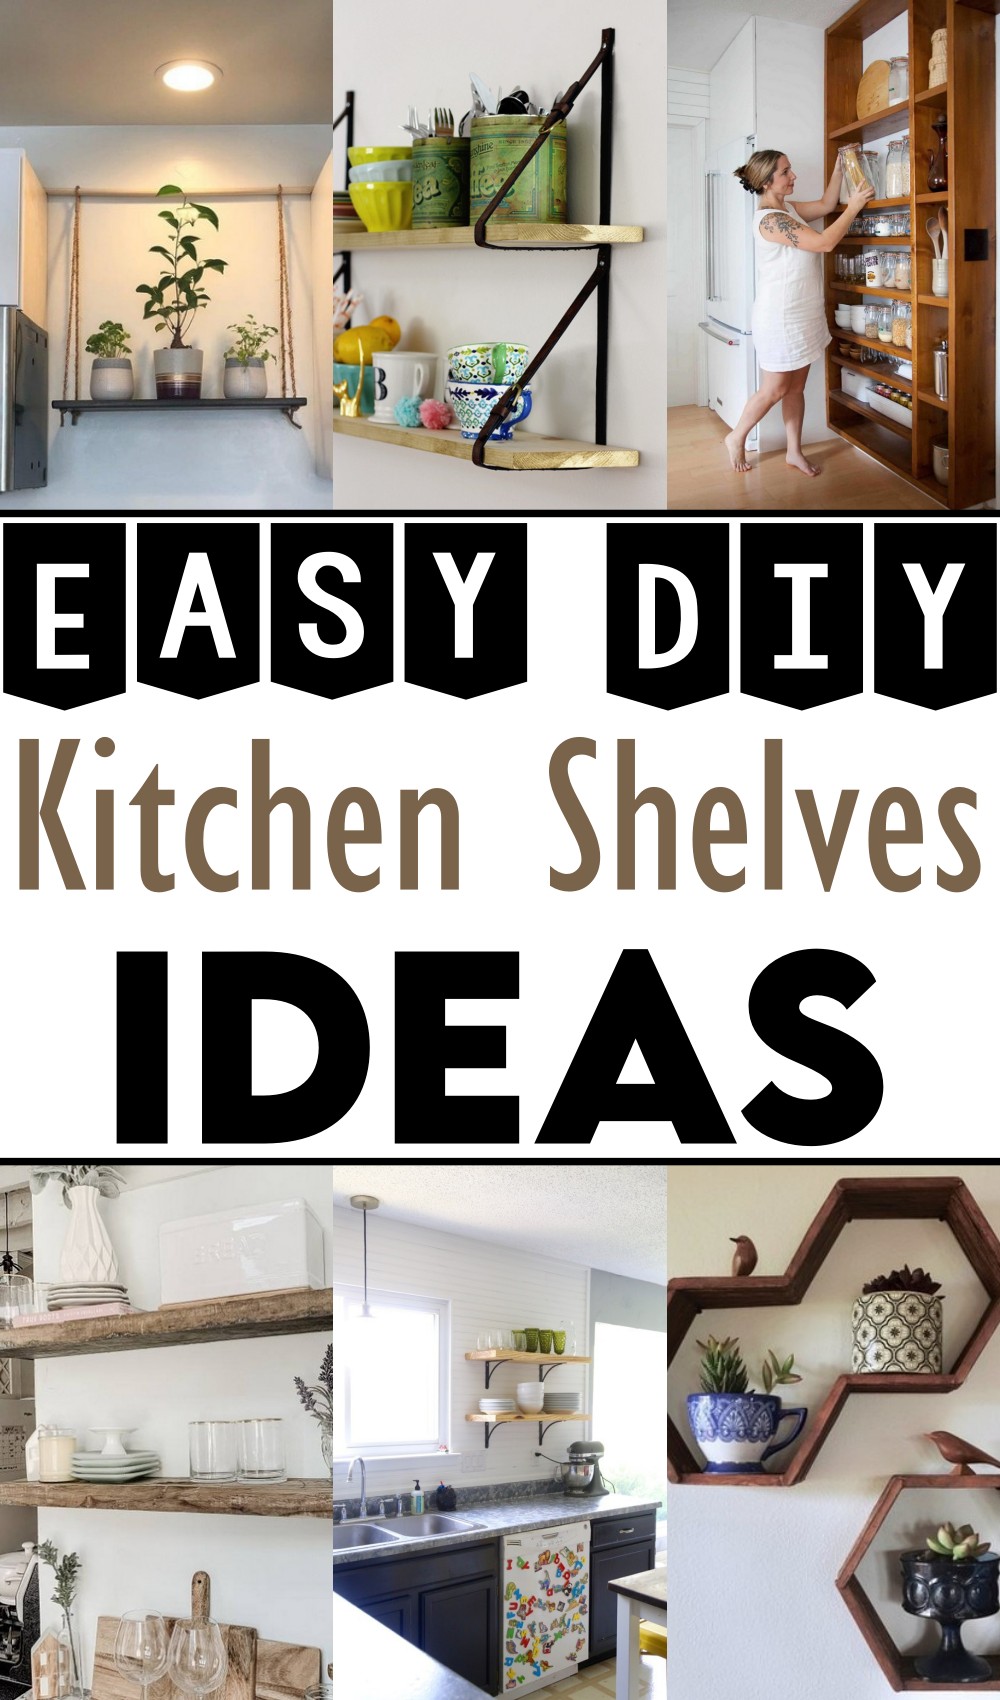
Hanging Kitchen Shelves:
Feeling that your kitchen space lacks that warm, homey vibe? Bring life to it with this easy-to-make Hanging Kitchen Shelf. The suspended shelf maximizes your space, providing room to display delicate potted herbs or keep your favorite spices and cookbooks at hand.
To craft an enticing hanging kitchen shelf, begin by drilling holes into each corner of a wooden board. Insert ropes into the holes, creating loops on each corner’s underside. Double-secure the hold by tying those loops to a dowel, making it twice as sturdy. Stain the shelf for a polished look. Admire your chic, rustic piece that adds character to your kitchen.
Materials:
- 12 x 12 x 24 Poplar board
- 3/4 x 36 wood dowel
- 2x small picture hanging nails
- 10ft of 3/8 twist rope
- Varathane Espresso Stain/Poly
Kitchen Shelf Idea Decor:
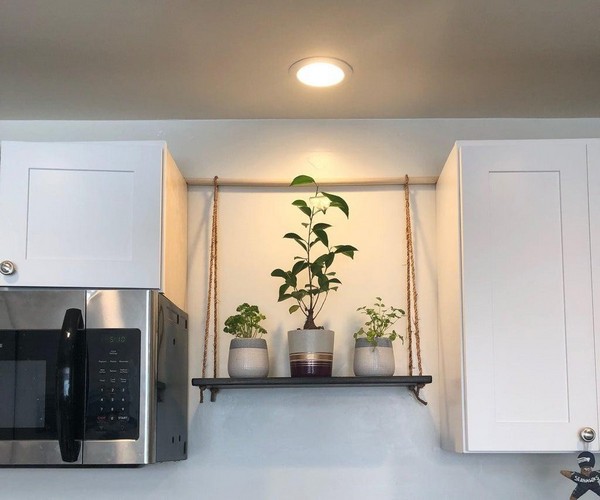
This DIY Kitchen Island is perfect for extra storage and workspace in your kitchen. It’s easy to make, holds numerous kitchen items, and even has extra space for food prep and storing spices. Ideal for smaller kitchens.
Creating a chic kitchen island starts with a pre-sized shelf frame. Use a laminated pine board to bolster the cabinet’s back, then marry the cabinet and frame with reinforcement supports. Adjust the top support for space if necessary. Apply pearl-finish paint for a unified look. Measure and cut green, low-cost bamboo boards for the countertop and shelves. Finish with special oil treatment and reattach the cabinet door.
Materials:
- Cheap pre-made kitchen cabinet
- Maple wood
- Pine wooded pine boar
- Paint
- Bamboo Board
DIY Kitchen Shelving Unit:
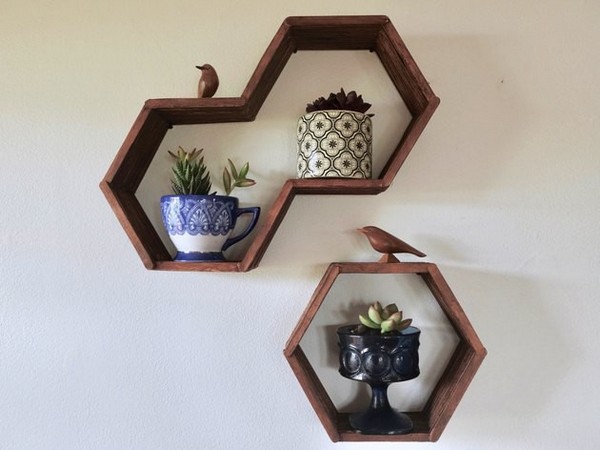
Looking for a stylish yet functional addition to your kitchen? Then try this DIY idea, showcasing a honeycomb design created from popsicle sticks; these shelves provide multiple configuration options while also being budget-friendly.
For making this DIY craft, create a template, arrange popsicle sticks according to it, secure them with hot glue, and then stain them for a rustic finish. Layer them until you achieve the desired depth, ensuring the dimensions suit your needs. A terrific summer project radiating craft and charm!
Materials:
- 45-inch x 1-inch popsicle sticks
- Hexagon shelf template
- Hot glue gun
- A wood stain of your choice
- Craft brushes
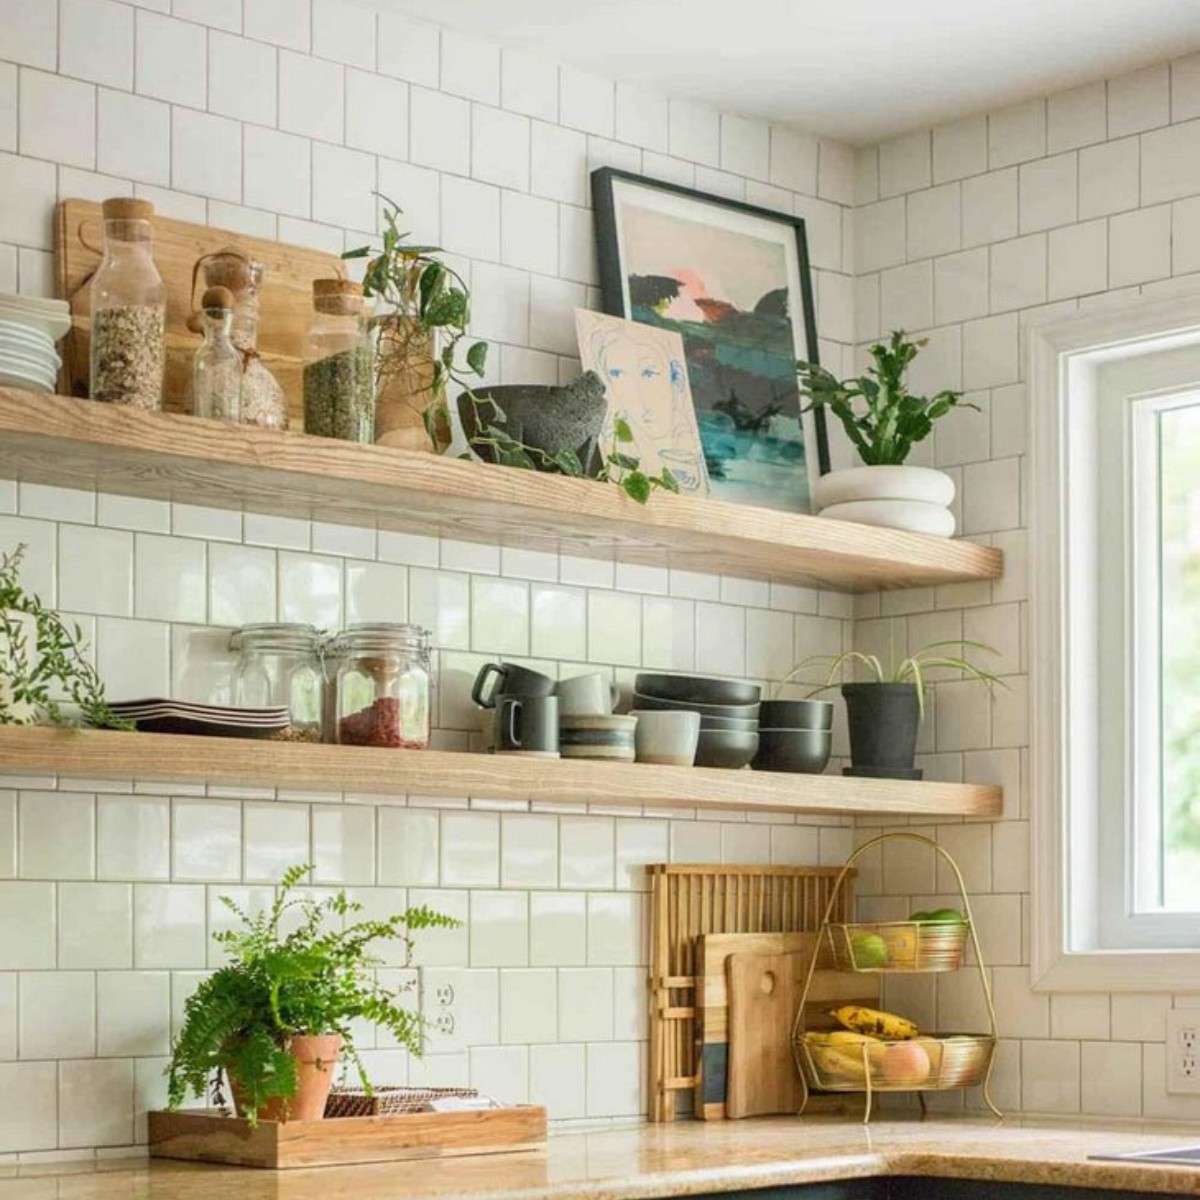
DIY Durable Floating Shelves
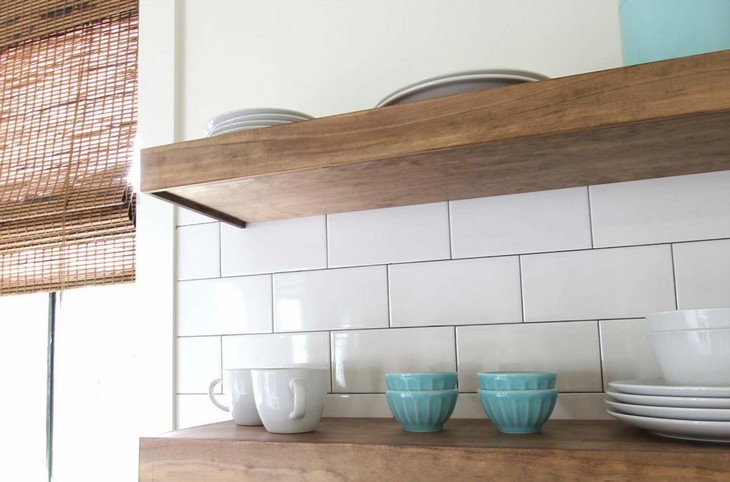
Here’s a simple yet stylish way to add storage to your kitchen. Having the plane and smooth woody look these floating shelves help to cover under-shelf lighting and enhance your kitchen’s overall aesthetics. So why wait? Get started on this project today!
Obtain your tools and supplies, measure and cut your wood appropriately, assemble with glue and nails, then treat with stain for a refined look. Secure sturdy brackets to your wall, and slide your new shelves onto them. The end product is a transformed kitchen space with a personalized touch.
Materials:
- Finish Nailer
- Tape Measurer
- Wood Glue
- Wood Stain
- Wood
- Mounting Brackets
- Stud Finder
- Wood Filler
- Miter Saw
DIY Shelves With Belt Straps
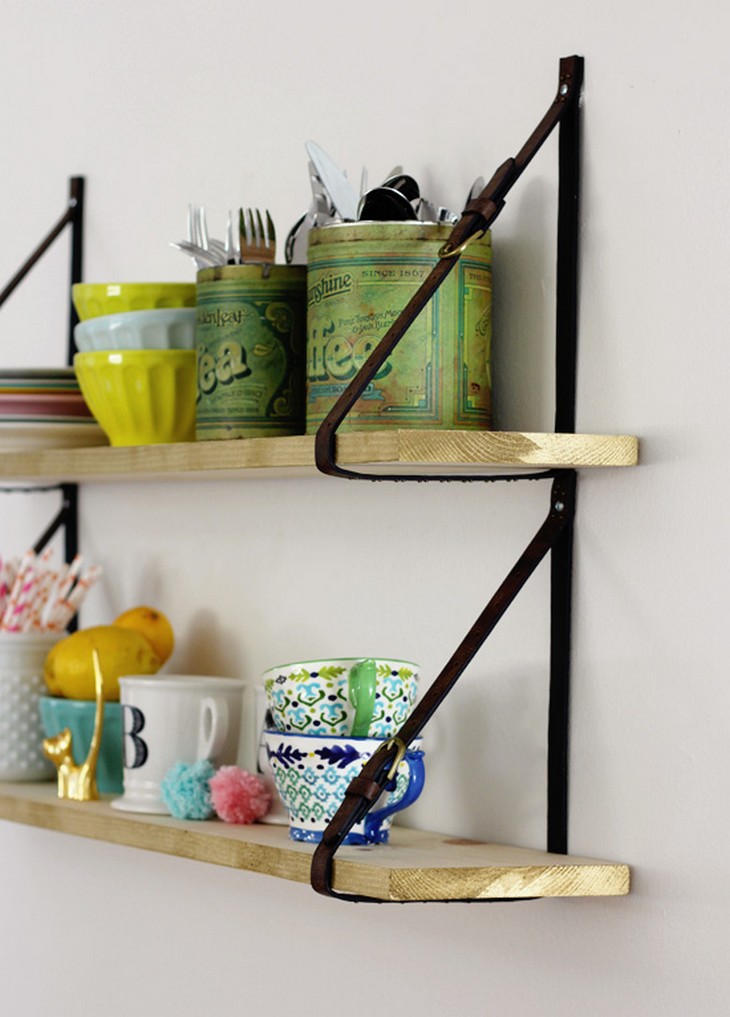
What more easier and more inventive than this DIY floating shelf idea? Its use an affordable belts from brands like Forever 21 as straps, not only adds a quirky aesthetic to the shelves but also ensures they are secure and able to hold heavy items like plant pots, decorative pieces, and utensils.
Begin by cutting your boards to the desired length, then paint their edges for a touch of flair. Use old belts or leather straps, carefully cut and fold them, and attach them to the wall. Thread the boards through the straps, ensuring a snug fit, and let your unique shelves add a personal touch to your decor.
Materials:
- Boards from the hardware store cut to the desired length
- Paint in the color of your choice (optional)
- Four belts or leather straps about 1″ wide
- Four drywall anchors
- A drill
- A Phillips screwdriver
DIY Corner Floating Shelves
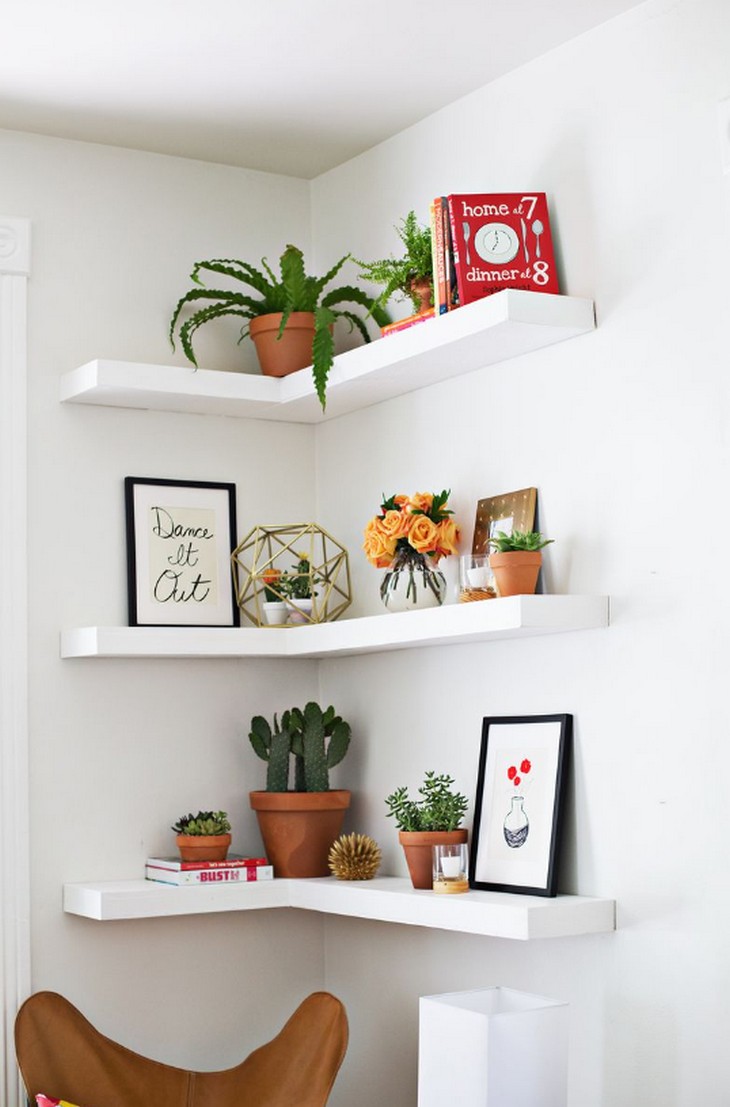
This DIY guide teaches you how to create aesthetically pleasing and sturdy floating shelves that appear to have no brackets, giving your kitchen a sleek, modern look. These cleverly designed shelves can hold heavy items and are ready to transform your simple and boring corner into a modern and eye-catching area where you would love to spend your time!
This corner floating shelf will give you the additional storage space you need for your kitchen. Making this shelf is a good idea, especially if you have little room to store things. This DIY project will show you how to make one pretty quickly. So, With this project, you can create a comprehensive, sturdy shelf to store groceries, cookbooks, or whatever you need in your cabinet.
Materials:
- Six 2 x 4s
- Two 1 x 8 x 12 kiln-dried cedar
- One 1/4 x 4 x 8 plywood
- 1 1/4 wood screws
- Heavy duty fasteners
- Spackle
- Paint
- Caulk
- Wood glue
DIY Kitchen Floating Shelves
As storage can be scarce in smaller kitchens, like those in city rowhomes, these floating shelves offer the perfect solution. Built for under $50, the shelves are crafted from affordable barn wood, featuring a clean, bracket-free look that blends and creates a vintage and luxurious look with your white background!
Start by cutting the wood to the correct dimensions and deciding on the desired look of your shelf. Carefully drill holes into the wood, making sure each is level to ensure your final product will hang evenly. Once your shelves are secured on the wall, you’re all set!
Materials:
- Barn wood
- Brackets
- Drill with bit
- Screw eye
- Basic decorative items for styling
DIY Tetris Shelves
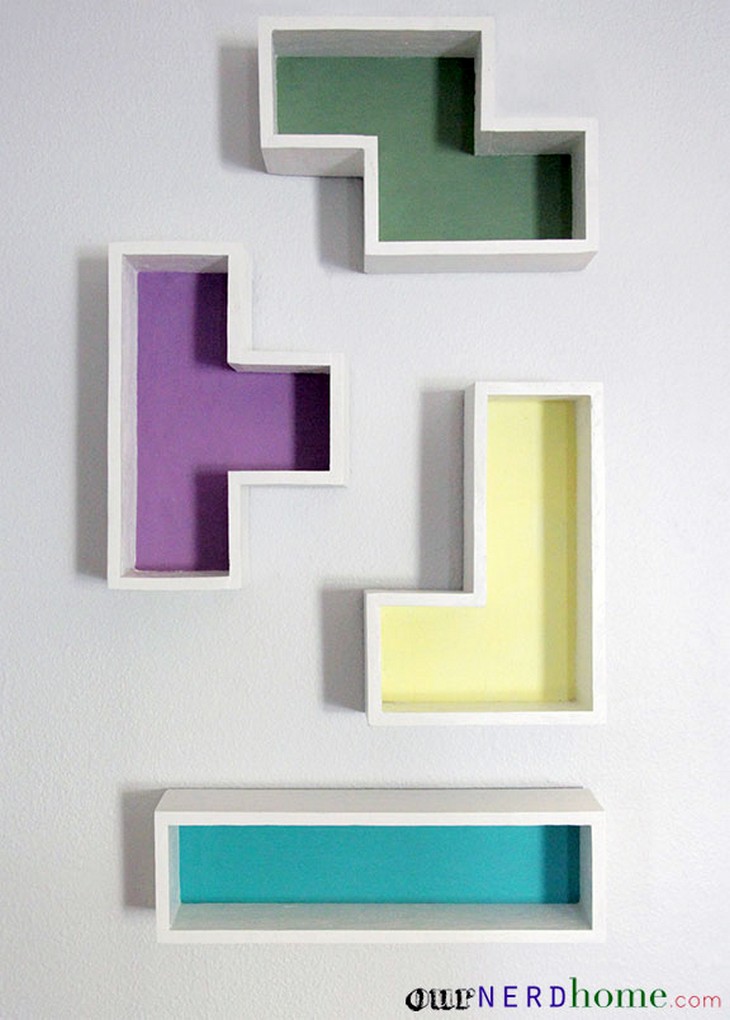
Unleash your inner gaming geek with these DIY Tetris Shelves. Ideal for enhancing your kitchen space, these shelves add a splash of playful touch while solving storage problems. Flexible and affordable, it’s like playing Tetris with your own kitchen storage.
Creating Tetris-inspired shelves is a fun and easy DIY project. Begin with a 1/2″ plywood sheet and sketch the iconic Tetris shapes on a 4×4 grid. Cut your shapes using a jigsaw and prepare the pieces for the sides. Assemble with wood glue and nails, adding extra length to some pieces for unmetered sides. Finish with wood filler, sanding for smoothness, and paint in your chosen colors.
Materials:
- 1/2 inch plywood
- Jigsaw or any similar tool for cutting wood
- A ruler or any measuring tool
- Wood glue
- Regular finishing nails
- Paint, Wood filler
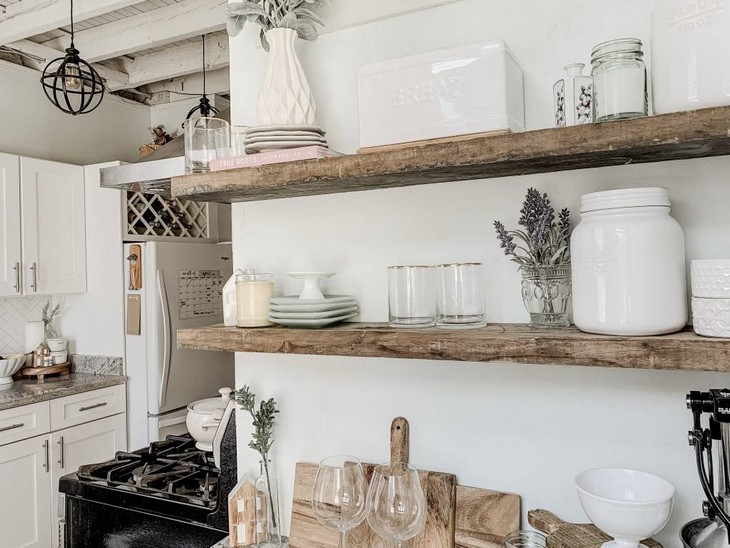
DIY Large Shelf
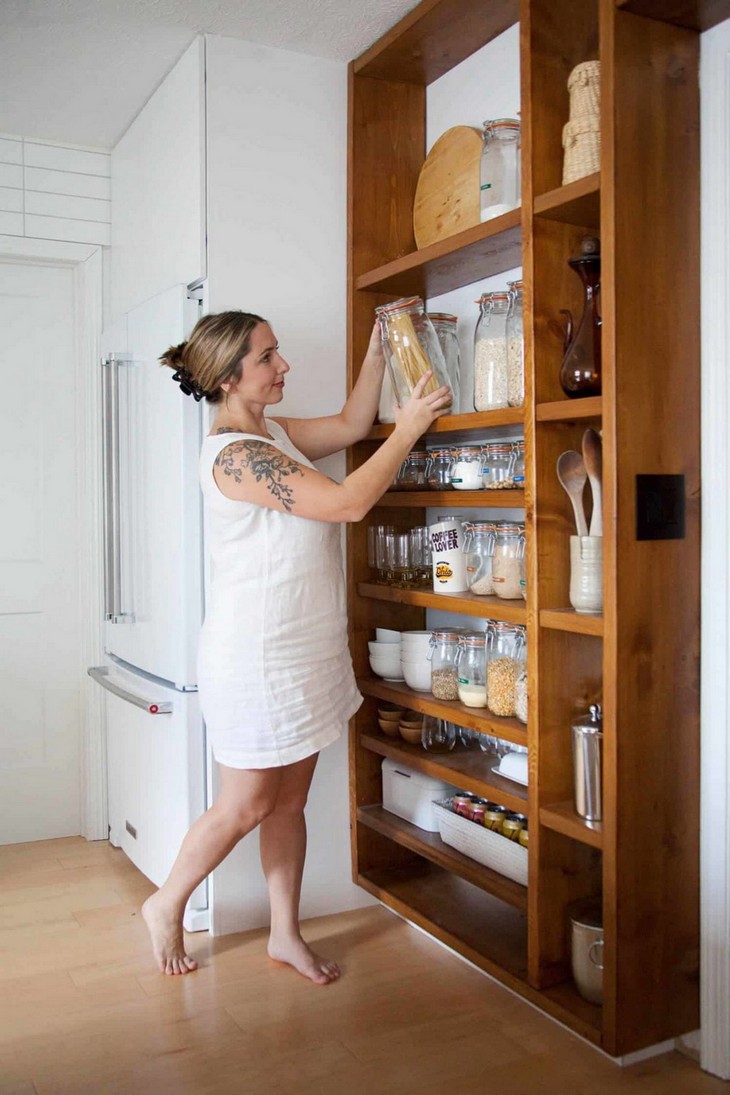
Upgrade your kitchen with a DIY Wood Shelving Wall that’s both functional and visually appealing. This DIY idea offers detailed instructions for creating these space-saving shelves that are perfect for storing pretty jars of pantry items, less frequently used serving dishes, and more.
Begin by removing bulky cabinets to make room for sleek and attractive shelving. Opt for 2×10 construction-grade lumber, keeping in mind, to pick the clearest and cleanest boards possible. Expect to put in significant sanding effort to get it smooth. Pre-condition and dye the wood, later seal it with a polyurethane or polyacrylic coat. Assemble your wooden shelves carefully, ensuring the fit is just right.
Materials:
- Construction-grade lumber
- Pre-stain wood conditioner
- General Finishes light brown dye
- Polyurethane or Polyacrylic
- Artist’s oil colors mixed with liquid for glaze
DIY Easy Open Shelving
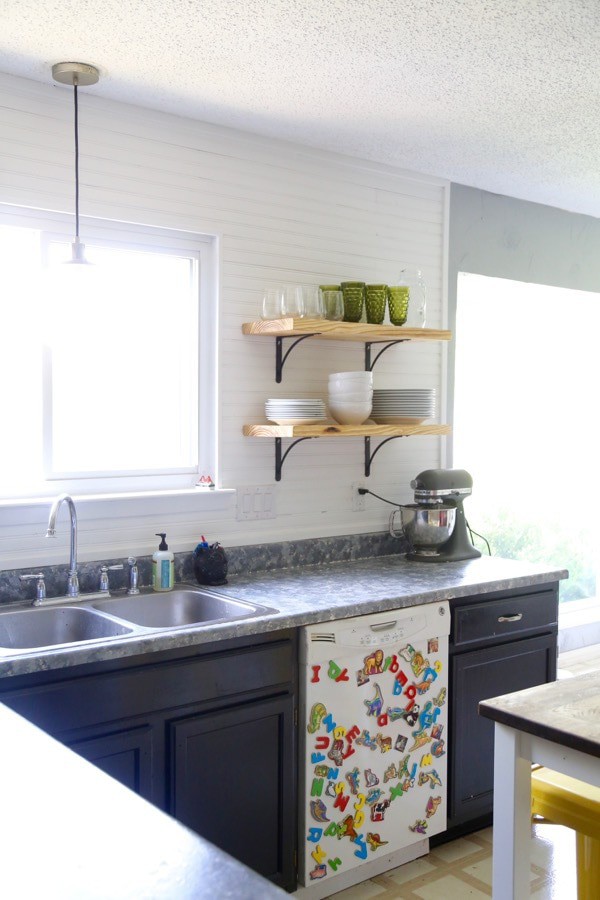
This easy DIY open shelving idea transforms your kitchen’s ambiance, lending it a light, airy feel that opens up the room. It’s not just about aesthetics, though it’s practical, too. Holding heavy utensils and other items these open shelves may just be the game-changer your kitchen needs.
To create the open shelving, start by purchasing chunky wood and brackets. Have the wood cut to 30 inches in length. Coat the wood with natural-colored Danish oil for a rustic look. After the wood dries, screw the brackets into wall studs, and position the wood on top, screwing it into the brackets. Enjoy your new open shelves!
Materials:
- Chunky 2×12 piece of wood
- Shelf brackets
- Danish oil in natural color
- A tape measure
Low-Budget Kitchen Shelves
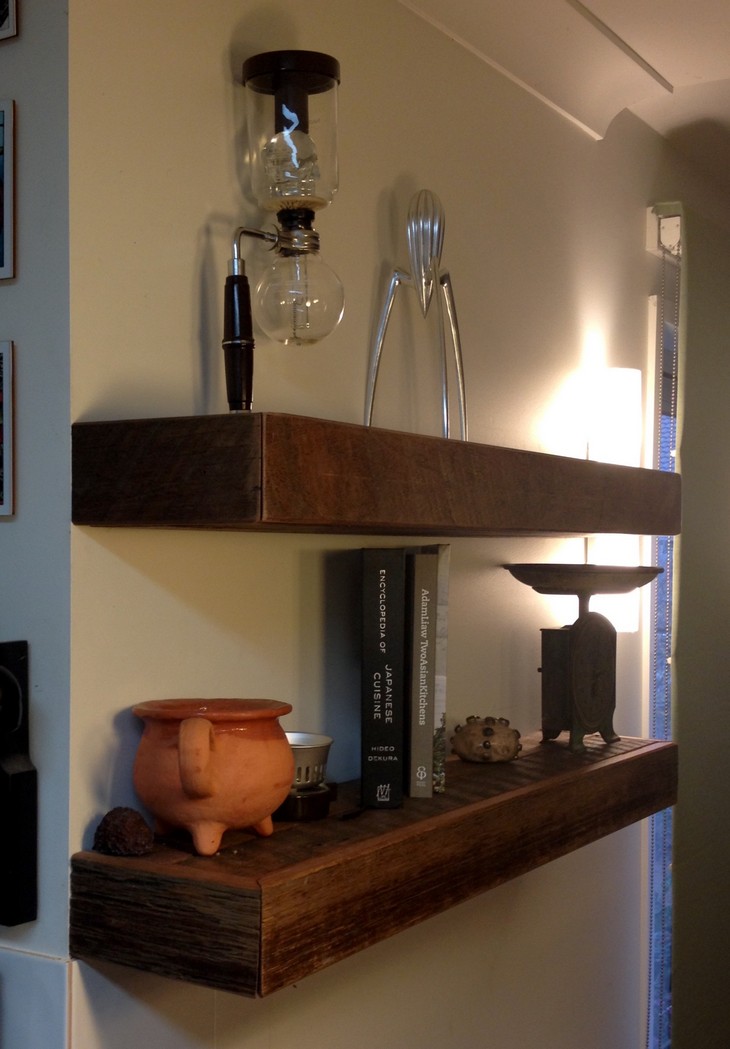
Enjoy the rustic charm and functionality of this DIY floating shelves showing the elegant bracket-free look. The addition of a secret compartment with hinges adds a surprising element of fun and practicality to the shelves.
Begin by forming an internal structure using structural pine. Cut the frame to size, ensuring to note the thickness of your cladding. Extend your frame per your required shelf width. Wrap the frame with attractive wood using glue and nails. You can also construct a hidden compartment within these assembled pieces by attaching the front piece with hinges. Finish it by cleaning and aligning the corners and polishing it with varnish or oil for a perfect finish.
Materials:
- Recycled wood
- Structural pine
- Glue
- Screws
- Nails
- Hammer
- Clamps
- Drill with bits
- Spirit level
- Hinges and latch
20$ Wood Floating Shelves

An ideal solution for those desiring an authentic, rustic touch, the Wood Floating Shelves DIY project demonstrates an adaptive decor approach for any kitchen. These hand-crafted shelves, utilizing sustainable materials such as pine and plywood, bring warmth and character to your kitchen layout.
For fashioning these low-cost wood floating shelves, start by assembling your materials, including 1x10x10s, 2x3x10s, plywood, and 1x4x10s. Construct inner supports using a Kreg Jig, adhere them to wall studs, and then fix the top and bottom shelf pieces. Next, add the trim, and lastly, sand and finish the wood to your liking. Happy building!
Materials:
- Kreg Jig and 1 1/2 screws
- Wood glue
- Wood filler
- Sandpaper
- Stain/paint
Firewood Turned To Shelf
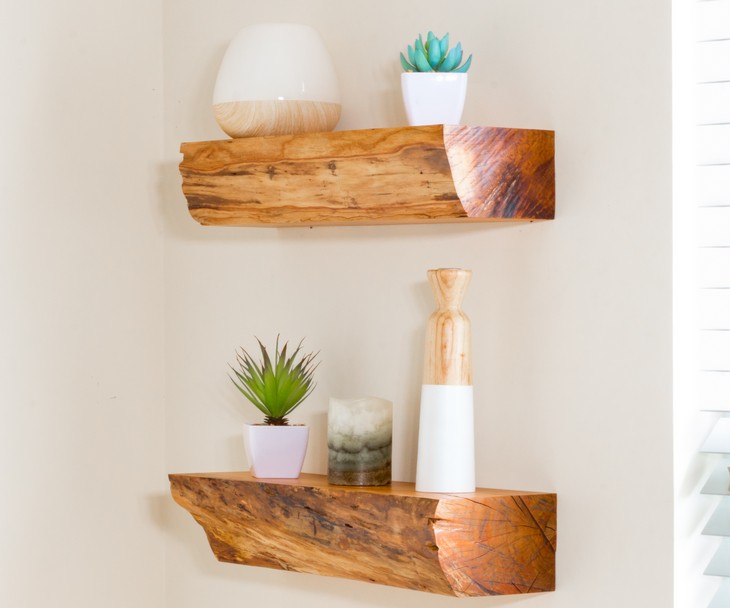
This DIY project illustrates that with some creativity, even firewood can be transformed into valuable and eye-catching additions to your home aesthetics. Notably, the project also introduces an element of hidden storage imparting an encapsulating charm to an otherwise straightforward design.
To create unique floating shelves from firewood, begin by selecting a log and splitting it. You can cut the log into slabs using a sled or handsaw. Get a square edge on these using a jointer and bring them to the final thickness. After cleaning the live edges, prepare the invisible mounting hardware. Add a touch of functionality by drilling relief holes that double as hidden storage. Apply an oil-based poly finish before mounting the shelves to a wall.
Materials:
- Firewood
- Invisible mounting hardware
- Oil-based polyurethane (Poly)
- Bandsaw
- Jointer
- Planer
- Random orbital sander
- Cordless drill
- 2″ Forstner bit
- 1.5″ Spade bit
- 7/16 drill bit
LED Floating Shelves
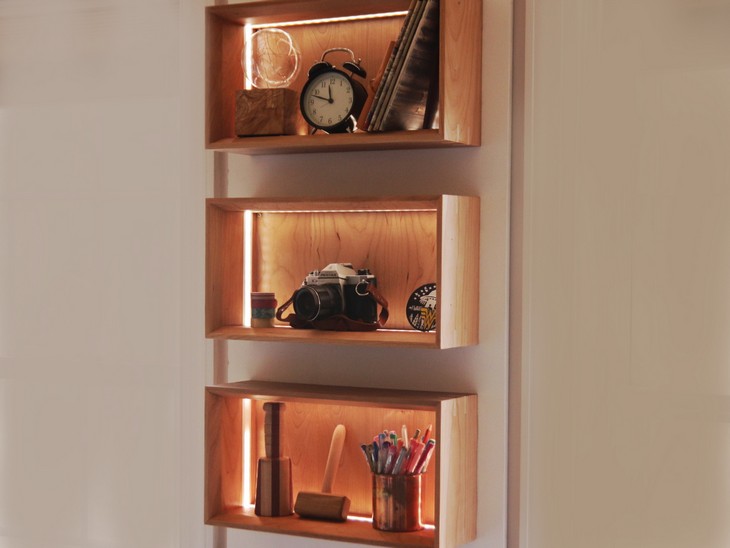
Unleash the blend of illumination and style with the LED Floating Cube Shelves DIY project. This innovative project incorporates the glowing elegance of LEDs into a set of delightful wooden cube shelves for an airy floating effect to show your items. These shelves can also be used as night lights.
To create these floating LED cube shelves, first, construct mitered cherry boxes, incorporating routed dados for LED lighting. These cubes are then affixed to a whiteboard, hiding all wiring behind it. The cubes are illuminated, showcasing the items displayed within. For detailed steps, check the source.
Materials:
- Cherry wood
- Cherry plywood
- LED strips
- LED Dimmer Switch
- Power Supply
- Pigtails
- Masking tape and painter tape
- Shellac
- Cardstock paper
- Hot glue
- ModPodge
Harry Potter Bookshelf

Crafted with elegance in mind, the Harry Potter Floating Shelf tutorial allows Potter fans to display their book collection in an intriguing and unique manner. The shelf is a representation of the Deathly Hallows symbol from the Harry Potter series that is ready to style your home!
These magical Harry Potter floating shelves are crafted from Walnut and Padauk hardwoods and epoxy. Shaped into the symbol of the Deathly Hallows, the shelves consist of an epoxy-resin pour triangle, a circular MDF shelf, and a Padauk wand. The process also involves cutting, gluing, painting, and assembling before securing the shelf to the wall.
Materials:
DIY Rustic Wine Shelves
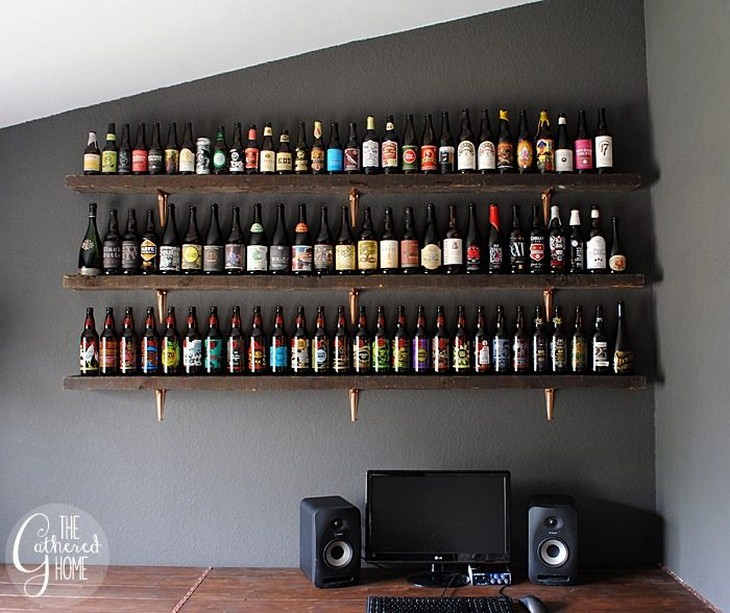
This idea is suitable for those who have a wine collection. Most people prefer a glass of wine to relax. Not only are they an easy project to make, but they will provide a great storage area for your wine bottles!
To create rustic wood shelves, first, decide on the desired placement of the brackets and mark the points on the wall. Using a BLACK+DECKER AutoSense drill, attach the brackets. Place your rustic industrial beams onto the brackets, ensuring they’re level. Now, you can beautifully arrange your items on the shelves.
Materials:
- Pieces of wood
- Wall brackets
- Screws
- BLACK+DECKER AutoSense DrillDriver
- Green and Blue tapes
- A level tool
- Ruler and pencil