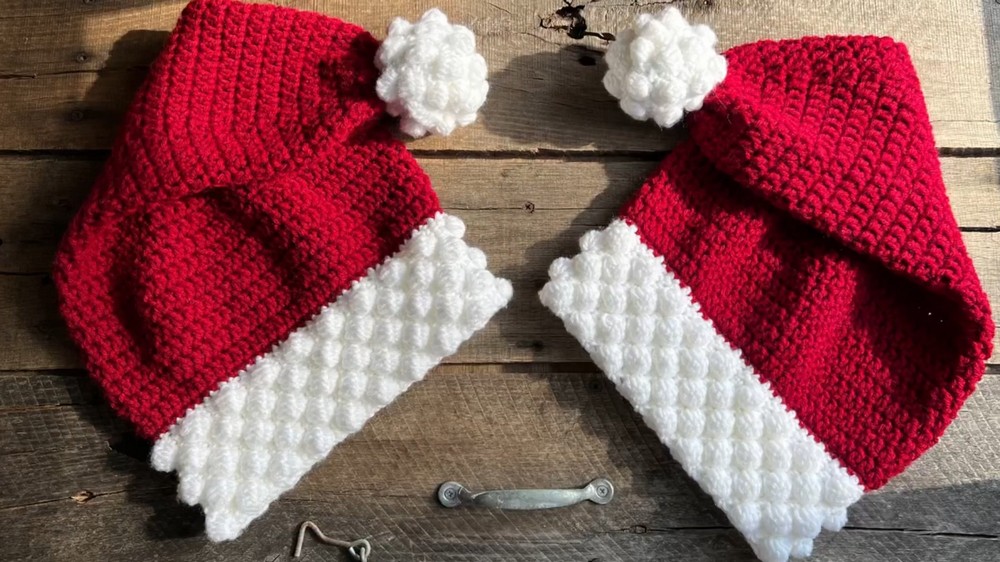
Charming Crochet Santa Hat Pattern for Festive Looks
Spread festive cheer with this Crochet Santa Hat Pattern for a joyful, cozy accessory that adds charm to holiday outfits and gatherings.
The sight of a red hat with a snowy pom-pom has long been a signal of warmth, cheer, and the festive season’s spirit. A crochet Santa hat carries that same charm, wrapping comfort and tradition into a piece that brings smiles wherever it appears. Soft in texture and easy to wear, it fits both children and adults, making it a joyful accessory for gatherings, parties, and even cozy evenings at home. Its playful yet elegant shape makes it instantly recognizable, turning ordinary outfits into seasonal statements filled with character.
Cheerful Crochet Santa Hat Perfect in Gift Giving

Beyond style, it spreads togetherness—whether worn for family photographs, holiday events, or simply to brighten daily routines. Its sturdy structure allows repeated use, while the breathable fabric ensures comfort during long hours of wear. The pom-pom at the tip adds a delightful finishing touch, swaying gently with every movement, bringing an extra note of whimsy.
More than an accessory, this hat carries a tradition that ties generations, allowing families to share laughter, stories, and holiday cheer year after year. Functional, festive, and timeless, the crochet Santa hat brings a touch of magic into every celebration, becoming a treasured piece that symbolizes joy, warmth, and the spirit of giving.
Materials Needed
- Yarn (Christmas colors):
- White (for the brim and pom-pom).
- Red (for the hat).
- Crochet Hooks:
- 5.25 mm hook (I hook): For the brim and most of the hat.
- Optional: A smaller hook (e.g., 3.25–4 mm) for smaller detailing, if desired.
- Stuffing: Polyfill for the pom-pom.
- Yarn Needle: For seaming and weaving in ends.
- Scissors.
Special Features
- Bobble Stitch Brim: The brim makes use of bobble stitches to create a textured and modern design that contrasts with the simplicity of the scarf-like rectangle brim.
- Bobble Pom-Pom: The round pom-pom is crocheted instead of using a traditional yarn-wrapped pom-pom, which makes it durable and cohesive with the design.
- Adjustable & Customizable: While the pattern follows a standard adult size, the pattern can be customized for smaller or larger sizes by adjusting the number of rows or stitches.
- Straight Seam Technique: Creator demonstrates how to eliminate the slanted-looking seams created by working in rounds, producing a clean and polished finish.
Level of Difficulty
Beginner to Intermediate
This pattern is beginner-friendly, with clear step-by-step instructions for creating stitches like the bobble stitch and double crochet. However, it does require some attention to detail for assembling parts and maintaining consistent seam alignment, making it a great project for beginners with some crochet experience.
Step-by-Step Instructions
Making the Brim
- Foundation Chain
- Make a slip knot: Tiffany provides a detailed explanation of how to create a secure slip knot.
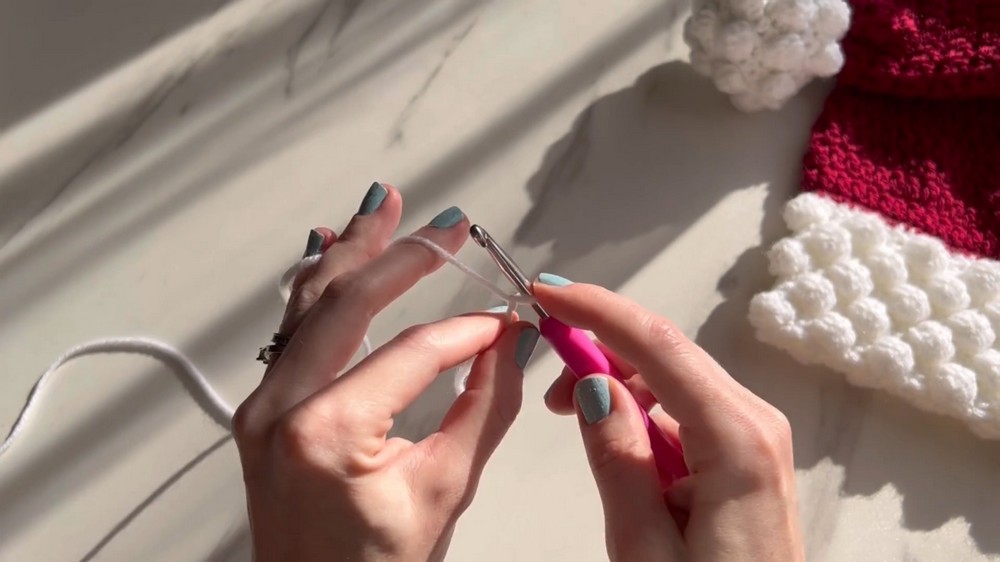
- Chain 12.
- Make a slip knot: Tiffany provides a detailed explanation of how to create a secure slip knot.
- Row 1: Single Crochet Row
- Starting from the second chain from the hook, single crochet (SC) in every chain across. You will have 11 single crochets at the end.
- 2: Bobble Stitch
- Chain 1, turn.
- Single crochet in the first stitch.
- In the second stitch, create a bobble stitch:
- Yarn over, insert your hook into the stitch, and pull through.
- Yarn over again and pull through the first two loops. (Repeat this 5 times total, keeping your work in the same stitch.)
- Once you have 6 loops on your hook, yarn over and pull through all 6 loops.
- Single crochet in the next two stitches to “pop” the bobble out.
- Continue alternating single crochet and bobbles across the row.
- Finish with a single crochet in the last stitch.
- 3: Single Crochet Row
- Chain 1, turn.
- Single crochet in every stitch (including the tops of bobbles).
- 4: Off-Set Bobble Row
- Chain 1, turn.
- Single crochet in the first 3 stitches.
- In the fourth stitch, create a bobble, alternating as in Row 2. This row will have only 2 bobbles.
- 5–72:
- Repeat Rows 2–5 until the brim reaches 72 rows altogether (or adjust as needed for size).
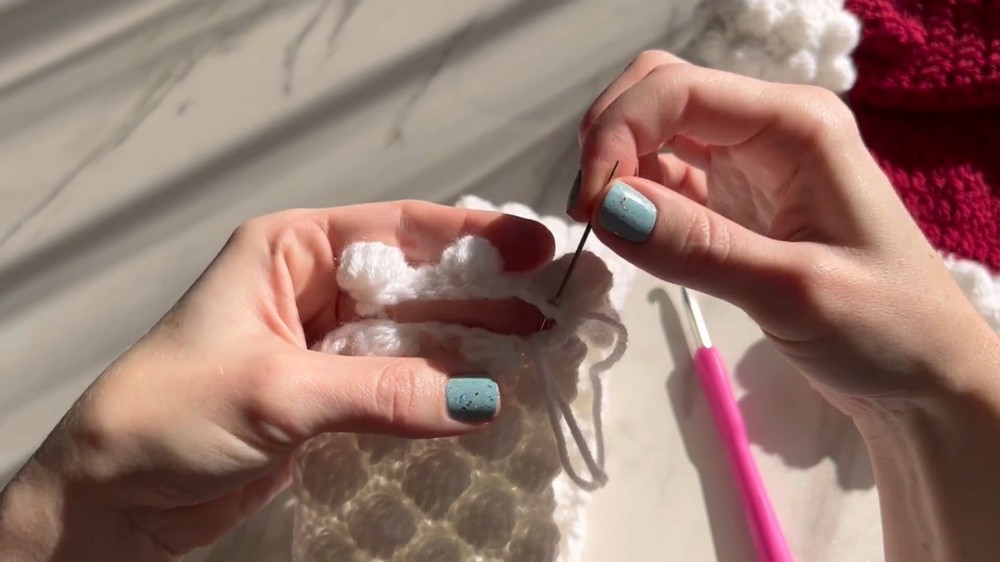
- Seaming the Brim
- Fasten off with a long tail.
- Fold the brim into a rectangle and use a whip stitch to seam the edges together.
Crochet Hat Base
- Attach the Red Yarn
- Using your red yarn, attach to the edge of the brim with a slip stitch.
- Round 1: Single Crochet Foundation
- Crochet 72 single crochets (one for each row of the brim) evenly around.
- Join with a slip stitch.
- Round 2: Double Crochet Round
- Change to a 5.25 mm hook.
- Chain 2. Work 1 double crochet (DC) in each stitch around. Total: 72 double crochets.
- Straight Seam Technique
- To avoid a slanted seam:
- Chain 2 at the beginning of each round.
- Skip the first stitch and return to it for the last double crochet of the round, creating a crossing pattern.

- To avoid a slanted seam:
- Shaping the Hat
- To create the cone shape:
- Add decrease rounds (e.g., 7 double crochets, then 1 decrease).
- Repeat the decreases every few rows until the top has 26 stitches (at Round 28).
- To create the cone shape:
- Close the Top
- Fasten off with a long tail.
- Use yarn and a needle to weave in and out of the last row, cinching the top closed. Secure by weaving tail ends tightly multiple times to lock the shape.
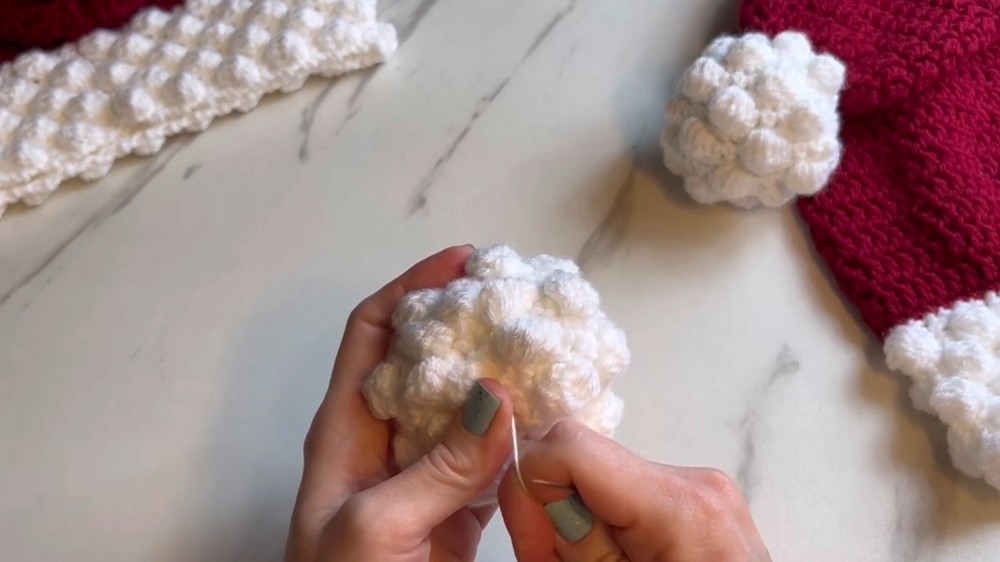
Making the Bobble Pom-Pom
- Bobble Stitch Pom-Pom Construction
- Repeat the steps for creating a brim, but crochet only 25 rows to make a smaller rectangle.
- Fold and seam the rectangle closed.
- Shaping the Pom-Pom
- Stuff the rectangle lightly with polyfill, ensuring a round shape.
- Use a whip stitch or gather the edges using a needle and yarn to form a ball.
- Attach the Pom-Pom
- Identify the top center of the hat and securely stitch the pom-pom in place.
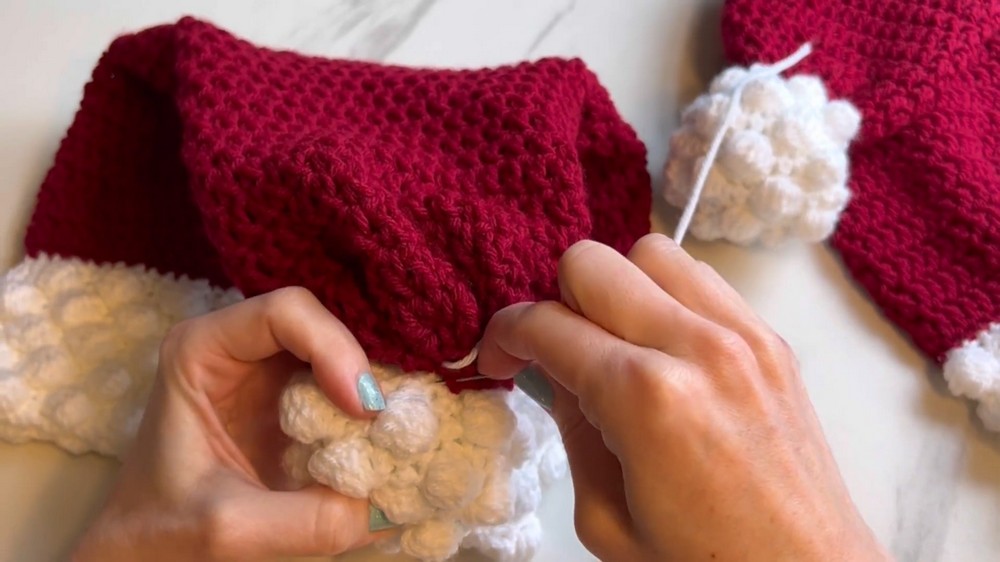
- Identify the top center of the hat and securely stitch the pom-pom in place.
Tutor’s Suggestions
- Manage Your Stitch Tension: When working with bobble stitches, ensure your tension is not too tight to make assembling easier.
- Count Stitches & Rows: Keep track throughout the project, especially with the brim, to maintain consistency and ensure seamless attachment of the hat and brim.
- Practice the Bobble Stitch: Creator mentions that the bobble stitch may take a few tries to master, but it’s easy once you get the rhythm.
- Alternate Colors for Fun: While this project sticks to classic red and white, you can swap in greener or metallic yarns for a twist!
Uses for the Santa Hat
- Festive Holiday Wear: Spread holiday cheer at parties, family gatherings, and events.
- Handmade Christmas Gift: A heartfelt, handmade gift for loved ones.
- Decorative Piece: Can be used as a festive decoration or oversized tree topper.
Tip
When attaching the pom-pom, make sure the yarn goes through multiple layers of the hat to secure it firmly—it’ll look more professional and last longer, even with regular use.
Conclusion
This pattern helps you create a whimsical yet practical piece of Christmas cheer: the Crochet Bobble Santa Hat. With its structured bobble stitch brim, fun pom-pom, and precise seamwork, this project lets you practice key crochet techniques while making something festive and unique. Whether you’re new to crochet or looking to expand your skills, this project offers joy and community through its shared spirit.