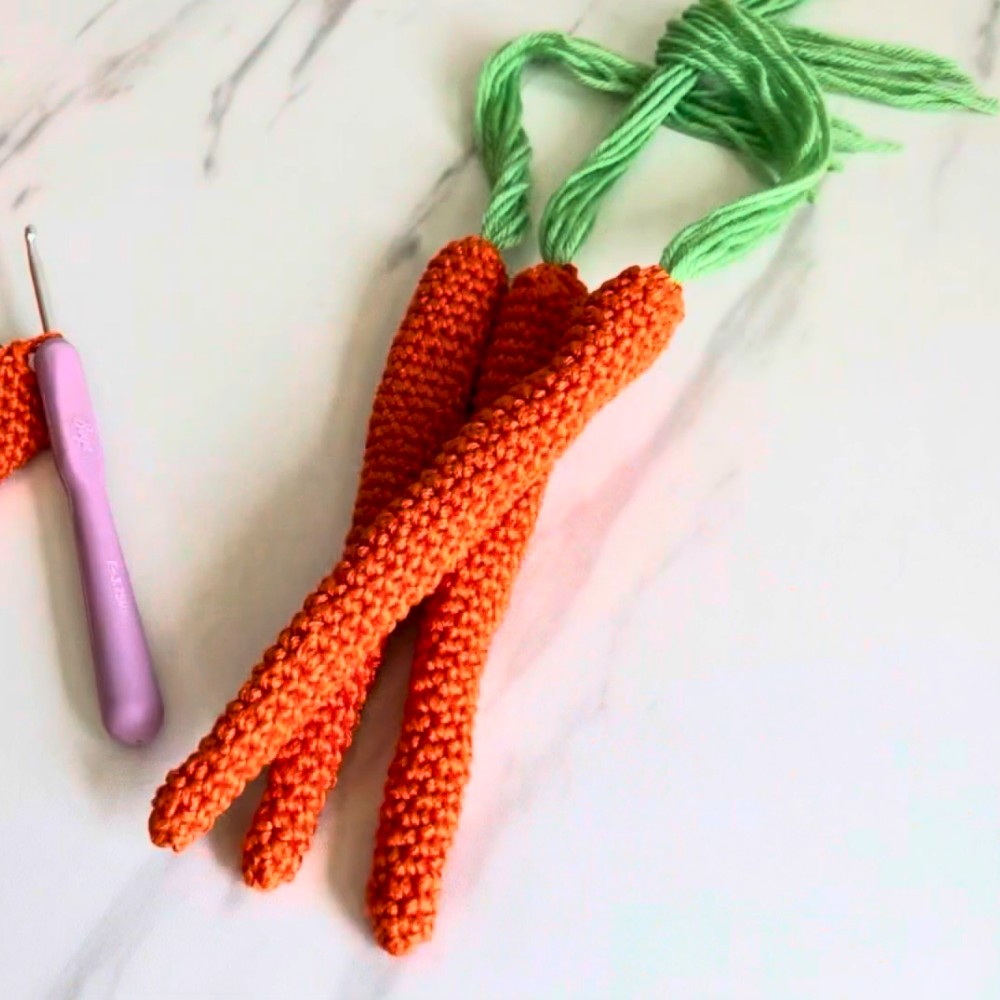
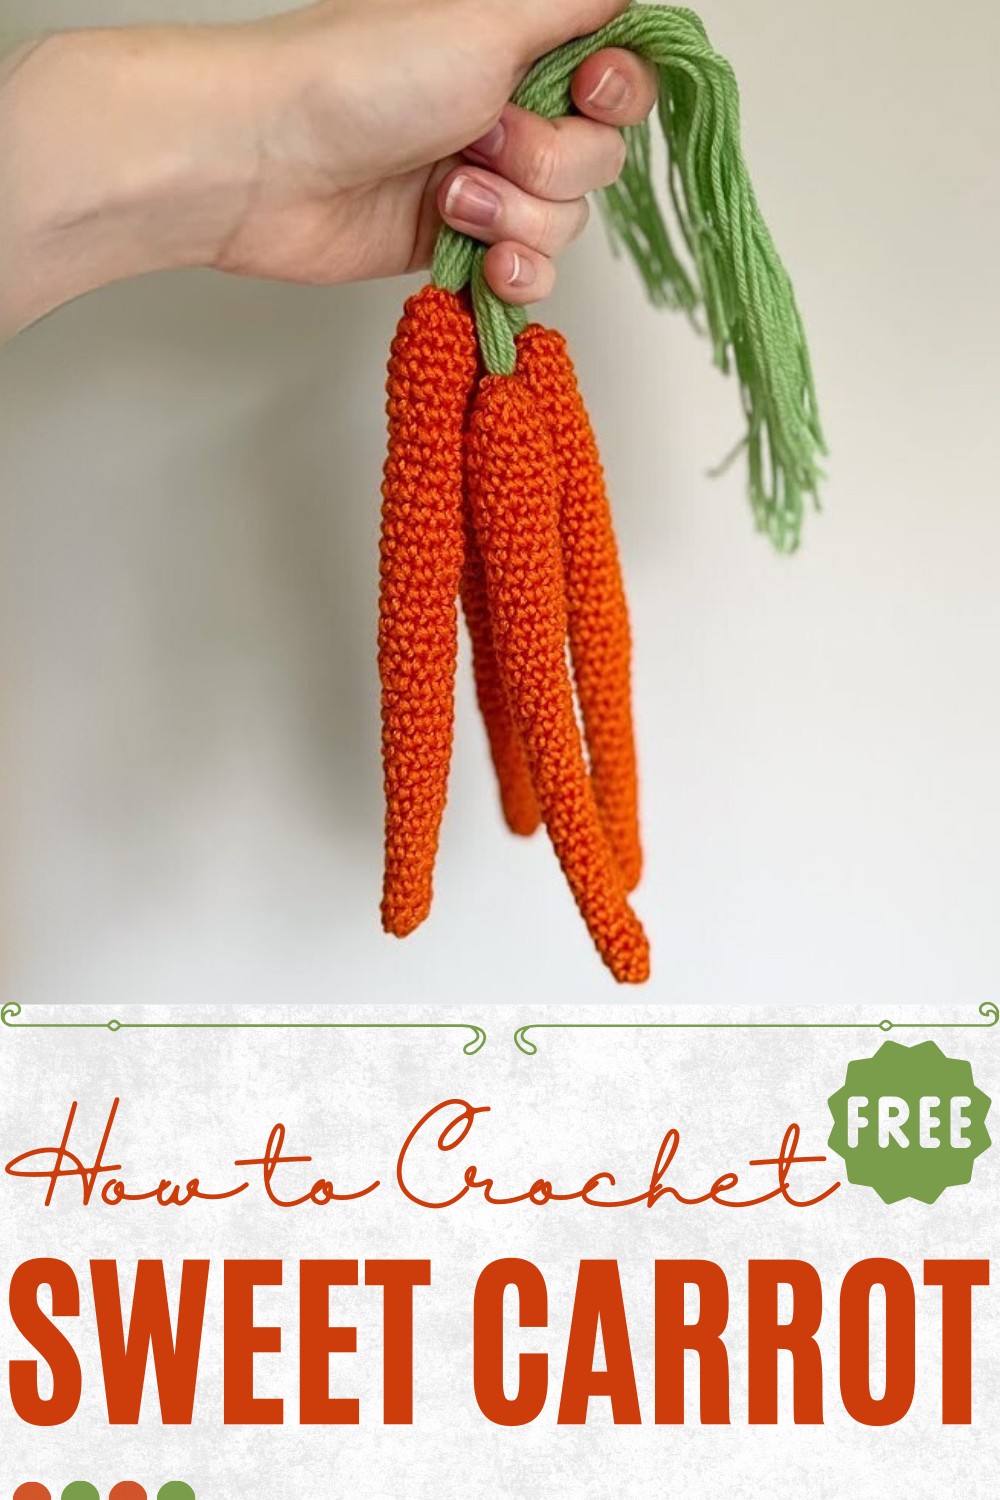
Tiny Crochet Carrot for Cozy Handmade Corners
Grow playful charm with this Crochet Carrot Pattern for a cute, whimsical accessory that brightens décor, gifts, and creative projects.
In a sunlit garden where greens sway gently and small creatures bustle among the rows, the humble carrot has always been a symbol of vitality and charm. The crochet carrot pattern brings this vibrant vegetable into the realm of soft artistry, transforming it into a playful and versatile creation. Its bright orange body and lively green tops capture the essence of freshness, making it ideal for decorative displays, seasonal décor, or as an interactive toy for children. The soft yet resilient texture ensures that it holds shape beautifully, while its compact size allows it to be used in imaginative play, home displays, or as a cheerful gift accent.
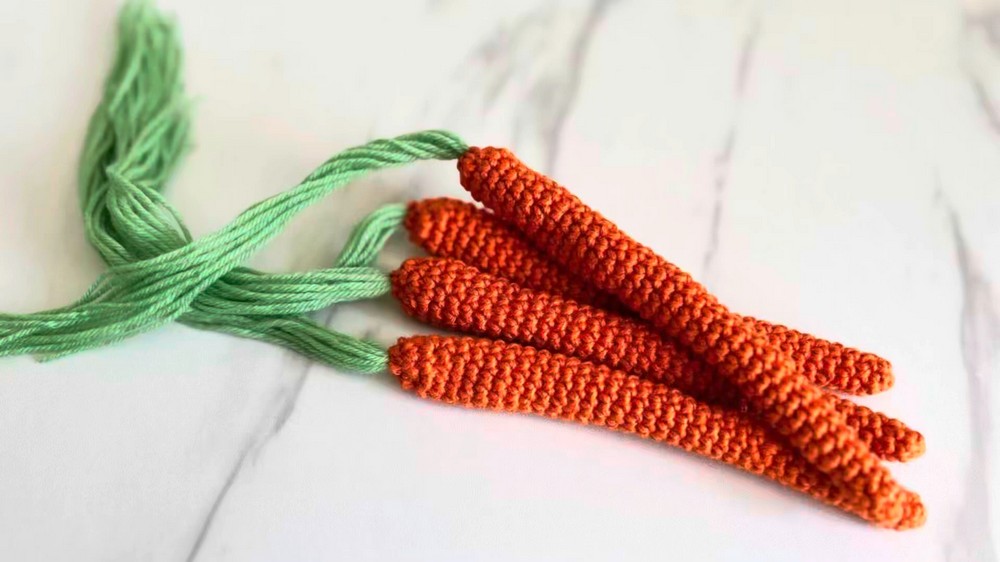
Bright Crochet Carrot Perfect for Handmade Toy Sets
Beyond its visual appeal, the crochet carrot promotes hands-on engagement, encouraging dexterity and mindfulness during crocheting. Each piece can be personalized through subtle variations in height, fullness, or leaf arrangement, adding individuality to every carrot.
Durable enough to withstand playful handling yet charming enough to enhance a shelf or table arrangement, this crochet creation seamlessly combines utility and whimsy. Its cheerful presence evokes the simple joys of nature, connecting indoor spaces to the warmth of garden life while offering a delightful tactile experience for all ages.
Materials Needed
To get started, you will need:
- Yarn:
- Orange yarn for the carrot body.
- Green yarn for the carrot stem.
- Crochet Hook: The recommended size for your chosen yarn (the video used a size that suits a 4-ply yarn).
- Stitch Markers: Extremely useful for marking the first stitch of each round.
- Darning/Embroidery Needle: Required for closing the carrot and adding the stem.
- Scissors: For cutting the yarn.
- Fiberfill/Tail Stuffing: Optional but useful for shaping the carrot.
Step-by-Step Instructions
1. Starting the Magic Ring (Round 1)
- Hold the yarn as demonstrated to create a magic ring. Wrap the yarn around your pointer and middle finger to create an “X.”
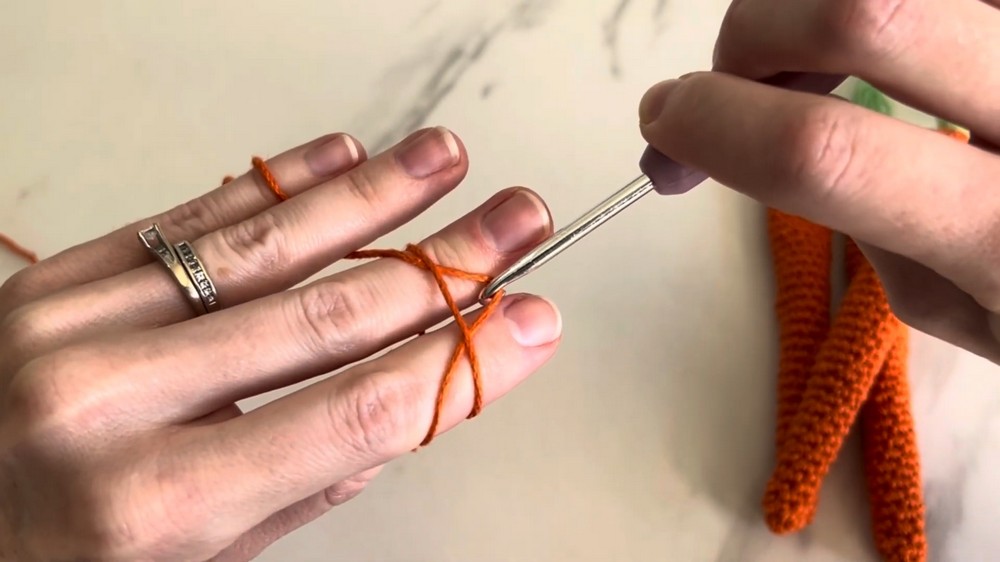
- Use your crochet hook to pull the loop of yarn under the “X,” forming a loop on your hook.
- Continue rotating your wrist to hold the loop in place, and remove your fingers from the ring. Tighten by pulling the yarn tail.
- Crochet 6 single crochets (SC) into the magic ring. Mark the first stitch with a stitch marker.
2. Building the Shape of the Carrot
Rounds 2 to 5:
- Round 2: Crochet 1 SC into each stitch (6 stitches total).
- Rounds 3 – 5: Repeat the same process, crocheting 1 SC into all 6 stitches of each round. The carrot base will lengthen into a cone shape. Mark the first stitch of every round for consistency.
Round 6:
- Into the first stitch, crochet 2 SC (an increase).
- Crochet 1 SC into the remaining 5 stitches. You should now have 7 stitches total.
Rounds 7 to 11:
- Crochet 1 SC into each stitch, maintaining the count of 7 total stitches per round.
Round 12:
- Begin by working 2 SC into the first stitch.
- Continue by crocheting 1 SC into the next 6 stitches. You now have 8 stitches total.
Rounds 13 to 17:
- Work 1 SC into each stitch, maintaining 8 stitches per round.
Round 18 and Beyond:
- Repeat the pattern of increasing by 1 stitch at the start of the round and then continuing with SC stitches. This process is repeated every 5 rounds, with regular increases at the beginning of each cycle.
End at Round 36:
- By this point, you should have a total of 12 stitches per round and a fully formed carrot.

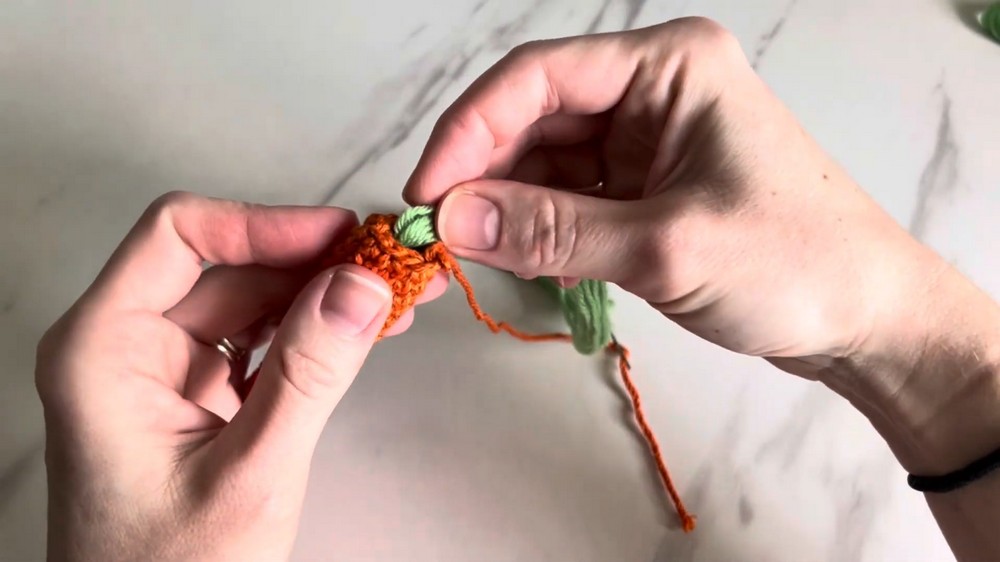
3. Adding the Stem and Texture
- Create the Carrot Stem:
- Cut 6 strands of green yarn and fold them in half to form loops.
- Tie a knot near the loops to secure them. The number of strands can be increased if a thicker stem is desired.
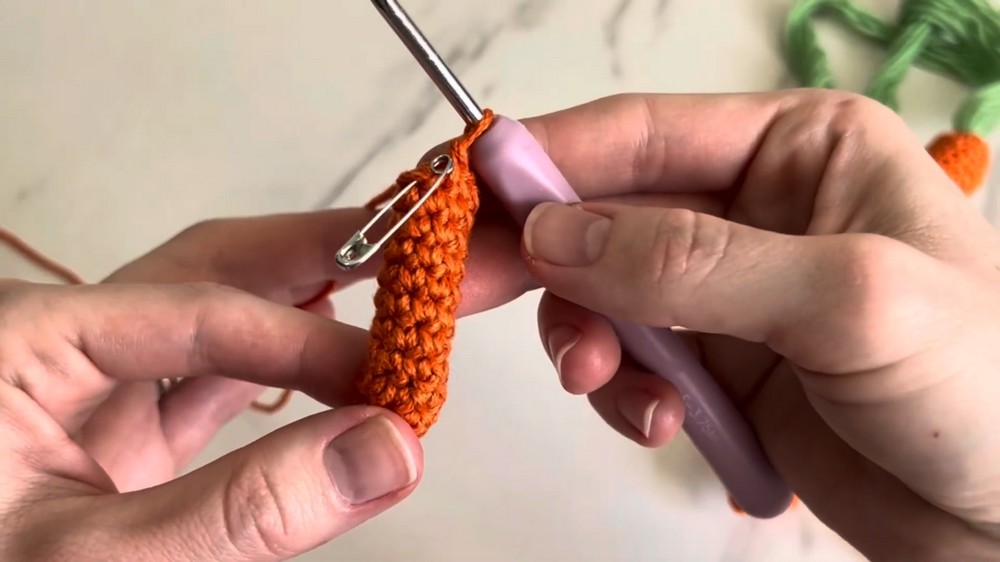
- Attach the Stem:
- Insert the knot into the opening at the top of the carrot. Ensure it rests tightly beneath the top.
- Seam the Top of the Carrot:
- Using a darning needle, sew through the front loops of the stitches at the top edge. Repeat this around the top to close it tightly.
- Once the top is fully closed, weave the yarn back and forth to secure it further.
- Final Adjustments:
- Trim the stem to your desired length or adjust the texture for a more realistic appearance.
- Trim the stem to your desired length or adjust the texture for a more realistic appearance.
Special Features
- Seamless Design: By working in spirals, the carrot has no visible seam lines, providing a polished, professional finish.
- Customizable Size and Thickness: Simply extend the rounds or add more stitches for a larger carrot. Similarly, adjust yarn thickness for variation.
- Textured Stem: The addition of hand-done stem loops adds extra realism to the finished project.
- Beginner and Intermediate Friendly: While beginner-level techniques are used, its repetitive process is also satisfying for intermediate crocheters.
Tutor’s Suggestions
- Mark Every Round: The tutor emphasizes marking the first stitch of every round to avoid confusion while working in spirals.
- Adjust Tension: Avoid stitching the first few rounds too tightly, as it can make the next rounds difficult to work through.
- Check Stitch Counts: Frequently count stitches after every row to ensure accuracy—especially after increasing rounds.
- Flatten the Work: As rows become bigger, regularly flatten your work to prevent stitches from shifting out of alignment.
Level of Difficulty
- Level: Beginner to Intermediate.
- While basic stitches and techniques are used (magic ring, single crochet, increases), beginners may need extra practice for managing spirals, marking rows, and working with front loops.
Uses
- Decorations: Great for adding to a spring or Easter-themed display.
- Play Food Sets: Ideal for creating pretend play food for children.
- Amigurumi Projects: Add as a feature with other amigurumi designs.
- Gifts: Handmade carrots make thoughtful, quirky gifts for gardeners, children, or crochet lovers.
Tip
When closing the top of the carrot, use the darning needle to weave the tail under multiple stitches both backward and forward. This will make the seam stronger and ensure it doesn’t unravel over time, particularly if the carrot is frequently handled.
Conclusion
This crochet carrot is a fun, beginner-friendly project that’s both rewarding and practical! With its seamless spiral design and ability to customize the size, it’s great for various uses like play, decor, or gifting. The pattern makes it easy to follow each step, ensuring you can complete the pattern with confidence. Whether you’re creating a small carrot or larger pieces for a themed project, this pattern offers a simple yet charming way to enhance your crochet repertoire.