Sleek Crochet Scrunchie Inspirations with a Cozy Feel
Stylish hair days shine with this Crochet Scrunchie Pattern, blending soft texture, stretchy comfort, and a touch of handmade flair.
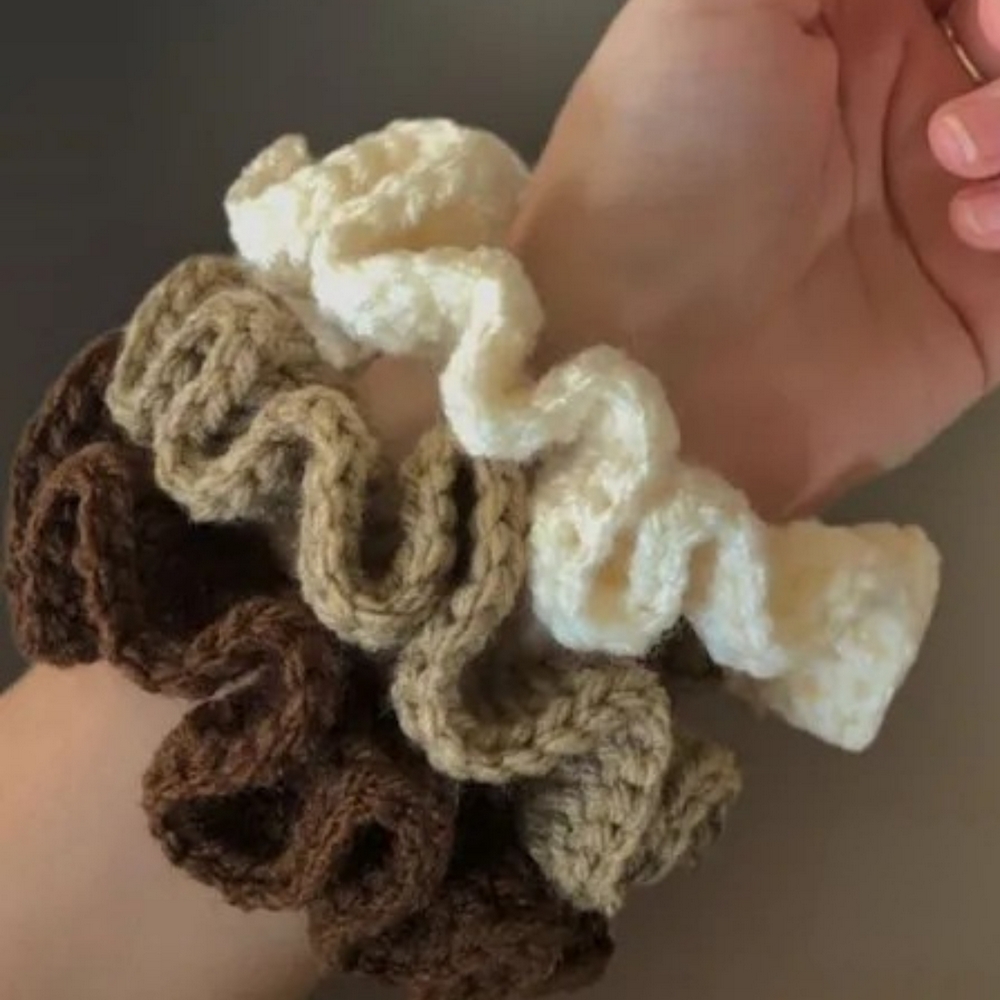
A gentle twist of yarn turns into a scrunchie that secures hair with softness while adding a graceful touch to any hairstyle. The Crochet Scrunchie pattern offers more than just a practical accessory it is a balance of comfort, beauty, and durability. Its flexible structure allows it to stretch with ease, holding hair firmly without pulling or causing breakage, making it a healthier choice compared to traditional elastics. The soft texture feels pleasant against the strands, ensuring long hours of wear without discomfort.
Luxe Touch Crochet Scrunchie Inspirations to Try Now
Lightweight and versatile, it slips effortlessly into daily routines, from casual ponytails and braids to elegant buns and festive styles. Its charm lies in its ability to adapt, whether paired with cozy loungewear, professional attire, or evening outfits. The scrunchie’s circular form and subtle stitch details add a layer of visual interest, turning a simple hair tie into an accessory with personality.
Durable yarn ensures it maintains shape and softness after repeated use and washing, offering long-lasting reliability. Easy to carry in a bag or pocket, it becomes a go-to companion for quick styling. Both practical and stylish, the Crochet Scrunchie enhances everyday looks while protecting hair, making it a timeless and thoughtful accessory.
Materials Needed
To make a crochet scrunchie, you’ll need the following materials:
- Rubber Band: Match the color of the rubber band with the yarn to minimize its visibility.
- Yarn: Any yarn of your choice; acrylic or cotton is recommended for its softness and durability.
- Crochet Hook: Use a suitable hook size for your yarn (usually 4mm–5mm).
- Scissors: For cutting off excess yarn.
- Darning/Embroidery Needle: To weave in the loose ends.
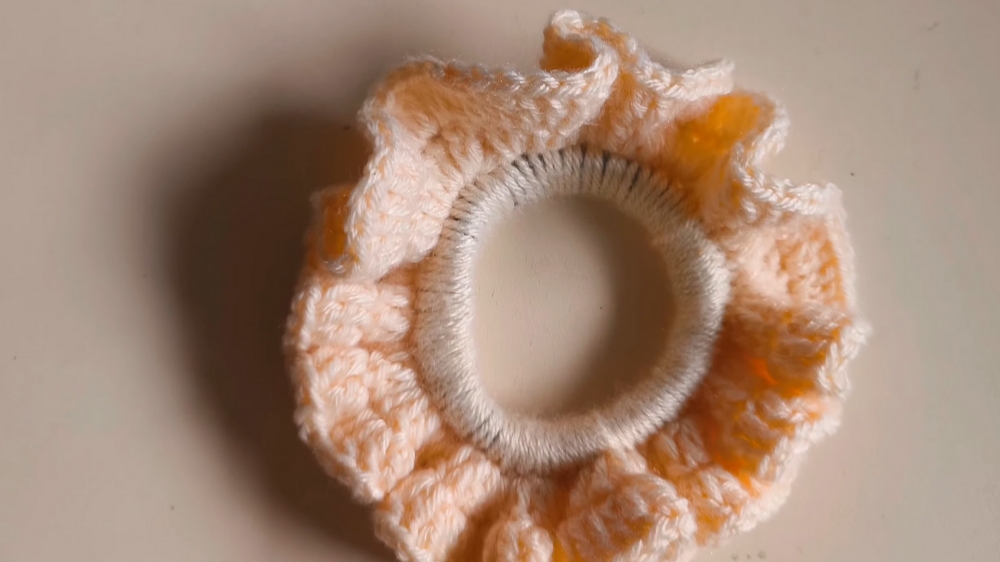
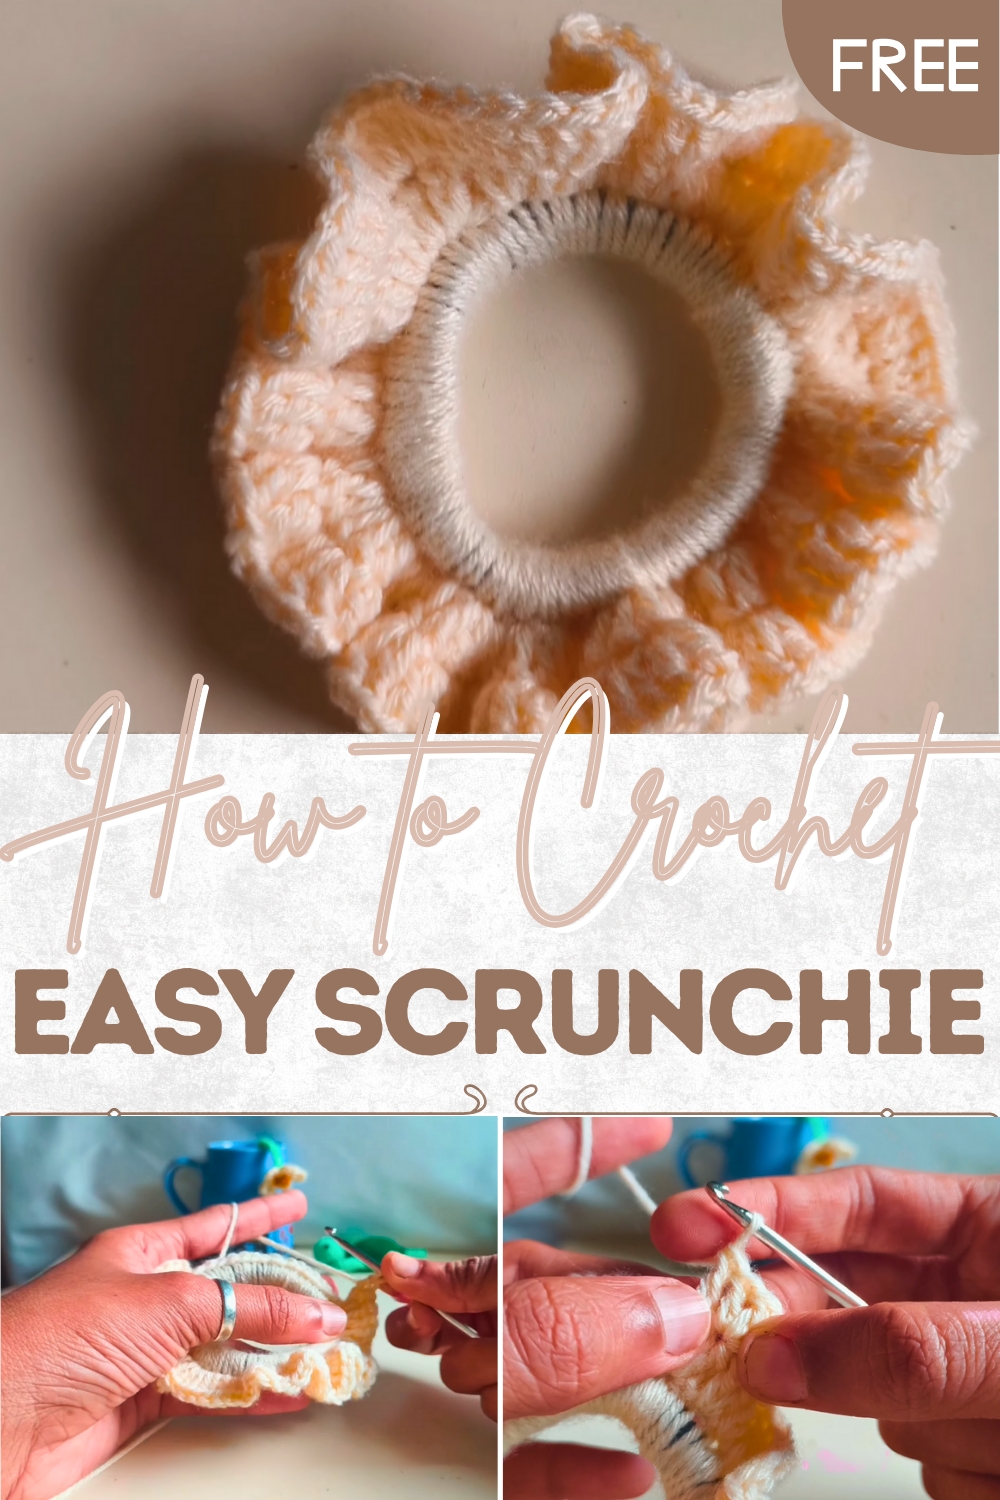
Special Features of the Crochet Scrunchie
- Elastic Core: Features a rubber band at the center, ensuring a snug and secure fit for all hair types.
- Layered Design: Incorporates layers of double crochets that add volume and a decorative wavy texture.
- Customizable: You can adjust the size of the scrunchie by varying the thickness of the yarn or the number of stitches.
- Beginner-Friendly: The stitches used (single crochet and double crochet) are simple to learn and execute.
Step-by-Step Instructions
Step 1: Preparing the Base
- Tie a Knot Around the Rubber Band:
- Start by tying the yarn securely around the rubber band.
- Chain One:
- Insert your hook into the rubber band, yarn over, and pull through.
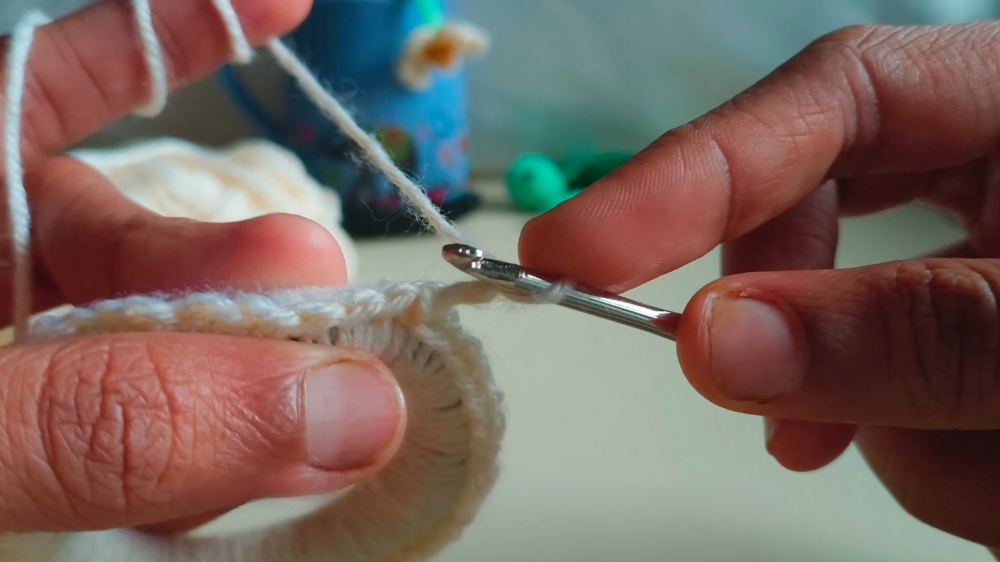
- Start Single Crochet (SC):
- Insert your hook into the rubber band.
- Yarn over and pull out a loop.
- Yarn over and pull through both loops on the hook.
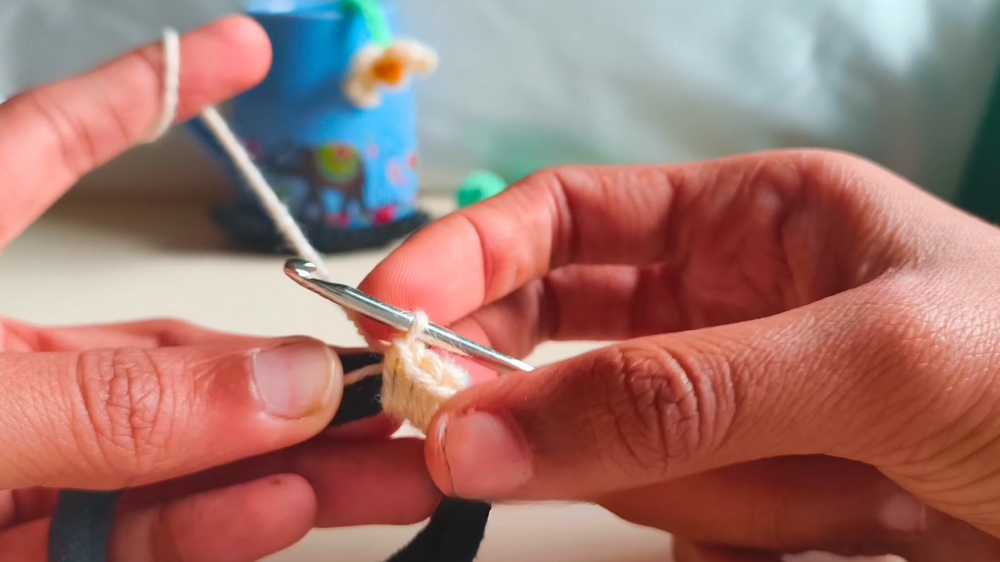
- Repeat Single Crochets Around the Rubber Band:
- Continue making single crochets (SC) around the rubber band until it is fully covered.
- Keep the stitches close together to close any gaps.
- Complete the Circle:
- Insert your hook into the first single crochet of the round, yarn over, and pull through. Pull through again to close the round with a slip stitch.
2: Adding Double Crochet Stitches (Row 1)
- Chain Two for Height:
- Yarn over and chain two to increase the height for the next round.
- Begin Double Crochet (DC):
- Yarn over, insert the hook into the same stitch, and pull out a loop.
- You will have three loops on your hook. Yarn over, pull through the first two loops, then yarn over and pull through the remaining two loops.
- This completes the first double crochet.
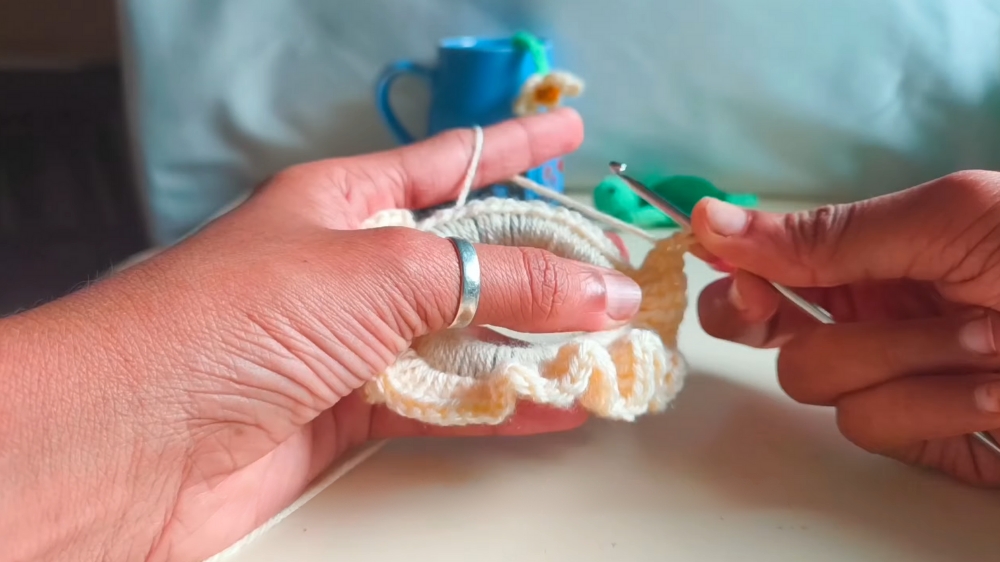
- Add an Increase (Two DC in the Same Stitch):
- Yarn over and work a second double crochet into the same stitch.
- This process of two double crochets into one stitch is called an increase.
- Continue Around the Circle:
- Work two double crochets in each stitch. This will create the frilled and ruffled effect characteristic of the scrunchie.
- Close the First Row:
- When you reach the end of the round, slip stitch into the top of the first double crochet.
- When you reach the end of the round, slip stitch into the top of the first double crochet.
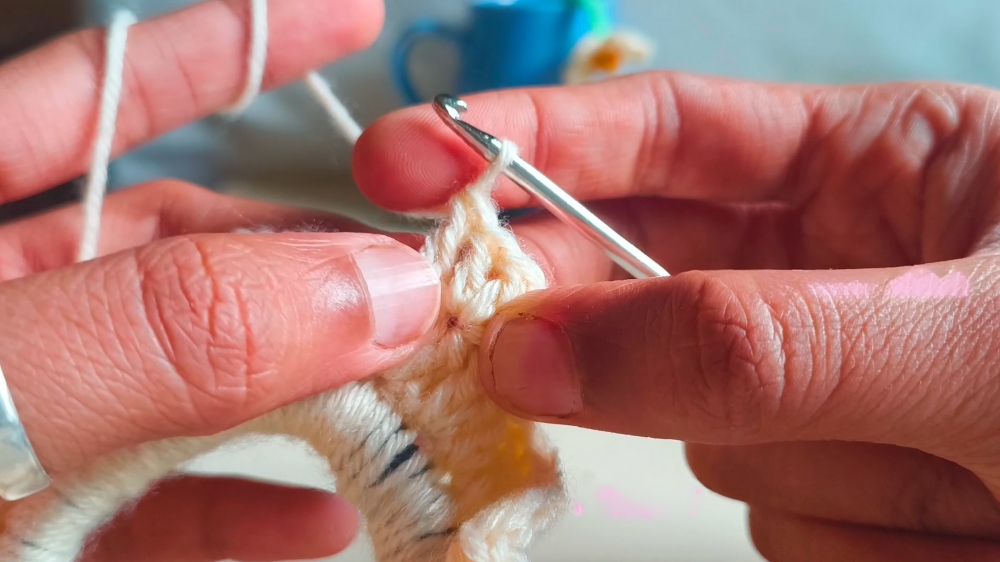
3: Creating the Second Row of Double Crochets (Row 2)
- Chain Two for Height:
- Start the new row by chaining two to match the height of the double crochets.
- Work Double Crochets in Each Stitch:
- Repeat the process of creating two double crochets in each stitch from the previous row.
- This double layering adds more ruffles and volume to the scrunchie design.
- Close the Second Row:
- Finish the row by slip stitching into the third chain of the starting chain two.
- Finish the row by slip stitching into the third chain of the starting chain two.
4: Finishing
- Secure the Yarn:
- Chain one, pull through, and cut off the excess yarn.
- Weave in the Loose Ends:
- Use a darning or embroidery needle to hide the loose yarn within the stitches at the back of the scrunchie.
- Trim any remaining excess carefully with scissors.
- Final Adjustments:
- Stretch and shape the scrunchie gently to ensure the ruffles are evenly distributed.
Tutor’s Suggestions
- Use Matching Rubber Bands: Choose a rubber band color close to the yarn to make it less visible and give the scrunchie a polished look.
- Keep Stitches Tight: Avoid loose or uneven stitches to ensure a firm grip around the rubber band and neat results.
- Experiment with Yarn Types: You can create different textures and looks by experimenting with acrylic, cotton, or velvet yarn.
- Work in Better Lighting: Ruffles can get dense, so proper lighting will help you see your stitches clearly.
Uses of the Crochet Scrunchie
- Hair Accessory: Stylish yet gentle on the hair, perfect for ponytails or buns.
- Decorative Item: Matches outfits or adds a touch of flair to casual wear.
- Gift Idea: A thoughtful and personalized gift for friends and family.
- Craft Sales: Great for selling at markets or online for small business owners.
Level of Difficulty
The project is beginner-friendly, with simple single and double crochet stitches used throughout. The repetitive nature of the design makes it easy for new crocheters to practice their skills, though working tightly around the rubber band may pose a slight challenge initially.
Tip
Use a moderate amount of tension when stitching around the rubber band. If you pull too tightly, the ruffles may not form properly, and the rubber band could lose its elasticity.
Conclusion
Making a crochet scrunchie is a fun and rewarding project for all skill levels. Combining functionality with creativity, this scrunchie design is not only beautiful but also practical and durable. With a rubber band core and double crochet frills, it’s a quick way to jazz up your hairstyle while showcasing your crochet skills. Try it out, and soon you’ll have a lovely accessory that reflects your own style and color preferences!