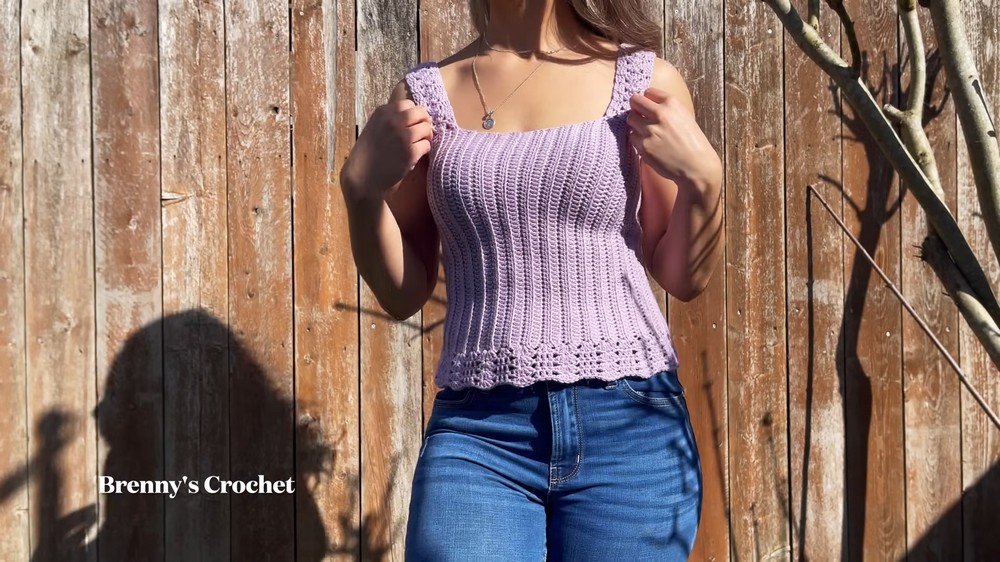
Pastel Crochet Top Pattern for Sweet and Soft Looks
Feel the joy of wearing a unique style with this free crochet top pattern for a comfortable fit and show off your favorite colors every day.
Making your own clothes is a wonderful way to enjoy fashion and feel proud of what you wear. When you use a crochet top pattern you can make a piece that is soft bright and unique. Each top is full of beauty because every loop and twist of yarn comes from your own hands. You do not need any special tools or skills just some yarn and a hook. This top fits perfectly for many occasions like family gatherings outings with friends or relaxing at home.
Retro Crochet Top Pattern That Captures Summer Vibes

You can choose your favorite colors and match with any pants or skirt you like. It feels good to wear something you made for yourself and it shows your special style to everyone around you. A crochet top pattern helps people of all ages have fun with simple steps and make clothing that is light and comfortable every time it is worn.
Materials List
- Yarn: Number 3 cotton yarn (light worsted/DK weight)
- Hook Size: 3.75 mm (US F-5) or size needed to achieve gauge
- Notions:
- Measuring tape
- Scissors
- Yarn needle or tapestry needle
- Stitch markers (or scraps of contrast yarn)
Key Abbreviations (US Terms)
| Abbreviation | Meaning |
|---|---|
| ch | chain |
| sl st | slip stitch |
| sc | single crochet |
| hdc | half double crochet |
| dc | double crochet |
| st(s) | stitch(es) |
| rep | repeat |
| sp | space |
| BLO | back loop only |
Special Notes
- Pattern is easily adjustable to size and length; charts for measurements are available or use your own for a custom fit.
- Create texture by working into the same loop of each row as specified.
- All turning chains do not count as a stitch.
- Mark the first and last stitch of each row to ensure consistent width and avoid accidental increases or decreases.
- For a snug fit, reduce the circumference 10 cm below actual measurement to account for fabric stretch.
Step-by-Step Pattern
1. Base Chain
Measurement:
- Use the measuring tape to determine the desired length of your top.
- Add a few extra inches if you want a longer fit since a decorative edge will also add length.
Foundation:
- Ch the number needed for your desired width (e.g., 60 ch for a size XS/S).
- This chain determines the horizontal length from side to side (not vertical!).

2. Row 1 – Double Crochet Row
- Begin in the third ch from the hook (skip first two ch).
- Dc in this ch and each ch across (work in both loops).
- At end of row, you should have (number of chains minus two) double crochets.
- Mark your first and last stitch with stitch markers each row.
3. Row 2 – Half Double Crochet Row
- Ch 2, turn.
- Hdc in first st and across, working only into the back loop of each st for texture.
- Mark the last hdc.
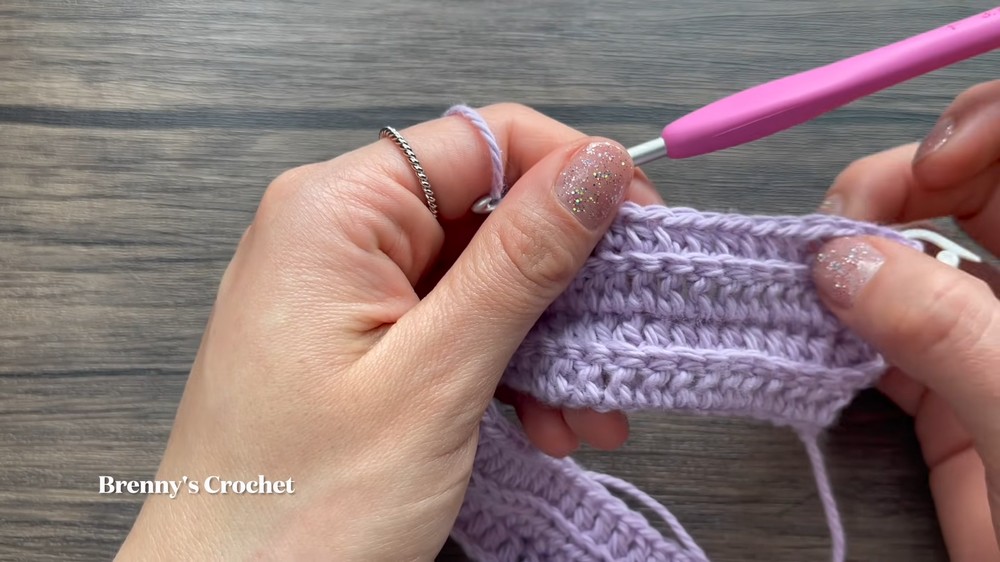
4. Row 3 – Double Crochet Row
- Ch 2, turn.
- Dc across, working in the back loop only of each st for relief and texture.
- Mark the last dc.
5. Row 4 and Onward – Repeat Rows
- Alternate Row 2 (hdc in BLO) and Row 3 (dc in BLO) until the piece reaches your desired circumference (check with measuring tape or size chart).
- Tip: If making for yourself, try on as you go and stop when it fits snugly around your bust.
6. Seam The Rectangle
- Finish on a hdc row for a tidy seam.
- Cut yarn, leaving a long tail for seaming.
- Fold rectangle right sides together.
- Using a yarn needle (or hook with sl sts), sew the sides together through matching stitches (preferably in the back loops for hidden seam).
- Fasten off and weave in ends.
7. Mark Strap Placement
- Turn piece RS out.
- Mark two points at the desired distance in the front and back for straps – usually in rounds with hdc (narrower rows).
- Place markers evenly for symmetry.
- Strap placement distance: Approx. 18 cm apart or as desired.
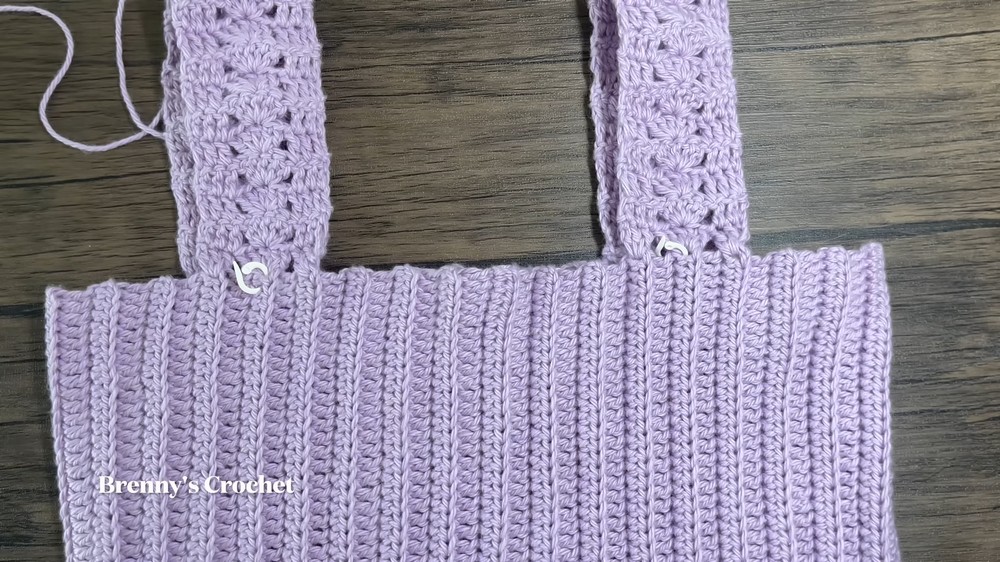
8. Straps
Attach yarn at your strap marker and work as follows:
- At marked spot, ch 3.
- In the same space, work 2 dc (creates a group of 3 dc).
- Skip to the next marked strap round, work 5 dc in one space.
- Repeat: alternate 3 dc in strap placement round, 5 dc in next.
- Continue this sequence for desired strap length (e.g., 23 repeats for a typical length).
- Turn work after each set of dc, begin row with sc, and continue as above.
- Fasten off.
- Tip: The group of 5 dc forms the center “fan” motif for the strap with 3 dc on either side.
- Repeat same process to make a second strap.
- Sew or crochet straps to back marked positions.
9. Sew Straps
- Turn work WS up.
- Sew each strap to its marked position at the back using a yarn needle.
- Pass needle through two strands of the base chain for stability.
- Fasten off and weave in ends.
10. Decorative Bottom Edge
Attach yarn at the marked round and work as follows:
- In each marked base round (preferably hdc rows), ch 3, work 2 dc in same space (group of 3 dc).
- Skip a row, in next hdc row, work 5 dc in same space.
- Repeat sequence: alternate 3 dc and 5 dc “fans” around hem.
- If you finish with 3 dc or 5 dc, it does not matter – the pattern is naturally flexible.
- Slip stitch to beginning and fasten off.
11. Optional Extra Hem Rounds
- For additional length, continue repeating decorative rounds as desired:
- In each group of 3 dc, work dc over each dc.
- In each group of 5 dc, work 5 dc in center st.
- Repeat for up to 4 rounds or as needed.
- Fasten off, weave in ends.

12. Finishing
- Weave in all ends securely with yarn needle.
- Remove stitch markers.
- Try on and wear with pride!
Conclusion
This top is accessible for beginners, worked as a simple rectangle joined into a tube and finished with textured stitches and decorative straps and edging. The measurements and pattern are highly customizable, and the relief pattern adds subtle sophistication. Sized for stretch and comfort, this top is perfect for personal wear or gifts.
Pattern Correction & Tips
- Correction:
- Ensure stitch count remains consistent each row by marking first and last stitch.
- When joining strap, sew through sturdy stitches at the back for security.
- Tips:
- Make rectangle 10 cm less than bust circumference for fitted look.
- Alternate between hdc and dc rows for texture.
- Use measuring tape and size chart for precision.
- Block your finished top for smooth stitches and professional finish.