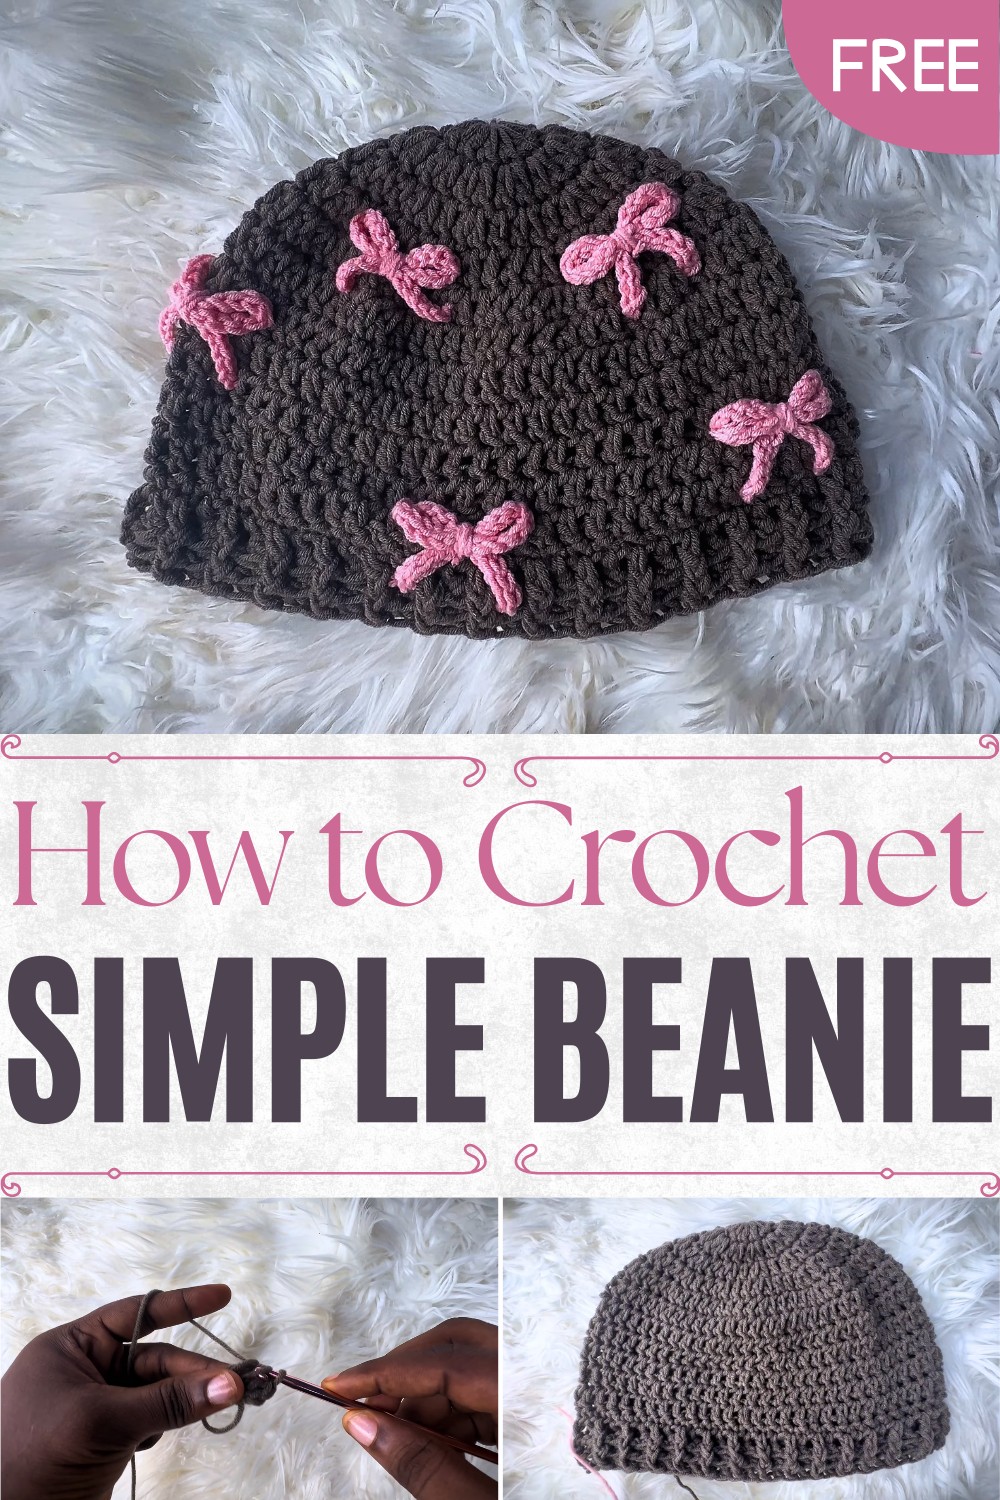
Minimalist Crochet Beanie Pattern to Complement Any Outfit
Stay cozy in style with this Free Crochet Beanie Pattern offering warm comfort, versatile fit, and a chic handmade touch for chilly days and nights
Crisp autumn mornings and chilly winter evenings often call for accessories that combine warmth with effortless style. The Free Crochet Beanie Pattern delivers exactly that, offering a cozy headpiece that keeps the wearer comfortable while adding a subtle statement to any outfit. Its snug fit provides insulation against cold winds, making it ideal for outdoor activities such as walking, commuting, or casual weekend adventures. Lightweight yet durable, this beanie balances protection with ease, allowing it to layer seamlessly under jackets or over hoods without discomfort.
How Crochet Beanie Patterns Balance Comfort and Style
Versatility is a key feature of this beanie. It can be crocheted in a variety of yarn weights and colors, allowing for personal expression and coordination with seasonal wardrobes. The simple construction makes it accessible to both beginners and experienced crocheters, while the textured stitches provide visual interest and depth. Beyond function, it serves as a thoughtful handmade gift for friends and family, offering warmth and style in one thoughtful package.
The Free Crochet Beanie Pattern combines practicality with timeless appeal, providing an accessory that transitions effortlessly between casual outings and colder weather activities. Its comfort, adaptability, and charming aesthetic make it a staple addition to any collection, offering both style and functionality during the colder months.
Materials Needed
- Yarn
- For Beanie: 5-ply cotton yarn (medium weight).
- For Ribbon: 4-ply cotton yarn (equivalent to DK weight yarn).
- Crochet Hook
- Use a 5.5mm hook for the beanie and a 4mm hook for the ribbon.
- Darning Needle
- For sewing loose ends and attaching ribbons.
- Scissors
- For cutting yarn tails.
- Stitch Marker (Optional)
- To mark placement when attaching ribbons.
Special Features
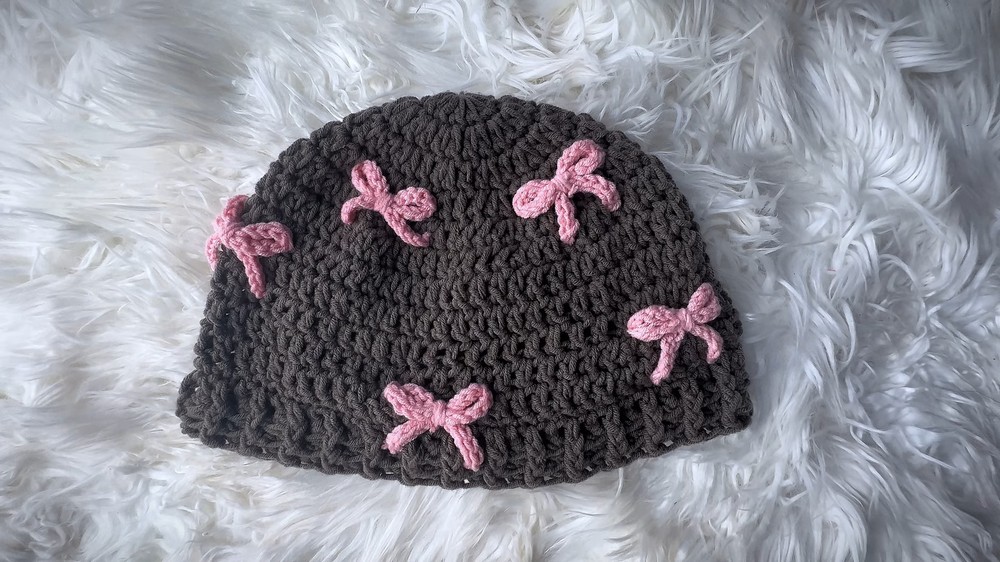
- Structured Design: The beanie achieves a clean, structured look through consistent increases and alternating front-post/back-post double crochet stitches in the final rows.
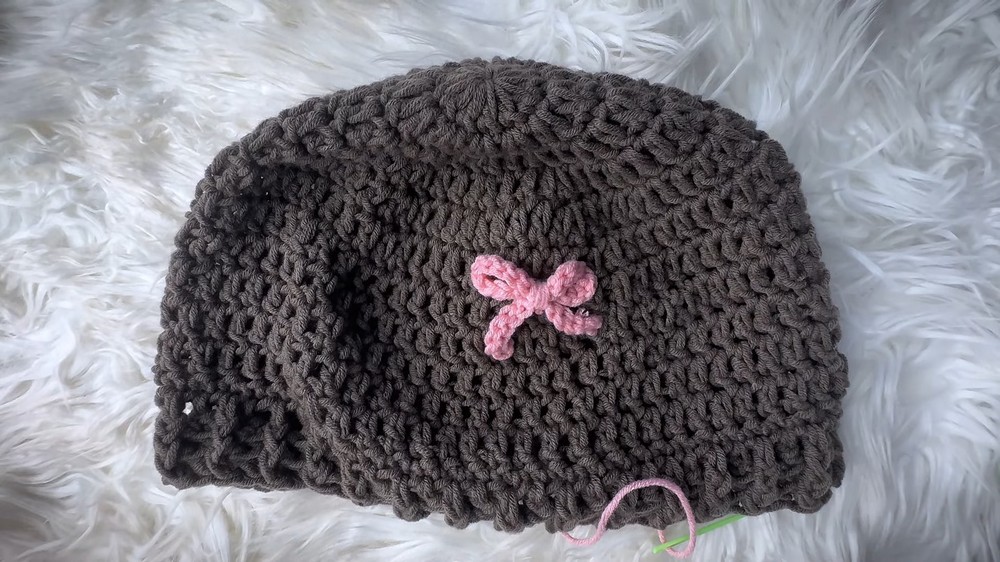
- Ribbon Detail: A unique ribbon accent adds personality and charm to the otherwise simple design.
- Adult-Sized Fit: The beanie measures approximately 7 inches deep, making it perfect for adults.
- Customizable: You can modify the ribbon placement or adjust the size of the beanie.
Level of Difficulty
- Beginner to Intermediate:
- Beginners can engage with this project because it uses simple stitches (magic ring, double crochet, single crochet, slip stitch).
- Intermediate crocheters will enjoy the challenge of front-post and back-post double crochet techniques and decorative finishing touches.
Step-by-Step Instructions for Beanie
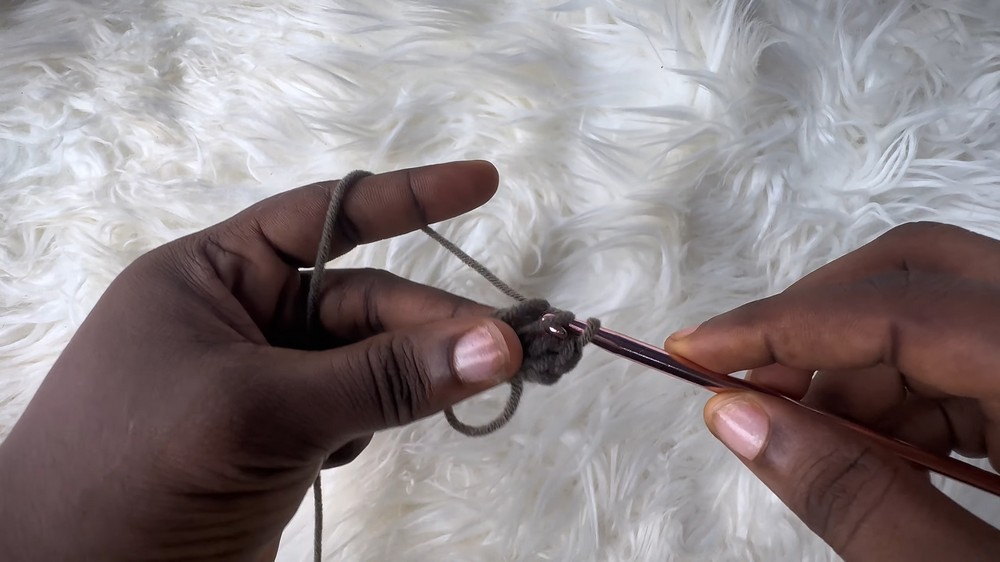
Step 1: Start with a Magic Ring
- Create a magic ring and pull tightly to secure it.
- Chain 2 (this does not count as a stitch).
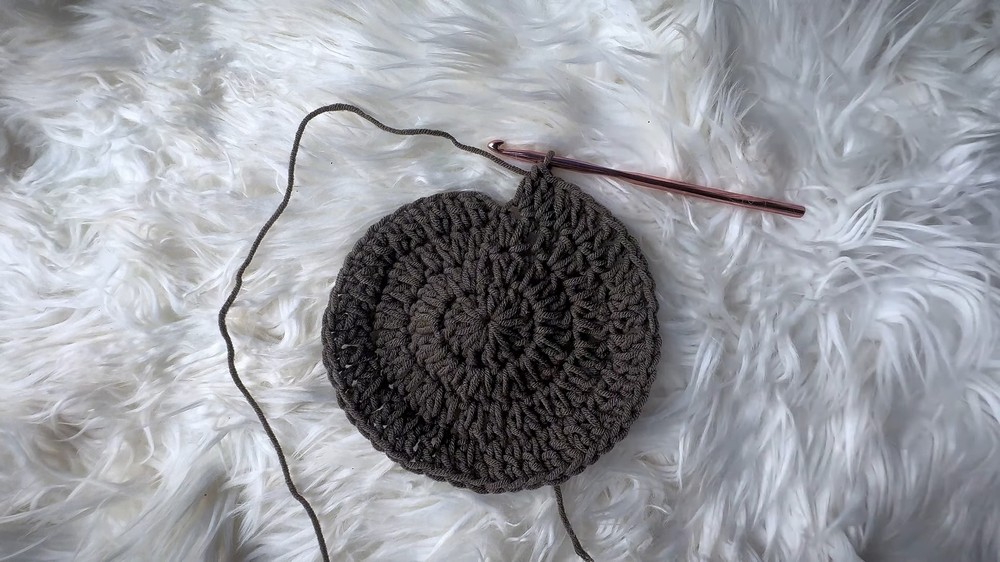
Step 2: Row 1 – Double Crochet Foundation
- Place 12 double crochets (dc) into the magic ring.
- Pull the loose end of the magic ring tight to close the circle.
- Slip stitch into the first double crochet (skip the chain 2).
Step 3: Row 2 – Increase Row
- Chain 2.
- Make 2 double crochets into the first stitch.
- Place 2 double crochets into each stitch around (24 stitches total).
- Slip stitch into the first double crochet (skip the chain 2).
Step 4: Row 3 – Alternating Increases
- Chain 2.
- Into the first stitch, place 1 double crochet. In the next stitch, place 2 double crochets.
- Continue alternating [1 double crochet + 2 double crochets] until the end of the row.
- Slip stitch into the first double crochet.
Step 5: Row 4 – Wider Alternating Increases
- Chain 2.
- Into the first two stitches, place 1 double crochet in each. Into the third stitch, place 2 double crochets.
- Repeat the pattern [2 single double crochets + 1 increase] till the end of the row.
- Slip stitch into the first double crochet.
Step 6: Row 5 – Final Increase Row
- Chain 2.
- Into the first three stitches, place 1 double crochet in each. Into the fourth stitch, place 2 double crochets (this is the increase).
- Continue alternating [3 single double crochets + 1 increase] till the end of the row.
- Slip stitch into the first double crochet.
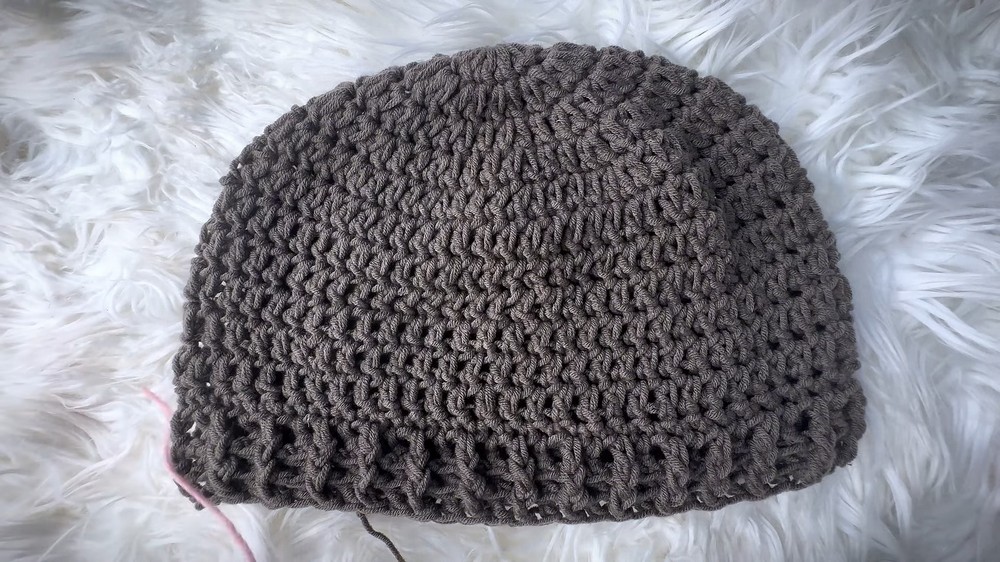
Step 7: Rows 6–11 – Uniform Double Crochets
- Chain 2 and skip any increases.
- Crochet 1 double crochet into each stitch around.
- End each row with a slip stitch into the first double crochet.
- Repeat this pattern for rows 6–11.
Step 8: Row 12 – Single Crochet Border
- Chain 1.
- Place 1 single crochet into each stitch around.
- End with a slip stitch into the first single crochet.
Step 9: Rows 13–15 – Front-Post and Back-Post Double Crochet
- Chain 2.
- Alternate between front-post double crochet (FPdc) and back-post double crochet (BPdc) for Row 14.
- FPdc: Insert hook from the front around the stitch post.
- BPdc: Insert hook from the back around the stitch post.
- End each row with a slip stitch at the starting double crochet.
- Repeat the same pattern for Row 15.
- Chain 1 and fasten off.
Step-by-Step Instructions for Ribbon
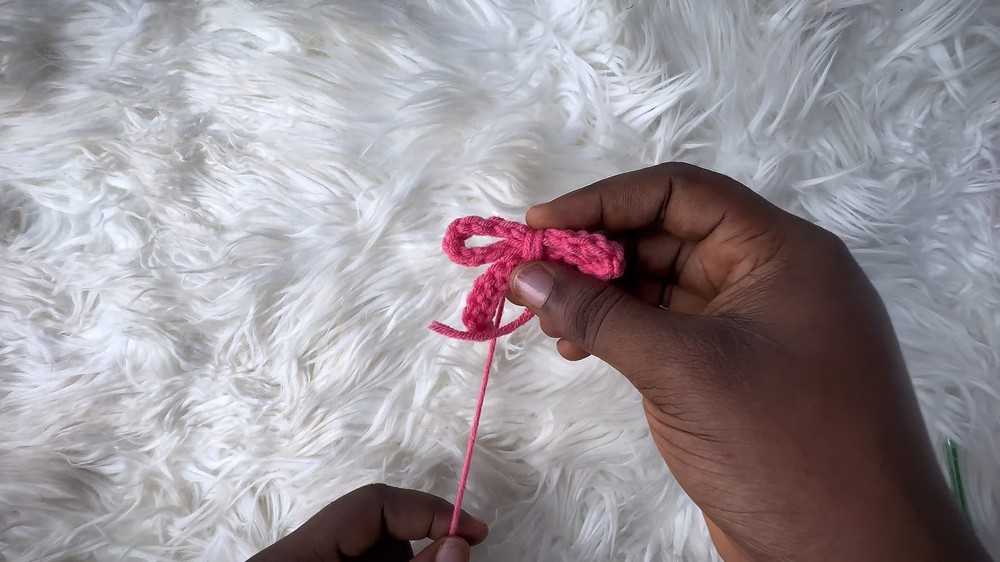
Step 1: First Ribbon (Circular Design)
- Chain 20, leaving a long tail.
- Work through the back loops only and make slip stitches into each chain stitch until the end.
- When finished, form a loop and join with a slip stitch at the first chain.
Step 2: Second Ribbon (Straight Design)
- Chain 13 with a long tail.
- Work slip stitches into the back loops only until the end.
- When finished, fasten off to create a flat strip.
Step 3: Combine Both Parts
- Take the circular ribbon piece and align it with the straight ribbon piece.
- Use the long tail to wrap the center section tightly, forming a bow.
- Secure by tying a knot and weaving in the yarn ends.
Attaching Ribbon to Beanie
- Decide on ribbon placement (e.g., side, front-center).
- Use a darning needle with matching yarn to sew the ribbon securely onto the beanie.
- Tie knots and weave in ends for a clean finish.
Tutor’s Suggestions
- Customize Ribbons: Experiment with different colors and yarn weights for the ribbons to match your personal style.
- Use Stitch Markers: When attaching ribbons, use stitch markers to determine placement on the beanie before sewing.
- Maintain Consistent Tension: Keep stitches uniform to achieve a neat, polished look.
Uses of the Crochet Beanie
- Winter Wear: Stay cozy and stylish during colder months.
- Gifting: The handmade beanie with ribbons makes a thoughtful gift for holidays or birthdays.
- Customizable Accessories: Free to add buttons or embellishments to enhance the ribbon design.
Conclusion
This crochet beanie tutorial teaches you how to create a cozy and stylish hat, complete with decorative ribbons. Its simple yet elegant design makes it perfect for personal use and gifting. With straightforward instructions and room for customization, you’ll end up with a handcrafted accessory that’s both functional and beautiful.
Final Tip
Measure for Precision: If you want perfect ribbon placement, wear the beanie and use stitch markers to mark the desired attachment areas. This ensures symmetry and added appeal to your design!