How to Crochet Fischer Poli Yarn Bag Pattern for Stylish Storage
Stunning Crochet Fischer Poli Yarn Bag Pattern for Effortless Chic

One of the standout advantages of this pattern is its versatility. You can tailor its size, color, and closure type to match your preferences—whether it’s adding magnetic snaps for convenience or decorative pins for a unique flair. It’s a project that will leave you with something not only practical but also custom-fitted to your personal taste.
The pattern is beginner-friendly, thoughtfully designed to be both simple and rewarding. It’s also a great way to get creative while indulging in the relaxing process of crochet. Whether you’re making it for yourself or as a gift for someone, this pattern proves that handmade items can be both functional and beautiful, seamlessly fitting into your daily life.
Materials Used
- Yarn: Fischer Poly Yarn made of polyester for softness and durability.
- Needle: 5 mm crochet needle.
- Accessories: Magnet closure, lapel clasp, label, and carabiner rings for straps.
- Optional Tools: Stitch markers for alignment and scissors for cutting threads.

Special Features
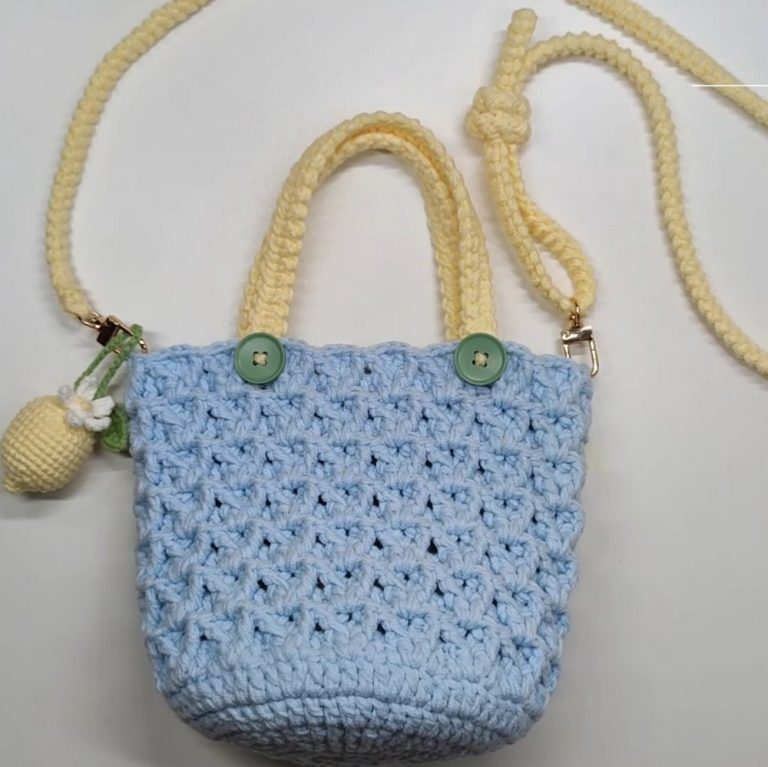
- Dual Compartments: Spacious interior divided into two sections for better organization.
- Elegant Stitch Design: Alternating single stitches and slip stitches create a textured, eye-catching pattern.
- Customizable Closures: Add magnets, lapel pins, or other clasps for secure and stylish functionality.
- Durable Material: Made with Fischer Poly Yarn (polyester) that’s soft, easy to work with, and long-lasting.
- Easy Construction: A simple structure that folds and sews into a professional-looking bag.
Step-by-Step Instructions
1. Create the Base
- Form an initial loop and crochet 24 chains.
- Turn the chain, and work on the back loops. Remember to skip the first loop before starting.

- Alternate single crochet stitches with slip stitches. Begin and end each row with a single crochet.
- Chain one, turn your work, and repeat the alternating stitch technique for 80 rows. The completed base should measure 46 cm x 16 cm.

2. Fold and Sew the Bag
- Fold the base with the wrong side facing out.
- Use single crochets to sew the sides together, taking loops from both sides, and hide loose threads within the stitches for a clean finish.

- Once both sides are sewn, turn the bag right-side out.
3. Work on the Dividers
- Fold the bag to create two compartments: the lid section and the inner part.
- Sew the inside section similarly, ensuring the alignment is correct. Keep the loops neat to maintain a professional finish.
4. Add Final Details
- Attach a magnet closure to the inner flap for secure storage.
- Add a lapel pin or a different clasp on the outer lid to keep it closed.

- Use carabiner rings for attaching straps, and sew in a decorative label for personalization.

Tutor’s Suggestions
- Pay attention to stitch placement and always alternate single and slip stitches without repetition. This ensures the textured pattern looks symmetrical and professional.
- Start and end each row with a single crochet stitch for consistency.
- While sewing the sides, fold the bag inside out to achieve cleaner seams when flipped afterward.
- When finishing, neatly hide the remaining thread within the stitches to create a polished look.
Uses
The pattern is not only stylish but also functional. With its two spacious compartments, it’s perfect for carrying personal essentials like wallets, keys, phones, and accessories. You can use it for both daily errands or as a chic accessory for special outings.
Level of Difficulty
This project is rated as easy, making it suitable for beginners who are familiar with basic stitches like single crochet and slip stitch. The repetitive nature of the stitches ensures progress is steady and straightforward.
Conclusion
The Fischer Poli Yarn Bag is a quick and easy project that combines simplicity, functionality, and style. Featuring a unique design with dual compartments and customizable closures, it’s a versatile accessory that you can personalize to match your needs. Perfect for beginners, this pattern allows you to experiment with textured stitches and produce a professional-looking bag with minimal effort.
Pro Tip
Use stitch markers to ensure proper alignment during sewing. This will help you maintain even seams, resulting in a clean, polished final product.