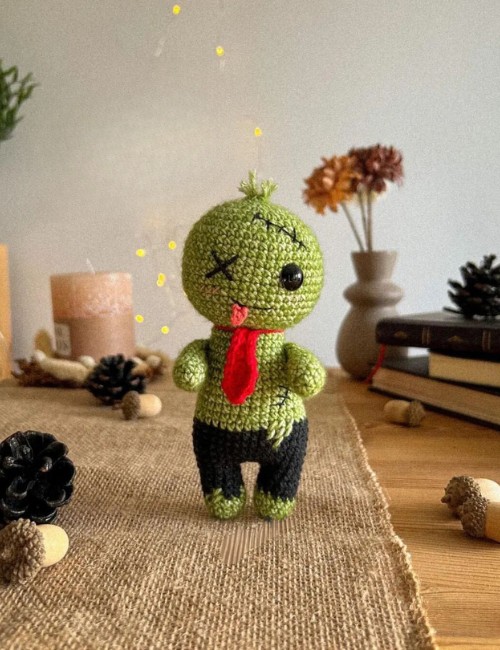
How to Crochet Zombie Amigurumi (Step-by-Step Pattern)
This crocheted zombie is cuter than scary because of its baby look and oh-so-cute details. It follows chibi art, wears a tie and torn pants, one eye is missed, and has a sewn head. You can learn how to crochet this zombie amigurumi with this step-by-step pattern for all skill levels. You can fearlessly gift it to your little one.
Designer: Bumbee_crochet On Instagram
How to Crochet Zombie Pattern
Grab your crochet hook and follow through with this free crochet zombie pattern designed with great effort by the Bumbee Crochet – a uniquely thinking crocheter. Hope you will find it accurate and prepare a nice gift for your baby:
Skills Needed: Yes, Beginners can do it.
Abbreviations
Abbreviations are for the ease of both the reader and the writer. This crochet zombie amigurumi guide has also been written using abbreviations or short names only. Below are the meanings for each for your better understanding:
- MR – Magic ring
- Ch – Chain
- Sc – Single crochet
- sl st – slip stitch
- inc – increase
- dec – decrease
Pattern:
Head:
1. 6 sc in MR 2. inc*6 (12 st)
3. (1 sc, inc)*6 (18 st) 4. (2 sc, inc)*6 (24 st) 5. (3 sc, inc)*6 (30 st) 6. (4 sc, inc)*6
(36 st)
7. (5 sc, inc)*6 (42 st)
8. (6 sc, inc)*6 (48 st)
9. 48 sc
10. 48 sc
11. 48 sc
12. 48 sc
13. 48 sc
14. 48 sc
15. 48 sc
16. 48 sc
17. 48 sc
18. (6 sc, dec)*6 (42 st)
19. (5 sc, dec)*8 (36 st)
20. (4 sc, dec)*6 (30 st)
21. (3 sc, dec)*6 (24 st)
Fasten off. Leave a long tail for sewing.
Place safety eye between rows 13 and 14. Embroider the second eyes appr. 7 sc apart.
Embroider the cut on the head and the mouth with a black thread.
Embroider the cheeks with the pink yarn if you like.
Legs and body:
1. 6 sc in MR
2. inc*6 (12 st)
3. 12 sc
4. 12 sc
Change color to black
5. 8. 12 sc (4 rows)
Fasten off and cut the yarn in the first leg.
Make another leg in the same way. On the second leg don't cut the yarn, continue to crochet
Ch 3 and join both legs
9. 12 sc around the first leg, 3 sc along the chain,
12 sc along the second leg, 3 sc along the other
side of the chain (30 st)
10. (4 sc, inc)*6 (36 st) 11.-15. 36 sc (5 rows)
Change color to green 16. 36 sc
17. (10 sc, dec)*3 (33 st)
18. 33 sc
19. 33 sc
20. (9 sc, dec)*3 (30 st)
21. 30 sc
22. (8 sc, dec)*3 (27 st)
23. 27 sc
24. 27 sc
25. (7 sc, dec)*3 (24 st)
26. 24 sc
27. 24 sc
Fasten off, leave a long tail for sewing.
Tongue:
Ch 3, from the second ch from the hook – 2 sl st. Fasten off, leave a long tail for sewing.
Arms:
1. 6 sc in MR
2. (1 sc, inc)*3 (9 st)
3 9.9 sc (7 rows)
Fold the edges together and single-crochet them with
4 sc. Fasten off. Leave a long tail for sewing.
Tie:
Ch 2, from the second ch from the hook-
1. inc, 1 ch, turn
2. inc*2, 1 ch, turn 3. 4 sc, 1 ch, turn
4. 4 sc, 1 ch, turn
5. 1 sc, dec, 1 sc, 1 ch, turn
6. 3 sc, 1 ch, turn
7. 3 sc, 1 ch, turn
8. 1 sc, dec, 1 ch, turn
9. 2 sc, 1 ch, turn
10. 2 sc
Turn your work 90 degrees and make a sl st in every row end along the left side, than along the right side of the tie.
Fasten off, leaving a long tail for sewing.
Assembly:
Sew the tongue to the head.
Sew the head to the body.
Sew the arms to the body between rows 25 and 22. Embroider the cut on the body with the black thread. Embroider the broken part on the pats with the green yarn you used for the body.
Attach a couple of green yarn cut-offs to the top of the head for the hair.
Fasten on the back or sew the tie.