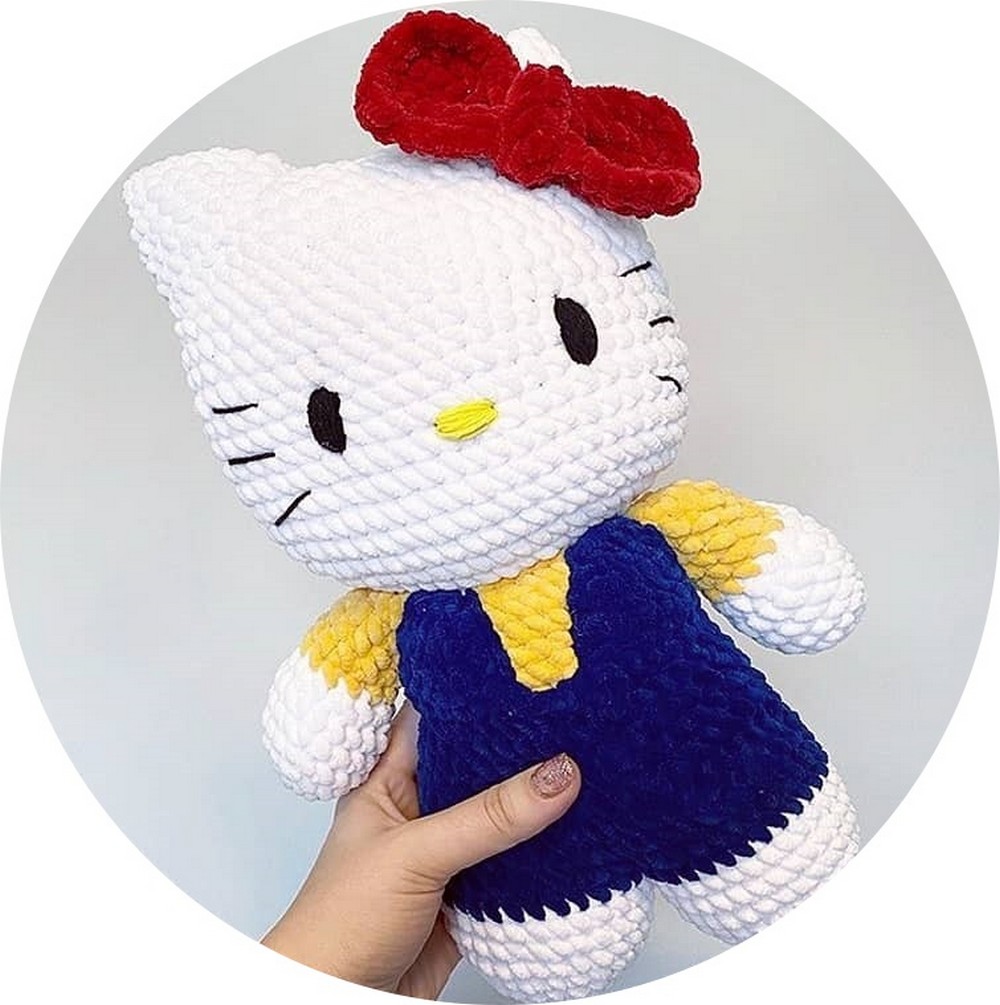
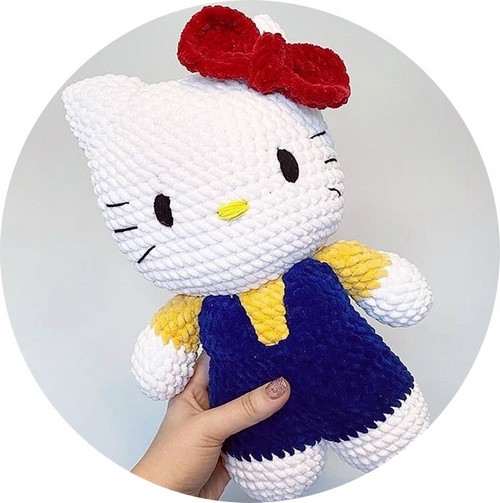
Crochet Hello Kitty Amigurumi Pattern For Nursery Decor
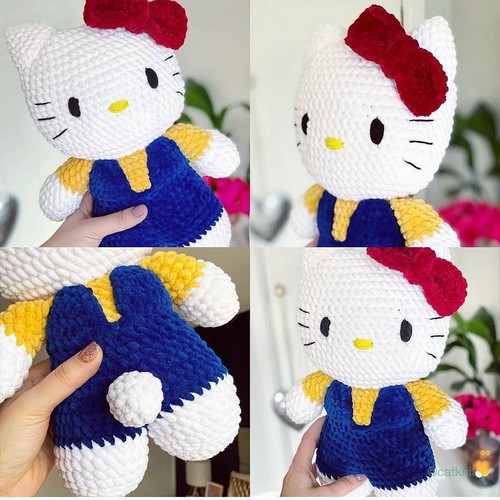
Hello Kitty is a cute and friendly little cat that many people around the world love. She wears a bow on her left ear and doesn’t have a mouth, because she speaks from the heart. People of all ages enjoy collecting Hello Kitty items, from small keychains to big stuffed animals. The Crochet Hello Kitty Amigurumi pattern lets you create your own cuddly amigurumi toy with yarn and a crochet hook. Using the warm, thick and fluffy yarn makes it a lot of soft to hug and quick to complete. By following the beginner-friendly pattern given below, you can make a soft, handmade Hello Kitty to cuddle, to give as a gift, or to add to a collection of Hello Kitty items.
MATERIALS:
- You’ll need 2 balls of white and 1 of the others
- Colour A: Cygnet Chenille, White
- Colour B: Cygnet Chenille, Midnight
- Colour C: Cygnet Chenille, Honeydew
- Colour D: Cygnet Chenille, Cranberry
- Colour E: Rico Ricorumi DK, Black
- Colour F: Rico Ricorumi DK, Yellow
- Crochet Hook: 4mm
- Toy stuffing
HEAD:
- 1. Using colour A, ch 13
- 2. [Sc 11 starting in the second st from the hook, sc 3 in the next st, mark the middle st with a stitch marker] repeat the above on the other side of the chain (28)
- 3. Sc until you get to the stitch marker, sc 2 in the st before the marker, sc 3 in the marked st and mark the middle st again, sc 2 in the next st. Repeat down the other side (36)
- 4-6. Repeat row 3 (60)
- 7-19. Sc in each st
- 20. Sc until you get to 3 sts away from the stitch marker, inv. dec, inv. dec the next 3 sts together, mark this st with marker, inv.dec.
- Repeat down the other side (52)
- 21-22. Repeat row 20 (36)
- 23. Sc until you get to 1 st away the stitch marker, inv. dec the next 3 sts together, and mark this st with marker. Repeat down the other side (32)
- Fasten off, leaving a long tail for sewing across the top.
- Stuff the head firmly before closing.
EARS (MAKE 2):
- 1. Using colour A, work 4 sc in the magic ring (4)
- 2. Inc in each st (8)
- 3. *1 sc, 1 inc** repeat * to ** 4 times (12)
- 4. *2 sc, 1 inc** repeat * to ** 4 times (16)
- 5. *3 sc, 1 inc** repeat * to ** 4 times (20)
- 6. *4 sc, 1 inc** repeat * to ** 4 times (24)
- 7. *5 sc, 1 inc** repeat * to ** 4 times (28)
- 8. Sl st in the next st, fasten off leaving a long tail for attaching to the head. Attach across rows 19-23 with 8 sts between on the top, and stuff the ears as you go.
FACE:
Nose:
- Using colour F, the nose is stitched on between row 10-11, across 2 stitches in the middle of the face. Keep going over the same st about 15-20 times until you’re happy with the shape.
Eyes:
- Using colour E, the eyes are stitched across rows 11-13, count 4 sts away from the nose, there should be 10 sts between each eye. As per the nose, keep going over the same st 15-20 times until you’re happy with the shape.
Whiskers:
- (Tip! Use pins to mark the placements first) Using colour E, start with the middle whisker which will sit between row 11-12. Count 3 sts away from the eye and make the st 3 sts long.
- The top whisker will sit 2 rows up from the middle whisker, starting between row 13-14 and end the st between row 14-15 to create a slight diagonal st (also 3 sts away from the eye and 3 sts long).
- The bottom whisker will sit 2 rows down from the middle
whisker and only be 2 sts long, start between row 9-10 and end the st between row 8-9 to create a slight diagonal.
LEGS (MAKE 2):
- Using colour A, work 6 sc in the magic ring (6)
- Inc in each st (12)
- *1 sc, 1 inc** repeat * to ** 6 times (18)
- *2 sc, 1 inc** repeat * to ** 6 times (24)
- Sc in BLO
- *3 sc, 1 inc** repeat * to ** 6 times (30)
- 9. Sc in each st
- Change to colour B, sc in each st
- Don’t cut the yarn once the second leg is done.
BODY:
- 11. Now you will connect the two legs, you do so by starting in the first unworked st of the other leg, sc 26 (that leaves 4 unworked sts), sc 26 of the other leg (52)
- 12. Sc in each st
- 13. *5 sc, 1 inv.dec** repeat * to ** 7 times, sc 2 (45)
- 14. Sc in each st
- 15. Sc 2, *4 sc, 1 inv.dec** repeat * to ** 7 times (38)
- 16-19. Sc in each st
- 20. Sc 2, BLO sc 6, sc 3, BLO sc 6, sc 5, BLO sc 6, sc 3, BLO sc 6, sc 1
- 21. Change to colour C, *2 sc, 1 inv.dec** repeat * to ** 9 times, 1 sc (38) 22-25. Sc in each st
- Fasten off leaving a long tail for attaching the head to the body.
DUNGAREES:
- These will be worked in the unworked front loops of round 20 with colour B.
- After each row ch 1 (does not count as st) and turn.
- Right side (repeat for front and back right side dungaree strap):
- 1. Sc 6 (6)
- 2. Sc in each st
- 3. Sc 4, dec (5)
- 4. Sc in each st
- 5. Sc 3, dec (4)
- Fasten off.
- Left side (repeat for front and back left side dungaree strap):
- 1. Sc 6 (6)
- 2. Sc in each st
- 3. Dec, sc 4 (5)
- 4. Sc in each st
- 5. Dec, sc 3 (4)
- Do not fasten off once you’ve finished the last strap.
- Now you’ll crochet down the side of the strap, and between the straps where the two colours meet to create an edge, now continue up and down the other straps and in between to tidy up all the edges. Attach each strap to the yellow part of the body.
ARMS (MAKE 2):
- 1. Using colour A, work 6 sc in the magic ring (6)
- 2. Inc in each st (12)
- 3. *1 sc, 1 inc** repeat * to ** 6 times (18) 4-6. Sc in each st
- 7. *1 sc, 1 inv.dec** repeat * to ** 6 times (12)
- 8. Chance to colour C, sc in each st
- 9-12. Sc in each st
- Stuff the end of the arm firmly and the top part loosely (or it will stick out too much).
- 13. Inv.dec 3 times, now flatten the top opening and sc through both layers across the top to close.
- Attach the arms between the gaps of the dungarees, the top of the arm should be flush with the top of the body.
- Pin the head in place and use the tail from the body to attach the head to the body.
BOW:
- Part 1:
- 1. Using colour D, ch 15
- 2-6. Sc in each st.
- Now you’ll ch 1 then crochet down the short side, ch 1, crochet across the bottom of row 1, ch 1, crochet up the short side. Fasten off and weave in ends.
Part 2:
- 1. Ch 10
- 2. Starting in the second ch from the hook, sc 9, ch 1 (does not count as st), turn 3. Sc in each st
- Fasten off leaving a long tail for attaching.
- Attach part 2 around part 1 and attach the bow to row 19 of the head, directly in front of the right ear.
TAIL:
- 1. Using colour A, work 6 sc in the magic ring (6)
- 2. Inc in each st (12)
- 3-5. Sc in each st
- Fasten off leaving a long tail for attaching the tail to the body across rows 12-13 in the middle on the back. Stuff the tail lightly.
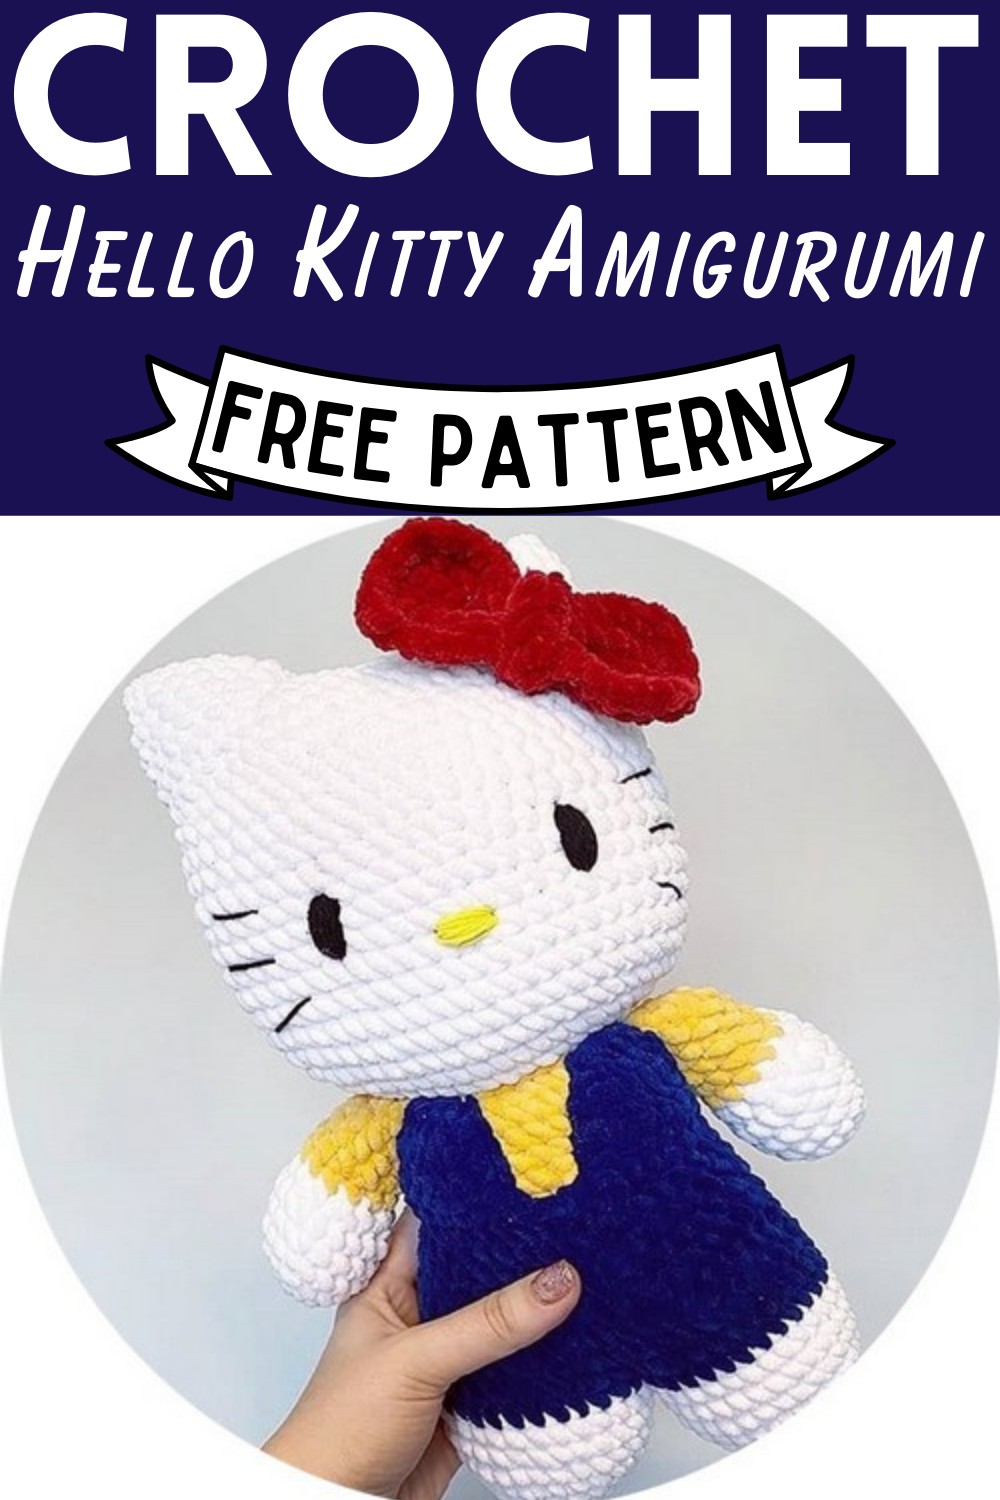
Designer: Catknit_ On Instagram