Bold Crochet Circle Granny Square for Trendy Decor Corner
Weave timeless charm with Crochet Circle Granny Square Pattern, featuring playful textures, vibrant details, and cozy handmade appeal.
Textiles have long reflected creativity, culture, and comfort, with intricate stitches transforming simple yarn into lasting works of art. The Crochet Circle Granny Square Pattern brings a unique twist to a classic form, merging the traditional square with a delicate circular motif at its center. This versatile creation can serve as a cozy blanket, a stylish pillow cover, or even a decorative table accent, adding both warmth and charm to any space.
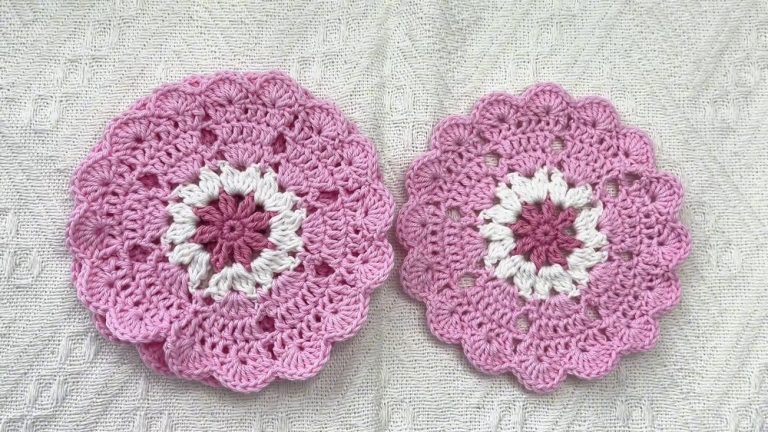
Vibrant Crochet Circle Granny Square for Stylish Layering

The construction begins at the center, where the circle grows outward through carefully worked stitches, creating a sense of rhythm and balance. As the circle transitions into the square shape, each corner and edge is shaped to maintain symmetry, while layers of texture provide depth and visual interest. The interplay of color can be subtle or bold, offering endless possibilities to match personal style or home décor.
Durable, adaptable, and full of character, the Crochet Circle Granny Square Pattern blends aesthetic appeal with practical function. Its lightweight structure allows for easy assembly into larger projects, while the textured surface offers both comfort and tactile intrigue. This pattern transforms simple yarn into a piece that radiates artistry, charm, and warmth, making it a lasting addition to any handmade collection or home.
Materials Needed:
- Yarn: Two contrasting colors (e.g., yellow and purple).
- Crochet Hook: Size suitable for your chosen yarn (recommended in the video).
- Scissors: To cut yarn ends.
- Yarn Needle: For weaving in loose ends.

Step-by-Step Details
Step 1: Creating the Magic Circle (Round 1)
- Start with the Magic Circle: Form a magic circle, which will act as the foundation for your granny square.

- Chaining and Double Crochets:
- Chain 3 (this counts as the first double crochet).
- Crochet 11 additional double crochets inside the magic circle (total of 12 double crochets).
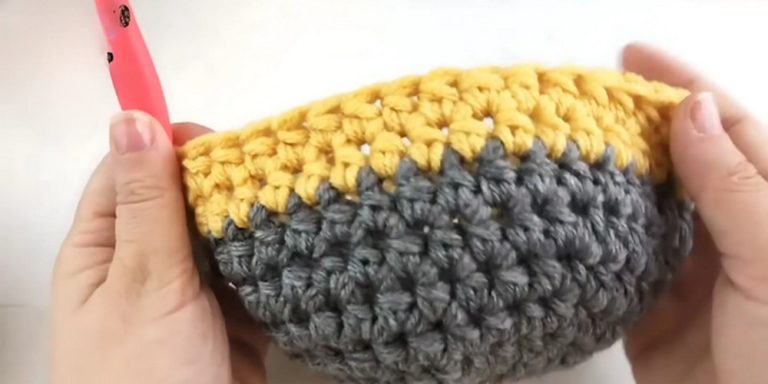
- Color Change:
- Undo the last stitch and introduce the second color (purple).
- Complete the sixth double crochet with the purple yarn, holding all loose ends taut.
- Complete the Magic Circle:
- Crochet 6 double crochets with the purple yarn to complement the initial 6 yellow double crochets.
- Pull the yellow yarn to tighten the magic circle and close the loop.
- Join the Round:
- Return to the yellow yarn to connect the last purple double crochet with the first yellow double crochet using a slip stitch.

- Return to the yellow yarn to connect the last purple double crochet with the first yellow double crochet using a slip stitch.
2: Expanding the Circle (Round 2)
- Start Round 2:
- Chain 3, which counts as the first double crochet.
- Double crochet into the same stitch.
- Work Two Double Crochets Per Stitch:
- Place 2 double crochets in each stitch around the circle.
- Color Change:
- Before completing the last stitch in yellow, drop the yellow yarn and pick up the purple.
- Use purple to crochet the remaining stitches in the same method: 2 double crochets in every stitch.
- Finish Round 2:
- Complete the round with a total of 24 double crochets and join back to the starting stitch with the yellow yarn.
3: Increasing the Circle (Round 3)
- Pattern: 2 Double Crochets, 1 Double Crochet:
- Chain 3, double crochet in the same stitch (2 double crochets in one stitch), then 1 double crochet in the next stitch. Continue alternating between 2 double crochets and 1 double crochet.
- Change Colors as Needed:
- Drop the working color when finishing the last stitch in that section and switch to the next color.
- Complete Round 3:
- Finish with a total of 36 double crochets, alternating the color sections.
4: Transitioning to a Square (Round 4)
- Start the Square:
- Chain 3, double crochet in the same stitch.
- Work the pattern 2 double crochets, 1 double crochet, 1 double crochet (repeat this throughout).
- Creating Corners:
- In specific stitches, make 2 treble crochets, chain 2, and 2 more treble crochets to form the corners of the square.

- In specific stitches, make 2 treble crochets, chain 2, and 2 more treble crochets to form the corners of the square.
- Carry Over Yarn:
- Ensure the unused yarn is carried neatly along the back to avoid loose ends.
- Finish the Round:
- Follow the stitch pattern and color changes to complete the square shape.
5: Adding Rounds for a Bigger Square (Round 5)
- Edge Clean-Up with Single and Half-Double Crochets:
- Add texture and size by crocheting single crochets, half-double crochets, and double crochets along the edges.
- Final Rounds (Optional):
- You can expand the square further by crocheting rows of double crochets, maintaining the corners with 2 double crochets, chain 2, and 2 double crochets.

- You can expand the square further by crocheting rows of double crochets, maintaining the corners with 2 double crochets, chain 2, and 2 double crochets.
Special Features
- Unique Shape: Combines a circular design within a square border, making it visually distinctive.
- Multiple Colors: The use of two alternating colors adds depth and dimension.
- Creative Versatility: The technique can be adapted for projects like blankets, bags, or cardigans.
Level of Difficulty
The project is beginner-friendly, as it revolves around basic stitches such as single crochet, double crochet, and treble crochet. However, it does require stitch counting and seamless color changes, which might slightly challenge absolute beginners.
Tutor’s Suggestions
- Keep Yarn Neat: Always carry the unused yarn neatly along the back of the project for clean color transitions.
- Tighten the Magic Circle: Ensure the circle is securely tightened to prevent gaps at the center.
- Color Combinations: Experiment with different color pairs to find a combination that complements your project.
- Take Your Time with Corners: Extra attention is required while forming the corners to maintain a perfect square shape.
Uses:
- Create a beautiful blanket, combining several granny squares.
- Use individual squares for garments like cardigans or ponchos.
- Attach them together for projects like cushion covers, bags, or table runners.
Tip
When stitching the corners of the square, make sure to keep the chain-2 space loose to ensure the square lays flat and the shape stays aligned. Tight corners can cause the piece to pucker, disrupting the final look.
Conclusion
The Circle Granny Square is a delightful crochet design that blends simplicity and creativity. Its step-by-step process, alternating colors, and versatility make it a great project for adding personality to your crochet work. Whether you’re making a blanket, a bag, or a cardigan, this design is sure to provide a unique and charming touch. Follow the instructions, experiment with colors, and have fun bringing this granny square to life.