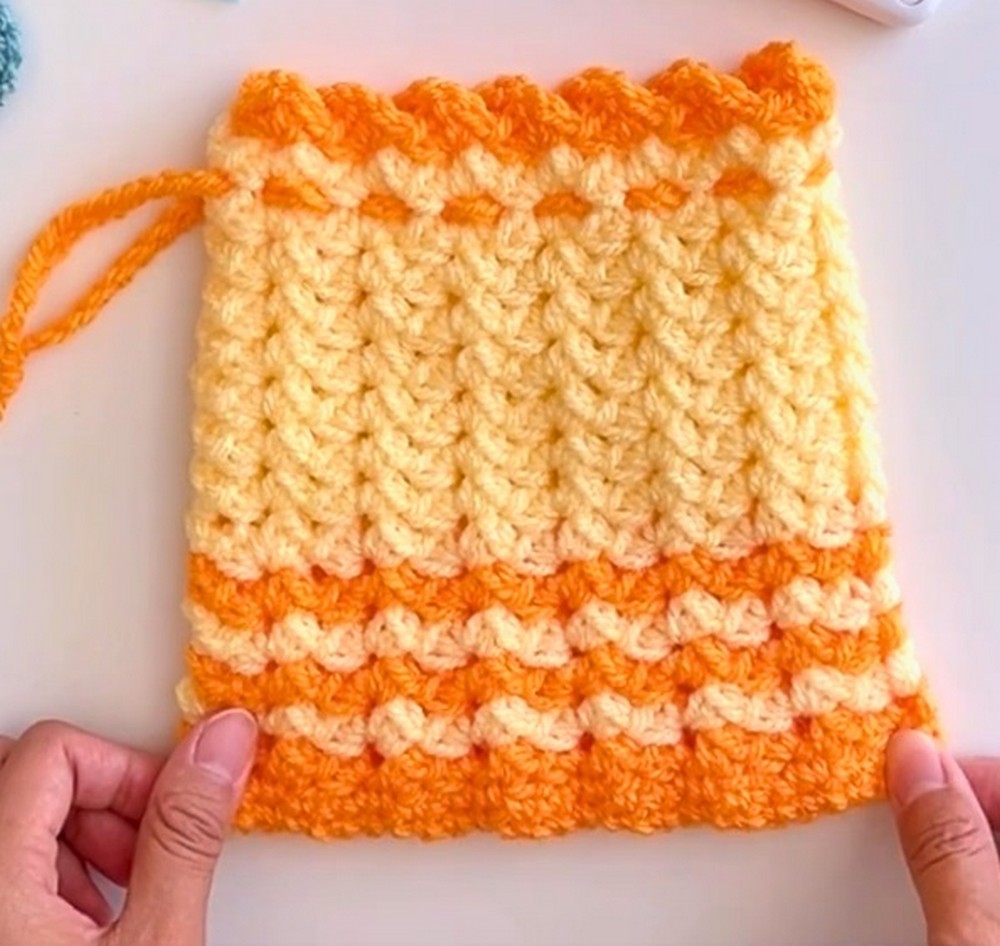
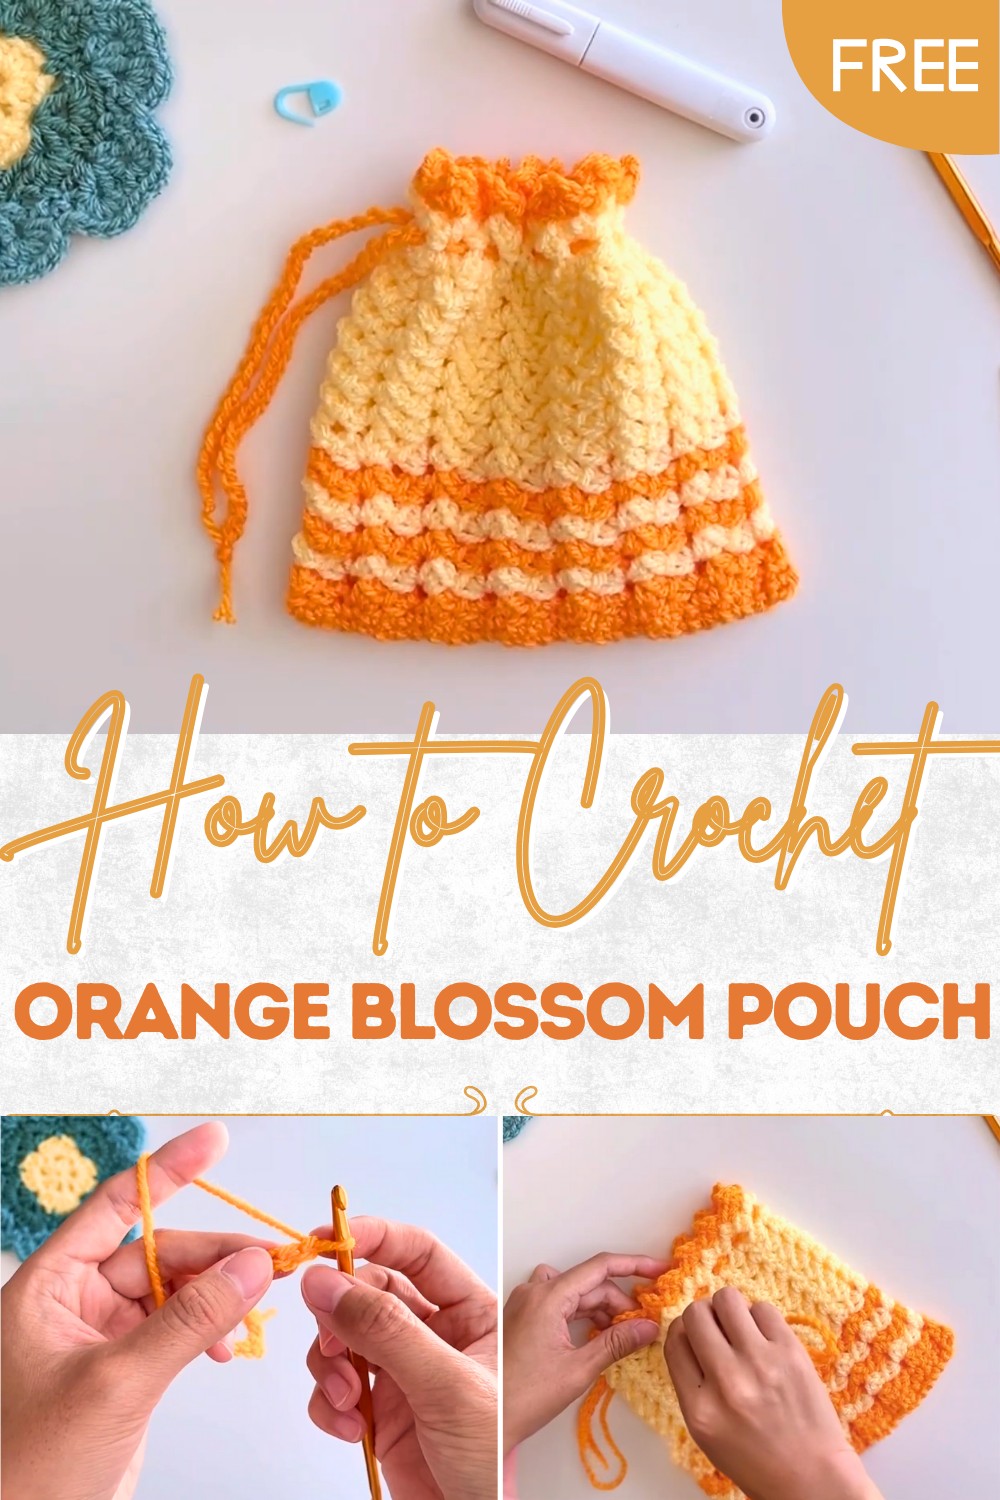
Luxe Crochet Orange Blossom Pouch with Dreamy Flair
Sweet charm unfolds with this Crochet Orange Blossom Pouch Pattern that captures floral beauty in a stylish and practical accessory.
Moments of elegance are often found in the smallest of details, and a pouch can be more than just a place to keep tiny essentials—it can become a keepsake in itself. The Crochet Orange Blossom Pouch Pattern reflects that idea with its charming character and graceful form, offering beauty that feels both delicate and practical. Inspired by the freshness of blossoms and the warmth of natural tones, this pouch carries an uplifting spirit while remaining highly functional.
Chic Crochet Orange Blossom Pouch for Everyday Style
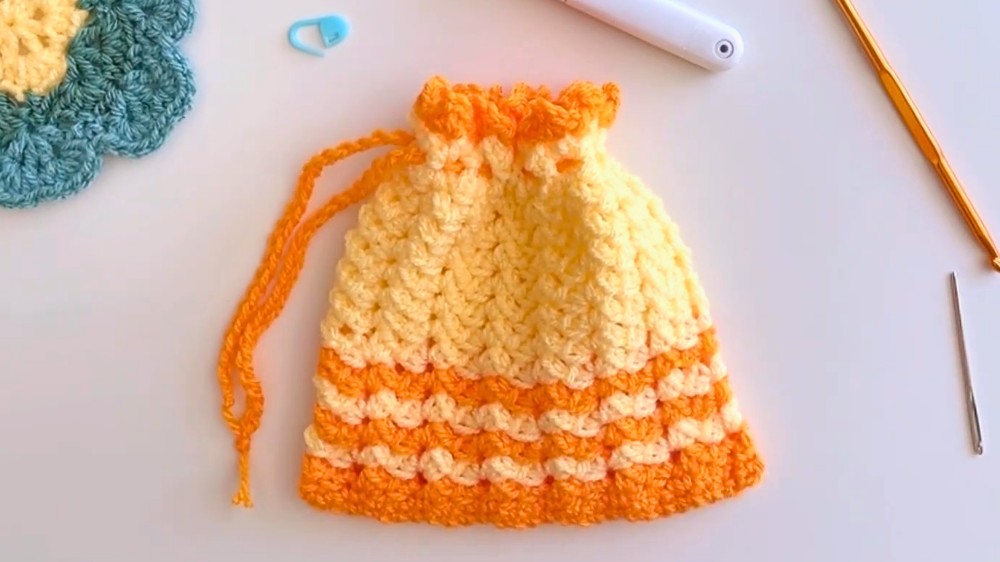
Its compact size makes it perfect for safeguarding jewelry, coins, or even little tokens of sentiment, while the floral-inspired motif adds a touch of refinement that elevates everyday use. The texture not only gives it a soft and appealing appearance but also makes it durable enough to be a reliable companion for daily routines. Its lightweight nature ensures it slips effortlessly into larger bags, yet it is striking enough to be carried on its own for a subtle statement.
This pouch also adapts gracefully to color variations, making it versatile for personal style or gifting. Whether used for special keepsakes or simply as an elegant organizer, the Crochet Orange Blossom Pouch Pattern combines functionality with charm, offering a timeless accessory full of character and grace.
Materials Needed
- Yarn:
- 2 colors of Hobbii AMIGO XL yarn (orange and yellow).
- Crochet Hook: Recommended size for this tutorial is appropriate for your yarn type, likely around 4–5 mm.
- Yarn Needle: For weaving in ends and threading the string.
- Scissors: For trimming yarn tails.
- Stitch Marker: To mark the start of rows.
Special Features
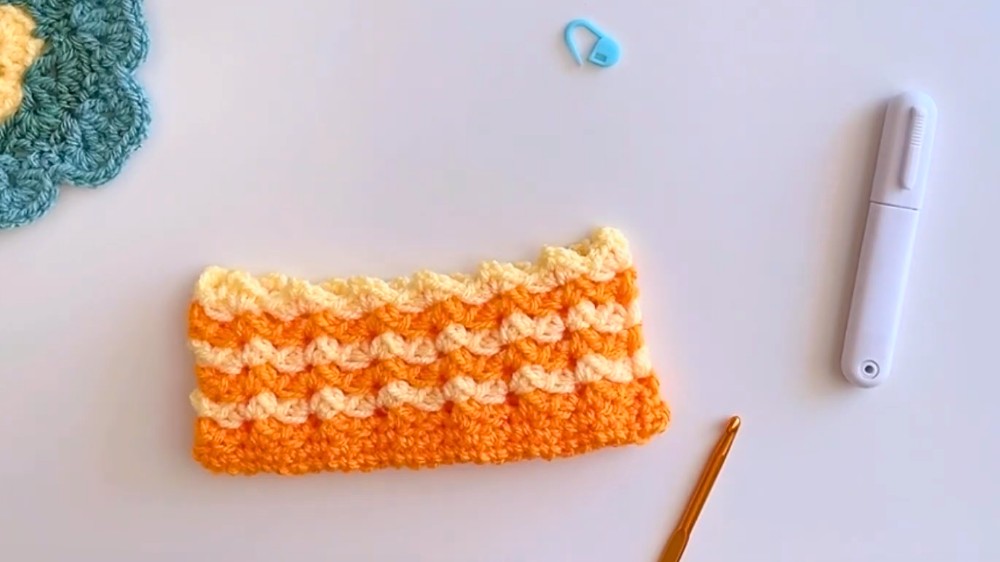
- Wavy Pattern: The standout design element is the repeating wavy pattern, which is created with rows of [2 single crochets + chain 2 + 2 single crochets] in chain spaces.
- Color Changes: Different yarn colors (orange and yellow) are alternated for a bright and vibrant contrast.
- Compact and Functional: The pouch is compact yet versatile, making it suitable for storing small items like accessories or coins.
- Simple String Addition: The chain-stitched string acts as both a decorative and functional closure.
- Beginner-Friendly: The pouch uses easy techniques (single crochet, chaining, and slip stitches), but includes colorful customizations and patterns.
Level of Difficulty
Beginner to Intermediate.
The pattern is suitable for beginners comfortable with basic crochet stitches (single crochet, slip stitch, and chain), but it also introduces concepts like working in chain spaces and handling color changes.
Step-by-Step Instructions
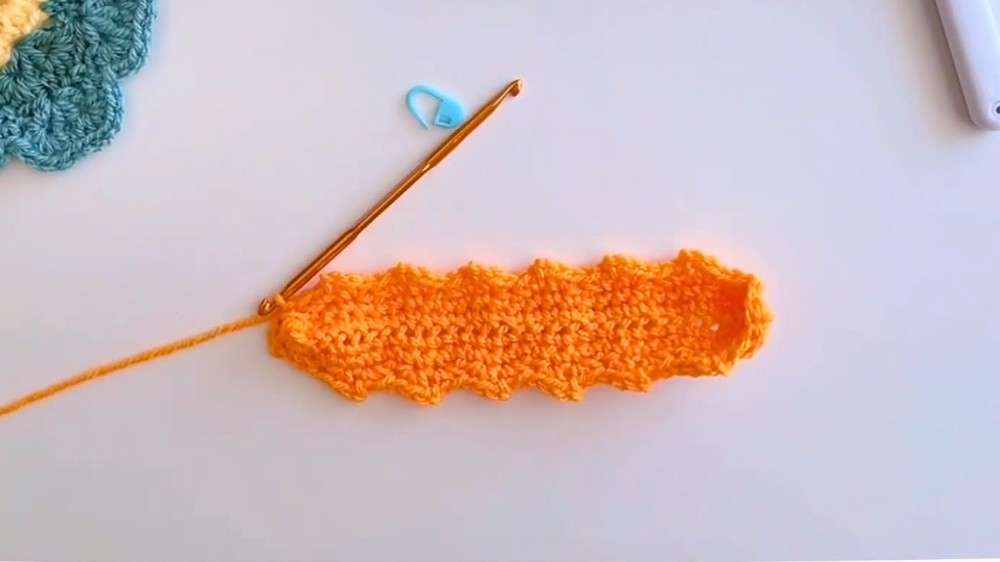
Step 1: Create the Foundation Base
- Chain Foundation: Start by making 28 chain stitches plus 1 foundation chain.
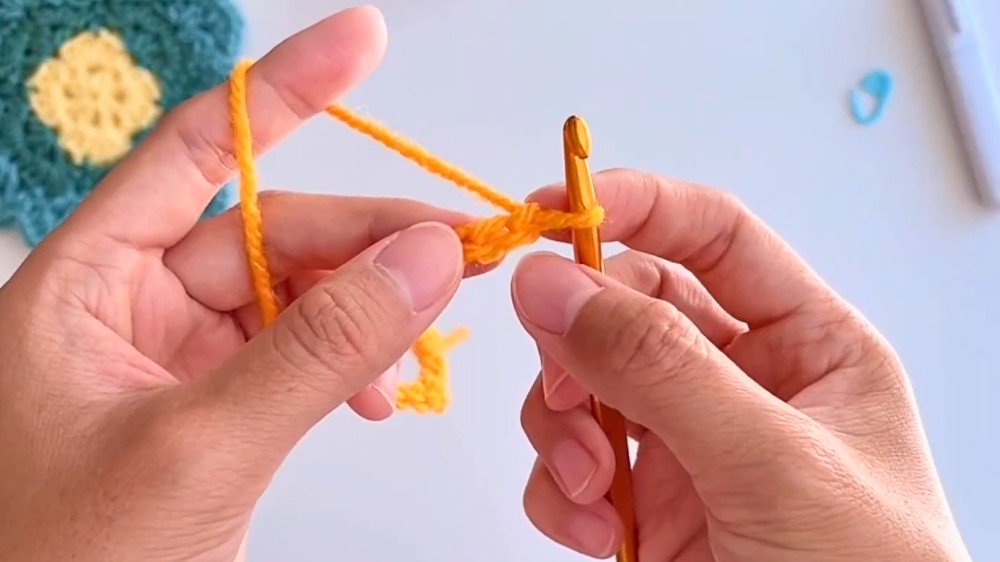
- First Row:
- Work 1 single crochet (SC) in the second chain from the hook.
- Continue making 1 SC in each chain until the end of the row (total: 28 stitches).
- Opposite Side Crochet:
- Turn the work and crochet 28 more single crochets on the opposite side of the chain.
- Finish the Row: Join with a slip stitch to the first single crochet of the row to create a seamless round.
2: Build the Pouch with Wavy Patterns
- Row 2:
- Chain 1 to start the row.
- Crochet 1 SC in each stitch around (total: 56).
- Mark the starting stitch with a stitch marker.
- At the end, join with a slip stitch.
- Row 3:
- Increase: 2 SC in the first stitch, and mark the first stitch with a stitch marker.
- Chain 2.
- Skip 2 stitches, and make 2 SC in the next stitch.
- Repeat the pattern: [2 SC + chain 2 + 2 SC], skipping 2 stitches in between.
- At the end of the row, join with a slip stitch to the first SC.
3: Alternate Yarn Colors
- Change the Yarn Color: After the third row, cut the yarn leaving a short tail and switch to a new color. Use the same pattern as above.
- Row 4:
- New yarn color: Insert your hook in the chain space, chain 1, and follow the wavy pattern.
- Pattern: [2 SC + chain 2 + 2 SC] in each chain space.
- Join with a slip stitch at the end.
- Repeat Rows with Alternating Colors: Continue alternating the orange and yellow yarns while following the same pattern for each row.
4: Work Solid Rows in Yellow
- After completing around 8 wavy rows with alternating colors, switch to one solid color (yellow) for several additional rows.
- Complete up to Row 16 using the same pattern ([2 SC + chain 2 + 2 SC]) in each row.
5: Final Touches
- Last Row: For the final row, switch back to the orange yarn. Finish the pouch with the same wavy pattern.
- Closure String:
- Create a long string using a simple chain stitch.
- The length of the string should be twice the width of the pouch.
- Weave the string through the spaces in Row 15 using a yarn needle.
- Tie the ends of the string together for a secure closure.

Tutor’s Suggestions
- Work at a Consistent Tension: Ensure even tension throughout your work to maintain the shape of the pouch.
- Practice Color Changes: Master the yarn-changing process to keep the color transitions smooth and neat.
- Use a Stitch Marker: Always mark the first stitch of each row, especially when working in a round.
Uses of the Pouch
- Accessory Storage: Ideal for holding coins, jewelry, or other small trinkets.
- Gift Idea: A great handmade gift for friends and family.
- Home Decor: With its bright colors and patterns, the pouch can also serve as a decorative item.
- Scalable Design: This pattern can be adapted to create larger crochet bags.
Conclusion
The “Orange Blossom Pouch” is a delightful crochet project that combines creativity and functionality. The wavy pattern with alternating yarn colors makes for an eye-catching design, while the step-by-step instructions ensure that the process is simple and enjoyable. You can customize the pouch using different yarn colors to suit your personal taste. This project is a great opportunity to practice working in rounds, handling color changes, and creating uniform patterns.
Tip
Always weave in your yarn tails securely in between rows to avoid fraying or unraveling over time. This will ensure your finished pouch looks clean and professional.