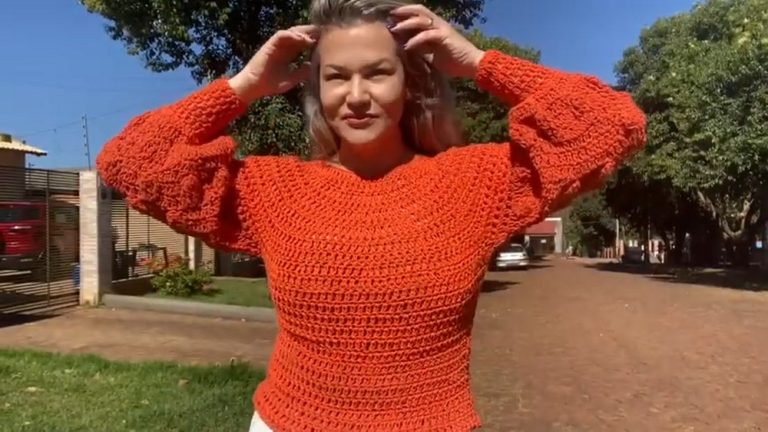
Crochet Skirt Pattern With Simple Yet Stunning Features
Perfect for any skill level, this crochet skirt pattern offers easy-to-follow instructions to make stylish and comfortable skirts for any occasion.
A timeless skirt can add elegance and versatility to any wardrobe. This crochet skirt pattern stands out for its stylish design and practicality. It features a comfortable, snug waistband and an intricate pattern that enhances the overall appeal, making it perfect for casual outings or semi-formal gatherings. Designed to provide a perfect fit, it accommodates various sizes by including adjustable elements and stretchable stitches. The hip-flattering shape and delicate ribbing at the hem ensure a modern finish that balances functionality and aesthetics.
Fashionable Crochet Skirt Pattern

Crochet Skirt Pattern: Detailed Step-by-Step Guide
This tutorial will guide you through creating a stylish crochet skirt using the bean stitch. Designed for both beginners and intermediate crocheters, the crochet dress pattern includes precise measurements, materials, and step-by-step instructions. By following these instructions, you’ll learn how to create a custom-fit skirt with a waist size of 28 inches, a hip circumference of 40 inches, and a length of 16 inches, including a ribbed finish at the bottom.
Materials Needed
- Yarn:
- Type: California Yarn (Green in color).
- Weight: 50 grams.
- You may use any medium-weight yarn suitable for your project.
- Tools:
- Crochet Hook: 3.5mm hook.
- Measuring Tape: To take waist, hip, and skirt length measurements.
- Scissors: For cutting the yarn.
- Stitch Markers: To identify points for hip increases.
Abbreviations
- ch: Chain.
- sc: Single Crochet.
- sl st: Slip Stitch.
- st: Stitch.
- bl: Back Loop.
- Bean Stitch: A decorative crochet stitch involving multiple loops and a structured pattern.
Step-by-Step Pattern
Step 1: Begin with the Waistband
- Create a Slip Knot:
- Form a slip knot and insert your hook into the loop.
- Chain 10 for the Waistband:
- Chain (ch) 10 stitches to begin the waistband.

- Chain (ch) 10 stitches to begin the waistband.
- Establish Ribbing Pattern:
- Chain 1, skip the first stitch, and place a single crochet (sc) in each of the remaining 9 stitches.
- Turn your work and work your single crochet stitches into the back loops (bl) of each stitch.
- Continue the Ribbing:
- Repeat the process until the waistband reaches your 28-inch waist measurement.
- Important: Stretch the waistband piece while measuring to ensure a snug fit.

Step 2: Join the Waistband Ends
- Join the Waistband:
- Chain 1 and place the ends of the waistband together.
- Use single crochet (sc) to join the stitches from both ends (work through the stitches on each side).
- Turn Work Inside Out:
- Ensure the seam created is on the wrong side of your work.
Step 3: Begin the Body of the Skirt
- Place Single Crochets Around the Waistband:
- Chain 1 and place single crochet stitches at the end of each row of the waistband.
- Bean Stitch Foundation Row:
- Begin working the Bean Stitch after completing the single crochet row:
- Chain 1, skip the first stitch, and insert the hook into the next stitch.
- Pull up a loop, yarn over, insert the hook again into the same stitch, and pull up another loop (you should now have 4 loops on your hook).
- Yarn over and pull through all 4 loops.
- Chain 1, skip the next stitch, and repeat the Bean Stitch process in the next stitch.
- Begin working the Bean Stitch after completing the single crochet row:
- Continue in a Spiral Pattern:
- Work around the waistband without slipping into any stitches or turning your work.
- Create Bean Stitches in a continuous spiral until the desired hip measurement is achieved.

Step 4: Increase for the Hips
- Identify Hip Increase Points:
- Place stitch markers at the two points on opposite sides of the skirt to mark where hip increases will occur.
- Increase Stitches:
- When reaching a marked stitch:
- Place 2 Bean Stitches in the same stitch, separated by chain 1 between the stitches.
- Make increases on both sides of the skirt until the hip circumference reaches 40 inches (stretch to measure).
- When reaching a marked stitch:
- Constant Rows:
- Once the hip measurement is achieved, stop increasing.
- Continue working Bean Stitches around the skirt without additional increases.
Step 5: Adjust the Length
- Work Constant Rows for Length:
- Continue working Bean Stitch rows until the skirt reaches your desired length minus 1 inch (for the ribbed edge).
- For this example, work until the skirt is 15 inches long, reserving the final inch for ribbing.

Step 6: Create the Ribbed Edge
- Single Crochet Row:
- Place single crochet (sc) stitches around the bottom edge of the skirt.
- Do not place single crochets directly into the Bean Stitch loops; instead, place them into the stitches between each Bean Stitch.
- Begin the Rib Pattern:
- Chain 6, then work slip stitch (sl st) into the back loops (bl) of the first 5 stitches.
- Continue working slip stitches along the ribbed rows, skipping stitches at the bottom edge as needed for proper alignment.
- Repeat Ribbing Rows:
- After completing a ribbed row, chain 1, turn your work, and continue with 5 slip stitches into the back loops of the previous row.
- Work this ribbing around the entire bottom edge of the skirt.

- Join the Ribbing:
- Once the ribbed edge is complete, join the final row using a slip stitch to secure.
Conclusion
You’ve followed these steps to successfully crochet a fitted skirt with a ribbed waistband and edge. This versatile skirt can be customized for any size or style by adjusting the length, waist, and hip measurements. Use this pattern to create skirts in various colors or yarn types to match your fashion preferences.
Additional Tips
- Always stretch your project slightly when measuring to ensure the fit is comfortable and snug.
- Use stitch markers to simplify marking hip increases and rib pattern transitions.
- If you’re new to slip stitches, take your time as they can be trickier to work consistently.